
Toyota Camry (XV70): Turn Signal/Hazard Flasher Circuit Current Above Threshold (B150819)
DESCRIPTION
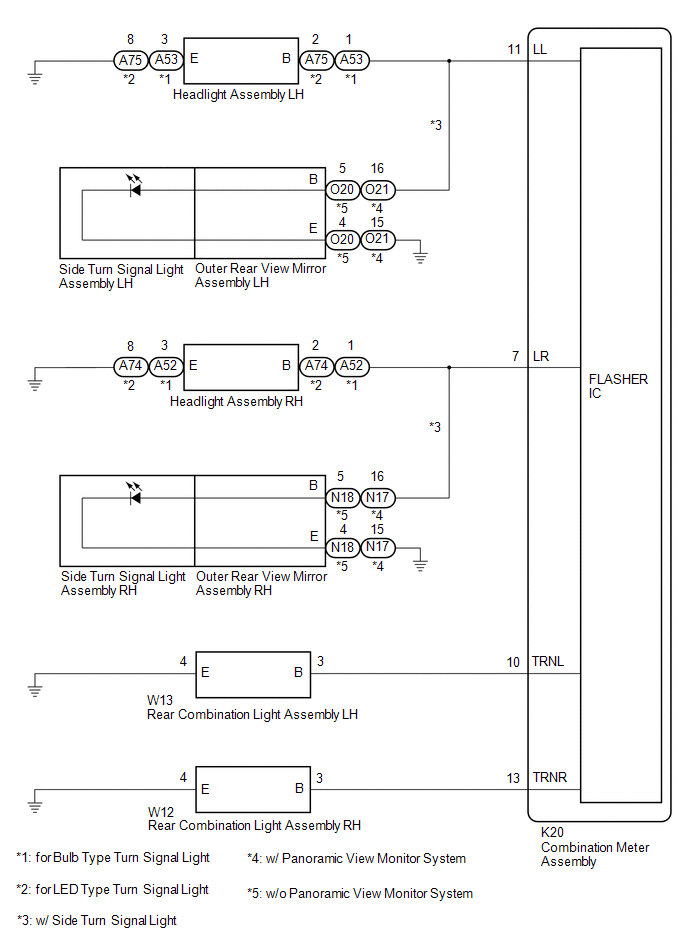
This DTC is stored when the combination meter assembly detects an short in a turn signal light circuit.
HINT:
If there is a short in a turn signal light circuit, all of the turn signal lights on the side with the short circuit will not blink.
|
DTC No. | Detection Item |
DTC Detection Condition | Trouble Area |
Memory | Note |
|---|---|---|---|---|---|
|
B150819 | Turn Signal/Hazard Flasher Circuit Current Above Threshold |
Diagnosis Condition:
Malfunction Status:
|
| DTC stored |
- |
- *: w/ Side Turn Signal Light
WIRING DIAGRAM
CAUTION / NOTICE / HINT
NOTICE:
- When replacing the combination meter assembly, always replace it with a new one. If a combination meter assembly which was installed to another vehicle is used, the information stored in it will not match the information from the vehicle and a DTC may be stored.
- Inspect the turn signal light bulbs, sockets and wire harnesses before performing the following procedure.
PROCEDURE
|
1. | INSPECT LIGHTS |
(a) Inspect the illumination of each turn signal light.
|
Result | Proceed to |
|---|---|
|
All LH turn signal lights do not blink |
A |
| All RH turn signal lights do not blink |
B |
| B |
 | GO TO STEP 11 |
|

| 2. |
CHECK HARNESS AND CONNECTOR (REAR COMBINATION LIGHT ASSEMBLY LH - COMBINATION METER ASSEMBLY) |
(a) Disconnect the W13 rear combination light assembly LH connector.
(b) Disconnect the K20 combination meter assembly connector.
(c) Measure the resistance according to the value(s) in the table below.
Standard Resistance:
|
Tester Connection | Condition |
Specified Condition |
|---|---|---|
|
W13-3 (B) or K20-10 (TRNL) - Body ground |
Always | 10 k? or higher |
| NG | | REPAIR OR REPLACE HARNESS OR CONNECTOR |
|
| 3. |
CONFIRM MODEL |
(a) Choose the model to be inspected.
|
Result | Proceed to |
|---|---|
|
w/o Side Turn Signal Light |
A |
| w/ Side Turn Signal Light |
B |
| B |
| GO TO STEP 6 |
|
| 4. |
CHECK HARNESS AND CONNECTOR (HEADLIGHT ASSEMBLY LH - COMBINATION METER ASSEMBLY) |
(a) Disconnect the A53*1 or A75*2 headlight assembly LH connector.
(b) Measure the resistance according to the value(s) in the table below.
Standard Resistance:
|
Tester Connection | Condition |
Specified Condition |
|---|---|---|
|
A53-1 (B)*1, A75-2 (B)*2 or K20-11 (LL) - Body ground |
Always | 10 k? or higher |
- *1: for Bulb Type Turn Signal Light
- *2: for LED Type Turn Signal Light
| NG | | REPAIR OR REPLACE HARNESS OR CONNECTOR |
|
| 5. |
CONFIRM MODEL |
(a) Choose the model to be inspected.
|
Result | Proceed to |
|---|---|
|
for Bulb Type Turn Signal Light |
A |
| for LED Type Turn Signal Light |
B |
| A |
| REPLACE COMBINATION METER ASSEMBLY
|
| B |
| GO TO STEP 10 |
| 6. |
CHECK HARNESS AND CONNECTOR (HEADLIGHT ASSEMBLY LH AND OUTER REAR VIEW MIRROR ASSEMBLY LH - COMBINATION METER ASSEMBLY) |
(a) Disconnect the A53*1 or A75*2 headlight assembly LH connector.
(b) Disconnect the O20*3 or O21*4 outer rear view mirror assembly LH connector.
(c) Measure the resistance according to the value(s) in the table below.
Standard Resistance:
|
Tester Connection | Condition |
Specified Condition |
|---|---|---|
|
A53-1 (B)*1, A75-2 (B)*2, O20-5 (B)*3, O21-16 (B)*4 or K20-11 (LL) - Body ground |
Always | 10 k? or higher |
- *1: for Bulb Type Turn Signal Light
- *2: for LED Type Turn Signal Light
- *3: w/o Panoramic View Monitor System
- *4: w/ Panoramic View Monitor System
| NG | | REPAIR OR REPLACE HARNESS OR CONNECTOR |
|
| 7. |
INSPECT OUTER REAR VIEW MIRROR ASSEMBLY LH |
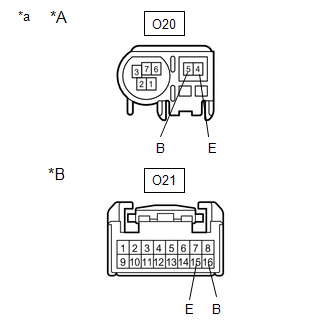
|
*A | w/o Panoramic View Monitor System |
|
*B | w/ Panoramic View Monitor System |
|
*a | Component without harness connected (Outer Rear View Mirror Assembly LH) |
(a) Remove the side turn signal light assembly LH.
Click here

(b) Measure the resistance according to the value(s) in the table below.
Standard Resistance:
|
Tester Connection | Condition |
Specified Condition |
|---|---|---|
|
O20-5 (B) - O20-4 (E)*1 |
Always | 10 k? or higher |
|
O21-16 (B) - O21-15 (E)*2 |
Always | 10 k? or higher |
- *1: w/o Panoramic View Monitor System
- *2: w/ Panoramic View Monitor System
| NG | | REPLACE OUTER REAR VIEW MIRROR ASSEMBLY LH
|
|
| 8. |
INSPECT SIDE TURN SIGNAL LIGHT ASSEMBLY LH |
(a) Inspect the side turn signal light assembly LH.
Click here
| NG | | REPLACE SIDE TURN SIGNAL LIGHT ASSEMBLY LH
|
|
| 9. |
CONFIRM MODEL |
(a) Choose the model to be inspected.
|
Result | Proceed to |
|---|---|
|
for Bulb Type Turn Signal Light |
A |
| for LED Type Turn Signal Light |
B |
| A |
| REPLACE COMBINATION METER ASSEMBLY
|
|
| 10. |
INSPECT HEADLIGHT ASSEMBLY LH |
(a) Remove the headlight assembly LH.
Click here
(b) Inspect the headlight assembly LH.
Click here
| OK | | REPLACE COMBINATION METER ASSEMBLY
|
| NG | | REPLACE HEADLIGHT ASSEMBLY LH
|
| 11. |
CHECK HARNESS AND CONNECTOR (REAR COMBINATION LIGHT ASSEMBLY RH - COMBINATION METER ASSEMBLY) |
(a) Disconnect the W12 rear combination light assembly RH connector.
(b) Disconnect the K20 combination meter assembly connector.
(c) Measure the resistance according to the value(s) in the table below.
Standard Resistance:
|
Tester Connection | Condition |
Specified Condition |
|---|---|---|
|
W12-3 (B) or K20-13 (TRNR) - Body ground |
Always | 10 k? or higher |
| NG | | REPAIR OR REPLACE HARNESS OR CONNECTOR |
|
| 12. |
CONFIRM MODEL |
(a) Choose the model to be inspected.
|
Result | Proceed to |
|---|---|
|
w/o Side Turn Signal Light |
A |
| w/ Side Turn Signal Light |
B |
| B |
| GO TO STEP 15 |
|
| 13. |
CHECK HARNESS AND CONNECTOR (HEADLIGHT ASSEMBLY RH - COMBINATION METER ASSEMBLY) |
(a) Disconnect the A52*1 or A74*2 headlight assembly RH connector.
(b) Measure the resistance according to the value(s) in the table below.
Standard Resistance:
|
Tester Connection | Condition |
Specified Condition |
|---|---|---|
|
A52-1 (B)*1, A74-2 (B)*2 or K20-7 (LR) - Body ground |
Always | 10 k? or higher |
- *1: for Bulb Type Turn Signal Light
- *2: for LED Type Turn Signal Light
| NG | | REPAIR OR REPLACE HARNESS OR CONNECTOR |
|
| 14. |
CONFIRM MODEL |
(a) Choose the model to be inspected.
|
Result | Proceed to |
|---|---|
|
for Bulb Type Turn Signal Light |
A |
| for LED Type Turn Signal Light |
B |
| A |
| REPLACE COMBINATION METER ASSEMBLY
|
| B |
| GO TO STEP 19 |
| 15. |
CHECK HARNESS AND CONNECTOR (HEADLIGHT ASSEMBLY RH AND OUTER REAR VIEW MIRROR ASSEMBLY RH - COMBINATION METER ASSEMBLY) |
(a) Disconnect the A52*1 or A74*2 headlight assembly RH connector.
(b) Disconnect the N18*3 or N17*4 outer rear view mirror assembly RH connector.
(c) Measure the resistance according to the value(s) in the table below.
Standard Resistance:
|
Tester Connection | Condition |
Specified Condition |
|---|---|---|
|
A52-1 (B)*1, A74-2 (B)*2, N18-5 (B)*3, N17-16 (B)*4 or K20-7 (LR) - Body ground |
Always | 10 k? or higher |
- *1: for Bulb Type Turn Signal Light
- *2: for LED Type Turn Signal Light
- *3: w/o Panoramic View Monitor System
- *4: w/ Panoramic View Monitor System
| NG | | REPAIR OR REPLACE HARNESS OR CONNECTOR |
|
| 16. |
INSPECT OUTER REAR VIEW MIRROR ASSEMBLY RH |
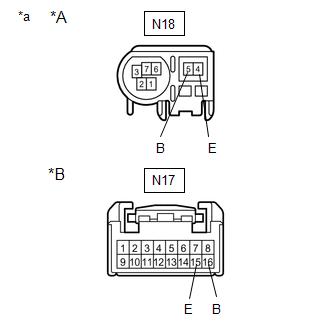
|
*A | w/o Panoramic View Monitor System |
|
*B | w/ Panoramic View Monitor System |
|
*a | Component without harness connected (Outer Rear View Mirror Assembly RH) |
(a) Remove the side turn signal light assembly RH.
Click here
(b) Measure the resistance according to the value(s) in the table below.
Standard Resistance:
|
Tester Connection | Condition |
Specified Condition |
|---|---|---|
|
N18-5 (B) - N18-4 (E)*1 |
Always | 10 k? or higher |
|
N17-16 (B) - N17-15 (E)*2 |
Always | 10 k? or higher |
- *1: w/o Panoramic View Monitor System
- *2: w/ Panoramic View Monitor System
| NG | | REPLACE OUTER REAR VIEW MIRROR ASSEMBLY RH
|
|
| 17. |
INSPECT SIDE TURN SIGNAL LIGHT ASSEMBLY RH |
(a) Inspect the side turn signal light assembly RH.
Click here
| NG | | REPLACE SIDE TURN SIGNAL LIGHT ASSEMBLY RH
|
|
| 18. |
CONFIRM MODEL |
(a) Choose the model to be inspected.
|
Result | Proceed to |
|---|---|
|
for Bulb Type Turn Signal Light |
A |
| for LED Type Turn Signal Light |
B |
| A |
| REPLACE COMBINATION METER ASSEMBLY
|
|
| 19. |
INSPECT HEADLIGHT ASSEMBLY RH |
(a) Remove the headlight assembly RH.
Click here
(b) Inspect the headlight assembly RH.
Click here
| OK | | REPLACE COMBINATION METER ASSEMBLY
|
| NG | | REPLACE HEADLIGHT ASSEMBLY RH
|
READ NEXT:
SEE MORE:
 Air Conditioner ECU Vehicle Information Reading/Writing Processor Malfunction (B15F5)
DESCRIPTION This DTC may be stored when items controlled by the air conditioning amplifier assembly cannot be customized via the navigation system vehicle customization screen.
HINT: The air conditioning amplifier assembly controls the air conditioning system related items that are customizable vi
Disassembly
DISASSEMBLY CAUTION / NOTICE / HINT
NOTICE:
When using a vise, place aluminum plates between the part and vise.
When using a vise, do not overtighten it.
HINT:
Use the same procedure for the RH and LH sides.
The procedure listed below is for the LH side.
PROCEDURE 1. REMOV
