
Toyota Camry (XV70): Ambient Illumination Light Circuit
DESCRIPTION
The main body ECU (multiplex network body ECU) controls the instrument panel ambient illumination light (instrument panel light assembly).
WIRING DIAGRAM
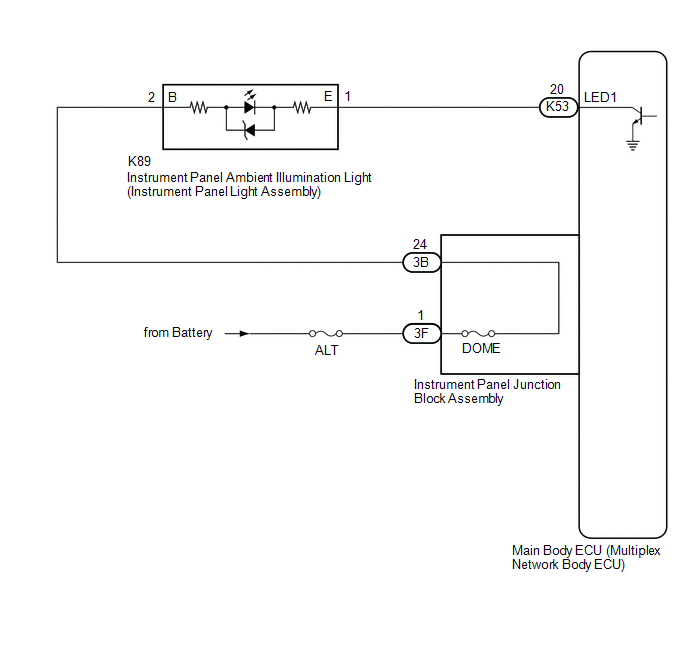
CAUTION / NOTICE / HINT
NOTICE:
- Inspect the fuses for circuits related to this system before performing the following procedure.
- Before replacing the main body ECU (multiplex network body ECU), refer to Registration.*
Click here

- *: w/ Smart Key System
PROCEDURE
|
1. | PERFORM ACTIVE TEST USING TECHSTREAM |
(a) Connect the Techstream to the DLC3.
(b) Turn the ignition switch to ON.
(c) Turn the Techstream on.
(d) Enter the following menus: Body Electrical / Main Body / Active Test.
(e) Perform the Active Test according to the display on the Techstream.
Body Electrical > Main Body > Active Test|
Tester Display | Measurement Item |
Control Range | Diagnostic Note |
|---|---|---|---|
|
Interior Illumination Light1 |
Instrument panel ambient illumination light (Instrument panel light assembly) |
OFF or ON | Preconditions for using the Active Test to check dimmer controlled illumination:
|
|
Tester Display |
|---|
| Interior Illumination Light1 |
OK:
Instrument panel ambient illumination light comes on.
| OK |  | USE SIMULATION METHOD TO CHECK
|
|

| 2. |
INSPECT INSTRUMENT PANEL LIGHT ASSEMBLY |
(a) Remove the instrument panel ambient illumination light (instrument panel light assembly).
Click here
(b) Inspect the instrument panel ambient illumination light (instrument panel light assembly).
Click here
| NG | | REPLACE INSTRUMENT PANEL AMBIENT ILLUMINATION LIGHT (INSTRUMENT PANEL LIGHT ASSEMBLY) |
|
| 3. |
CHECK HARNESS AND CONNECTOR (POWER SOURCE - INSTRUMENT PANEL JUNCTION BLOCK ASSEMBLY) |
(a) Disconnect the 3F instrument panel junction block assembly connector.
(b) Measure the voltage according to the value(s) in the table below.
Standard Voltage:
|
Tester Connection | Condition |
Specified Condition |
|---|---|---|
|
3F-1 - Body ground | Always |
11 to 14 V |
| NG | | REPAIR OR REPLACE HARNESS OR CONNECTOR |
|
| 4. |
CHECK INSTRUMENT PANEL JUNCTION BLOCK ASSEMBLY |
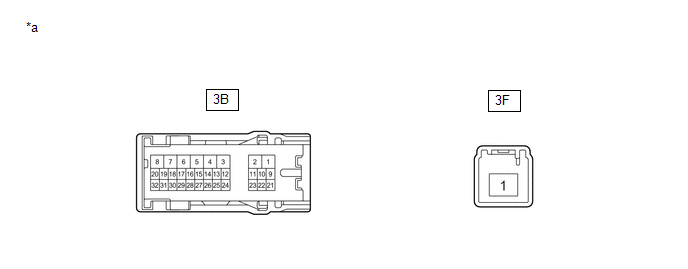
|
*a | Component without harness connected (Instrument Panel Junction Block Assembly) |
- | - |
(a) Disconnect the 3B instrument panel junction block assembly connector.
(b) Measure the resistance according to the value(s) in the table below.
Standard Resistance:
|
Tester Connection | Condition |
Specified Condition |
|---|---|---|
|
3B-24 - 3F-1 | Always |
Below 1 ? |
| NG | | REPLACE INSTRUMENT PANEL JUNCTION BLOCK ASSEMBLY
|
|
| 5. |
CHECK HARNESS AND CONNECTOR (INSTRUMENT PANEL JUNCTION BLOCK ASSEMBLY - INSTRUMENT PANEL LIGHT ASSEMBLY) |
(a) Measure the resistance according to the value(s) in the table below.
Standard Resistance:
|
Tester Connection | Condition |
Specified Condition |
|---|---|---|
|
3B-24 - K89-2 (B) | Always |
Below 1 ? |
|
3B-24 or K89-2 (B) - Body ground |
Always | 10 k? or higher |
| NG | | REPAIR OR REPLACE HARNESS OR CONNECTOR |
|
| 6. |
CHECK HARNESS AND CONNECTOR (INSTRUMENT PANEL LIGHT ASSEMBLY - MAIN BODY ECU (MULTIPLEX NETWORK BODY ECU)) |
(a) Disconnect the K53 main body ECU (multiplex network body ECU) connector.
(b) Measure the resistance according to the value(s) in the table below.
Standard Resistance:
|
Tester Connection | Condition |
Specified Condition |
|---|---|---|
|
K89-1 (E) - K53-20 (LED1) |
Always | Below 1 ? |
|
K89-1 (E) or K53-20 (LED1) - Body ground |
Always | 10 k? or higher |
| OK | | REPLACE MAIN BODY ECU (MULTIPLEX NETWORK BODY ECU)
|
| NG | | REPAIR OR REPLACE HARNESS OR CONNECTOR |
READ NEXT:
SEE MORE:
 Driver Side Power Window does not Operate with Power Window Master Switch
DESCRIPTION When the ignition switch is ON, the power window regulator motor assembly (for driver door) is operated by the multiplex network master switch assembly. The power window regulator motor assembly (for driver door) has motor, regulator and ECU functions. WIRING DIAGRAM
CAUTION / NOTICE
Check Bus 1 Line for Short to +B
DESCRIPTION There may be a short circuit between one of the CAN bus lines and +B when there is no resistance between terminal 23 (CA1H) of the central gateway ECU (network gateway ECU) and terminal 16 (BAT) of the DLC3, or terminal 8 (CA1L) of the central gateway ECU (network gateway ECU) and termin
