
Toyota Camry (XV70): Luggage Compartment Door Lock
Components
COMPONENTS
ILLUSTRATION
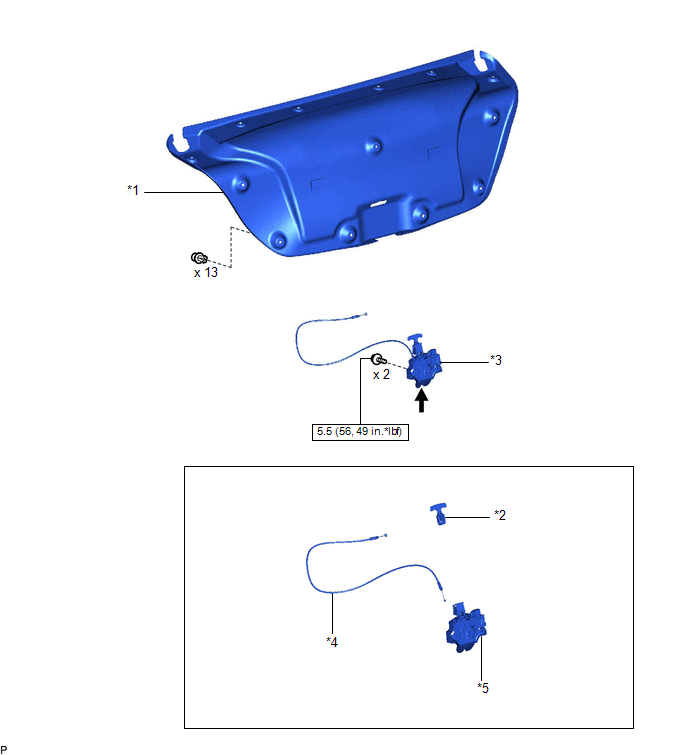
|
*1 | LUGGAGE COMPARTMENT DOOR COVER |
*2 | LUGGAGE COMPARTMENT DOOR INSIDE HANDLE |
|
*3 | LUGGAGE COMPARTMENT DOOR LOCK ASSEMBLY |
*4 | LUGGAGE DOOR LOCK CONTROL CABLE SUB-ASSEMBLY |
|
*5 | LUGGAGE COMPARTMENT DOOR LOCK |
- | - |
.png) |
N*m (kgf*cm, ft.*lbf): Specified torque |
.png) |
MP grease |
Removal
REMOVAL
PROCEDURE
1. REMOVE LUGGAGE COMPARTMENT DOOR COVER
Click here
.gif)
2. REMOVE LUGGAGE COMPARTMENT DOOR LOCK ASSEMBLY
| (a) Disconnect the connector. |
|
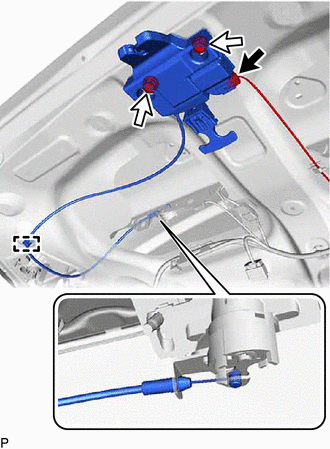
(b) Disengage the clamp.
(c) Disconnect the luggage door lock control cable sub-assembly from the luggage compartment door lock cylinder assembly.
(d) Remove the 2 bolts and luggage compartment door lock assembly.
3. REMOVE LUGGAGE COMPARTMENT DOOR INSIDE HANDLE
(a) Disengage the claw as shown in the illustration.
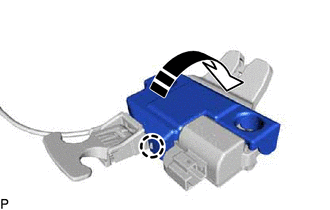
.png) |
Remove in this Direction |
| (b) Disengage the 2 claws. |
|
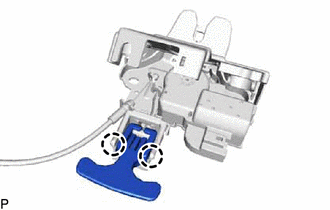
(c) Disconnect the cable to remove the luggage compartment door inside handle.
4. REMOVE LUGGAGE DOOR LOCK CONTROL CABLE SUB-ASSEMBLY
| (a) Remove the luggage door lock control cable sub-assembly. |
|
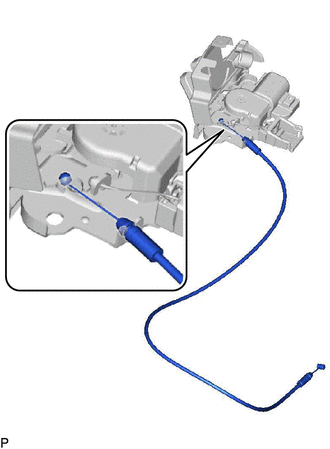
Inspection
INSPECTION
PROCEDURE
1. INSPECT LUGGAGE COMPARTMENT DOOR LOCK ASSEMBLY
(a) Check the operation of the door lock motor.
| (1) Move the door lock to the close (lock) position. |
|
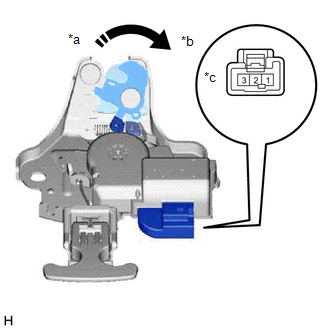
(2) Apply battery voltage to the door lock motor and check the operation of the door lock motor.
OK:
|
Battery Connection | Result |
|---|---|
|
Battery positive (+) > Terminal 1 Battery negative (-) > Terminal 2 |
Luggage compartment door lock motor open (unlock) operation |
If the result is not as specified, replace the luggage compartment door lock assembly.
(b) Check the operation of the luggage compartment door courtesy switch.
(1) Measure the resistance according to the value(s) in the table below.
Standard Resistance:
|
Tester Connection | Condition |
Specified Condition |
|---|---|---|
|
2 - 3 | Closed (Locked) |
10 k? or higher |
|
2 - 3 | Open (Unlocked) |
Below 1 ? |
If the result is not as specified, replace the luggage compartment door lock assembly.
Installation
INSTALLATION
PROCEDURE
1. INSTALL LUGGAGE DOOR LOCK CONTROL CABLE SUB-ASSEMBLY
(a) Install the luggage door lock control cable sub-assembly.
2. INSTALL LUGGAGE COMPARTMENT DOOR INSIDE HANDLE
(a) Connect the cable.
(b) Engage the 2 claws to install the luggage compartment door inside handle.
(c) Engage the claw as shown in the illustration.
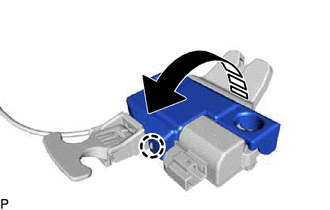
.png) |
Install in this Direction |
3. INSTALL LUGGAGE COMPARTMENT DOOR LOCK ASSEMBLY
(a) Apply MP grease to the sliding parts of the luggage compartment door lock assembly.
(b) Install the luggage compartment door lock assembly with the 2 bolts.
Torque:
5.5 N·m {56 kgf·cm, 49 in·lbf}
(c) Connect the luggage door lock control cable sub-assembly to the luggage compartment door lock cylinder assembly.
(d) Engage the clamp.
(e) Connect the connector.
4. INSTALL LUGGAGE COMPARTMENT DOOR COVER
Click here .gif)
READ NEXT:
 Precaution
PRECAUTION PRECAUTION FOR DISCONNECTING CABLE FROM NEGATIVE BATTERY TERMINAL
NOTICE: When disconnecting the cable from the negative (-) battery terminal, initialize the following systems after the ca
Parts Location
PARTS LOCATION ILLUSTRATION
*A w/o Smart Key System
*B for Toyota Entune Remote Connect Compatible Type
*1 DOOR CONTROL SWITCH ASSEMBLY
*2 UNLOCK WARNING SWITCH ASSEMBL
SEE MORE:
Key Reminder Buzzer does not Sound
DESCRIPTION The key reminder warning buzzer sounds when the driver door is opened while the ignition switch is off or ACC. The key reminder warning buzzer is activated when the main body ECU (multiplex network body ECU) sends an unlock warning switch signal and driver door courtesy light switch sign
Lost Communication with Cruise Control Front Distance Range Sensor Signal Sensor or Center Missing Message (U023587)
DESCRIPTION The forward recognition camera and millimeter wave radar sensor assembly communicate via CAN communication. If there is an error in the communication with the millimeter wave radar sensor assembly, the forward recognition camera stores DTC U023587.
DTC No. Detection Item
D
