
Toyota Camry (XV70): ACC Signal Circuit
DESCRIPTION
This circuit detects the ignition switch ACC or off condition, and sends it to the main body ECU (multiplex network body ECU).
WIRING DIAGRAM
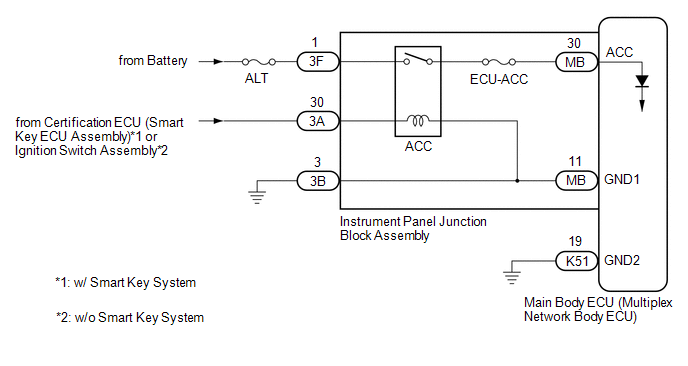
CAUTION / NOTICE / HINT
NOTICE:
- Inspect the fuses for circuits related to this system before performing the following procedure.
- First, check for smart key system (for Start Function) DTCs, and after confirming that there is no malfunction, proceed with troubleshooting.*
Click here
.gif)
- Before replacing the main body ECU (multiplex network body ECU), refer to Registration.*
Click here
- *: w/ Smart Key System
PROCEDURE
|
1. | READ VALUE USING TECHSTREAM |
(a) Connect the Techstream to the DLC3.
(b) Turn the ignition switch to ON.
(c) Turn the Techstream on.
(d) Enter the following menus: Body Electrical / Main Body / Data List.
(e) Read the Data List according to the display on the Techstream.
Body Electrical > Main Body > Data List|
Tester Display | Measurement Item |
Range | Normal Condition |
Diagnostic Note |
|---|---|---|---|---|
|
ACC SW | Ignition switch ACC signal |
OFF or ON | OFF: Ignition switch off ON: Ignition switch ACC |
"ON" is also displayed for this item when the ignition switch is ON. |
|
Tester Display |
|---|
| ACC SW |
OK:
Normal conditions listed above are displayed.
| OK | .gif) | PROCEED TO NEXT SUSPECTED AREA SHOWN IN PROBLEM SYMPTOMS TABLE
|
|
.gif)
| 2. |
CHECK HARNESS AND CONNECTOR (POWER SOURCE CIRCUIT) |
(a) Disconnect the 3F instrument panel junction block assembly connector.
(b) Disconnect the 3B instrument panel junction block assembly connector.
(c) Disconnect the K51 main body ECU (multiplex network body ECU) connector.
(d) Measure the voltage and resistance according to the value(s) in the table below.
Standard Voltage:
|
Tester Connection | Condition |
Specified Condition |
|---|---|---|
|
3F-1 - Body ground | Always |
11 to 14 V |
Standard Resistance:
|
Tester Connection | Condition |
Specified Condition |
|---|---|---|
|
3B-3 - Body ground | Always |
Below 1 ? |
|
K51-19 (GND2) - Body ground |
Always | Below 1 ? |
| NG | | REPAIR OR REPLACE HARNESS OR CONNECTOR |
|
| 3. |
INSPECT INSTRUMENT PANEL JUNCTION BLOCK ASSEMBLY |
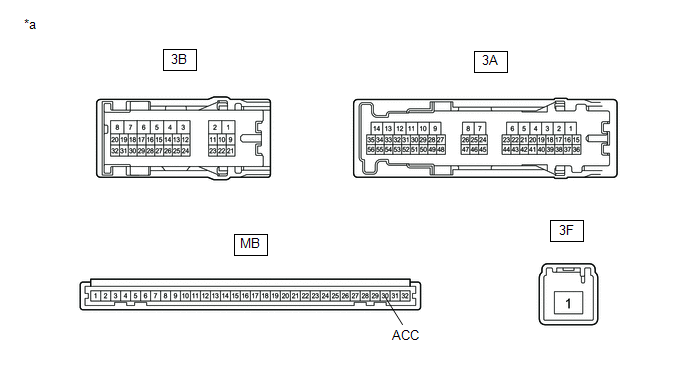
|
*a | Component without harness connected (Instrument Panel Junction Block Assembly) |
- | - |
(a) Remove the instrument panel junction block assembly.
Click here
(b) Remove the main body ECU (multiplex network body ECU) from the instrument panel junction block assembly.
Click here
(c) Measure the resistance according to the value(s) in the table below.
Standard Resistance:
|
Tester Connection | Condition |
Specified Condition |
|---|---|---|
|
3F-1 - MB-30 (ACC) | Battery not connected to 3A-30 and 3B-3 |
10 k? or higher |
|
3F-1 - MB-30 (ACC) | Battery positive (+) > 3A-30 Battery negative (-) > 3B-3 |
Below 1 ? |
| OK | | REPLACE MAIN BODY ECU (MULTIPLEX NETWORK BODY ECU)
|
| NG | | REPLACE INSTRUMENT PANEL JUNCTION BLOCK ASSEMBLY
|
READ NEXT:
SEE MORE:
 Components
COMPONENTS ILLUSTRATION
*1 STEERING WHEEL ASSEMBLY
*2 STEERING PAD SWITCH ASSEMBLY
*3 SHIFT PADDLE SWITCH (TRANSMISSION SHIFT SWITCH ASSEMBLY)
*4 NO. 1 SWITCH WIRE
N*m (kgf*cm, ft.*lbf): Specified torque
● Non-reusable part
&
Rear Speed Sensor (for Awd)
ComponentsCOMPONENTS ILLUSTRATION
*1 REAR SKID CONTROL SENSOR
*2 NO. 2 PARKING BRAKE WIRE ASSEMBLY
Tightening torque for "Major areas involving basic vehicle performance such as moving/turning/stopping": N*m (kgf*cm, ft.*lbf)
- - RemovalREMOVAL CAUTION /
