
Toyota Camry (XV70): Components
COMPONENTS
ILLUSTRATION
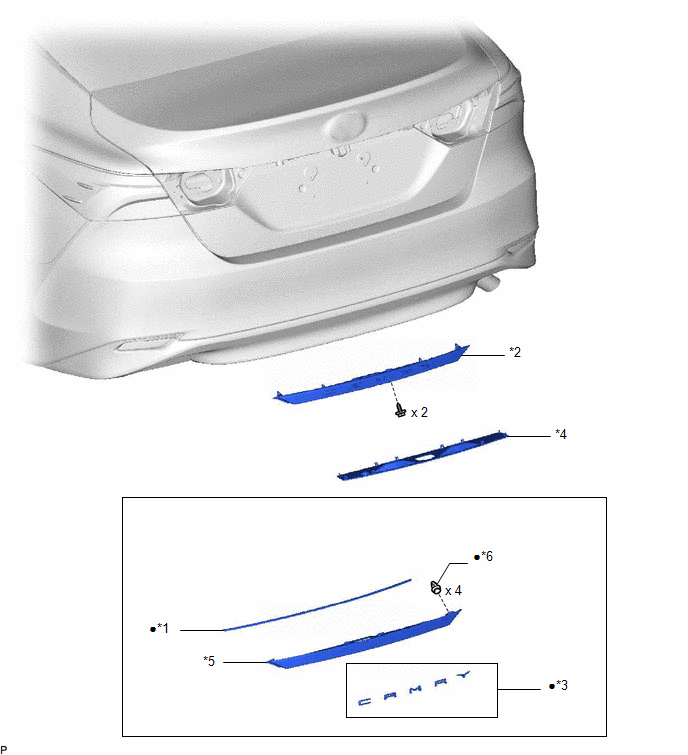
|
*1 | LUGGAGE COMPARTMENT DOOR OUTSIDE GARNISH PROTECTOR |
*2 | LUGGAGE COMPARTMENT DOOR OUTSIDE GARNISH SUB-ASSEMBLY |
|
*3 | NO. 2 LUGGAGE COMPARTMENT DOOR NAME PLATE |
*4 | NO. 3 LUGGAGE COMPARTMENT DOOR OUTSIDE GARNISH |
|
*5 | LUGGAGE COMPARTMENT DOOR OUTSIDE GARNISH |
*6 | CLIP |
|
● | Non-reusable part |
- | - |
READ NEXT:
 Removal
REMOVAL PROCEDURE 1. REMOVE REAR LIGHT ASSEMBLY LH
Click here
2. REMOVE REAR LIGHT ASSEMBLY RH
HINT: Use the same procedure as for the LH side. 3. REMOVE NO. 3 LUGGAGE COMPARTMENT DOOR OUT
Disassembly
DISASSEMBLY PROCEDURE 1. REMOVE NO. 2 LUGGAGE COMPARTMENT DOOR NAME PLATE
Click here
2. REMOVE LUGGAGE COMPARTMENT DOOR OUTSIDE GARNISH PROTECTOR
(a) Remove the luggage compartment doo
Reassembly
REASSEMBLY PROCEDURE 1. INSTALL LUGGAGE COMPARTMENT DOOR OUTSIDE GARNISH PROTECTOR
HINT: When installing the luggage compartment door outside garnish protector, heat the luggage compartment door ou
SEE MORE:
Maintenance
requirements
To ensure safe and economical driving, day-to-day care and regular
maintenance are essential. It is the owner's responsibility to
perform regular checks. Toyota recommends the following maintenance:
General maintenance
General maintenance should be performed on a daily basis. This can
be done b
Operation Method
OPERATION METHOD PROCEDURE 1. PRECAUTION
Click here 2. REMOVE REAR SEAT CUSHION ASSEMBLY
Click here
3. REMOVE REAR SEAT CUSHION LOCK HOOK
Click here
4. PARKING BRAKE FORCED RELEASE
CAUTION: Work on a level surface to ensure safety.
NOTICE:
To release the parking brake, foll
© 2023-2026 Copyright www.tocamry.com
