Toyota Camry (XV70): Front Axle Hub Bolt
Components
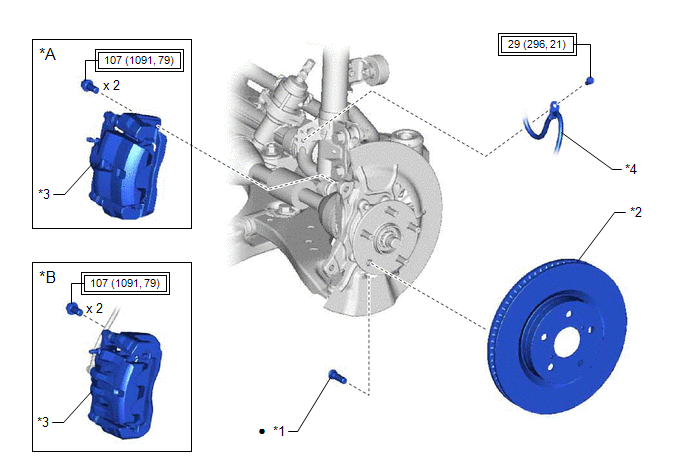
COMPONENTS
ILLUSTRATION
|
*A | except 2-Pod Caliper |
*B | for 2-Pod Caliper |
|
*1 | FRONT AXLE HUB BOLT |
*2 | FRONT DISC |
|
*3 | FRONT DISC BRAKE CALIPER ASSEMBLY |
*4 | FRONT FLEXIBLE HOSE |
.png) |
Tightening torque for "Major areas involving basic vehicle performance such as moving/turning/stopping" : N*m (kgf*cm, ft.*lbf) |
● | Non-reusable part |
Replacement
REPLACEMENT
CAUTION / NOTICE / HINT
HINT:
- Use the same procedure for the RH side and LH side.
- The following procedure is for the LH side.
PROCEDURE
1. REMOVE FRONT WHEEL
Click here
.gif)
2. SEPARATE FRONT FLEXIBLE HOSE
| (a) Remove the bolt and separate the front flexible hose from the front shock absorber assembly. |
|
.png)
3. SEPARATE FRONT DISC BRAKE CALIPER ASSEMBLY
(a) Remove the 2 bolts and separate the front disc brake caliper assembly from the steering knuckle.
NOTICE:
Use wire or an equivalent tool to keep the front disc brake caliper assembly from hanging by the front flexible hose.
4. REMOVE FRONT DISC
except 2-Pot Caliper: Click here
for 2-Pot Caliper: Click here
5. REMOVE FRONT AXLE HUB BOLT
| (a) Temporarily install 2 service nuts to the front axle hub bolts as shown in the illustration. Recommended Service Nut: Thread diameter: 12.0 mm (0.472 in.) Thread pitch: 1.5 mm (0.0591 in.) NOTICE: Install the service nuts to prevent damage to the front axle hub bolts. |
|
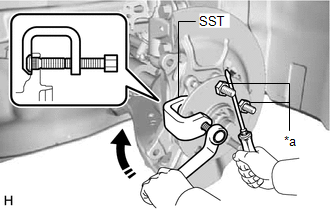
(b) Using SST and a screwdriver or an equivalent tool to hold the front axle hub sub-assembly, remove the front axle hub bolt.
SST: 09611-12010
NOTICE:
Do not damage the threads of the front axle hub bolts.
6. INSTALL FRONT AXLE HUB BOLT
(a) Temporarily install a new front axle hub bolt to the front axle hub sub-assembly.
| (b) Install a washer and service nut to the front axle hub bolt as shown in the illustration. Recommended Service Nut: Thread diameter: 12.0 mm (0.472 in.) Thread pitch: 1.5 mm (0.0591 in.) HINT: Recommended washer thickness is 5 mm (0.197 in.) or more. |
|

(c) Using a screwdriver or an equivalent tool to hold the front axle hub sub-assembly, install the front axle hub bolt by tightening the service nut.
NOTICE:
- Install the service nuts to prevent damage to the front axle hub bolts.
- Do not damage the threads of the front axle hub bolts.
(d) Remove the 3 service nuts and washer from the 3 front axle hub bolts.
7. INSTALL FRONT DISC
except 2-Pot Caliper: Click here
for 2-Pot Caliper: Click here
8. INSTALL FRONT DISC BRAKE CALIPER ASSEMBLY
(a) Install the front disc brake caliper assembly to the steering knuckle with the 2 bolts.
Torque:
107 N
READ NEXT:
 Components
COMPONENTS ILLUSTRATION
*A for RH Side
*B for LH Side
*1 NO. 1 FLOOR UNDER COVER
*2 NO. 2 FLOOR UNDER COVER
N*m (kgf*cm, ft.*lbf): Specified torque
Removal
REMOVAL CAUTION / NOTICE / HINT
The necessary procedures (adjustment, calibration, initialization, or registration) that must be performed after parts are removed and installed, or replaced during r
SEE MORE:
Parts Location
PARTS LOCATION ILLUSTRATION
*1 FRONT ENGINE MOUNTING INSULATOR
*2 REAR ENGINE MOUNTING INSULATOR
*3 CANISTER
*4 FUEL PUMP (for Low Pressure Side)
*5 MASS AIR FLOW METER SUB-ASSEMBLY
*6 PARK / NEUTRAL POSITION SWITCH ASSEMBLY
*7 VACUUM
Right Front Wheel Speed Sensor Signal Stuck High (C050624)
DESCRIPTION Refer to DTC C050612 Click here
DTC No. Detection Item
DTC Detection Condition Trouble Area
C050624 Right Front Wheel Speed Sensor Signal Stuck High
The speed sensor signal is not within the specified range for 5 seconds or more.
Front speed senso
