
Toyota Camry (XV70): Fuel Sender Circuit Open (B150013,B150113)
DESCRIPTION
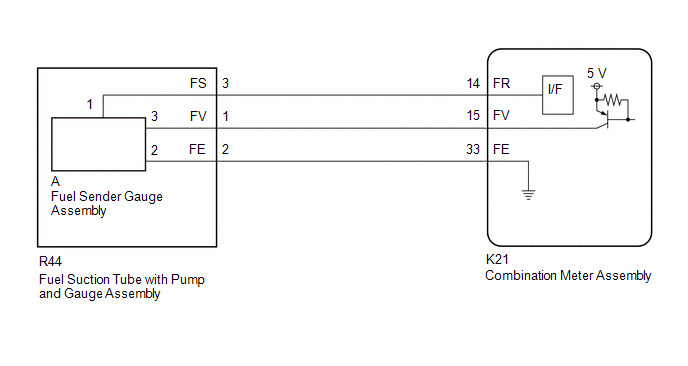
FOR 2WD
The fuel sender gauge assembly is connected to the combination meter assembly via direct line. If there is an open or short in the direct line, the combination meter assembly stores DTC B150013.
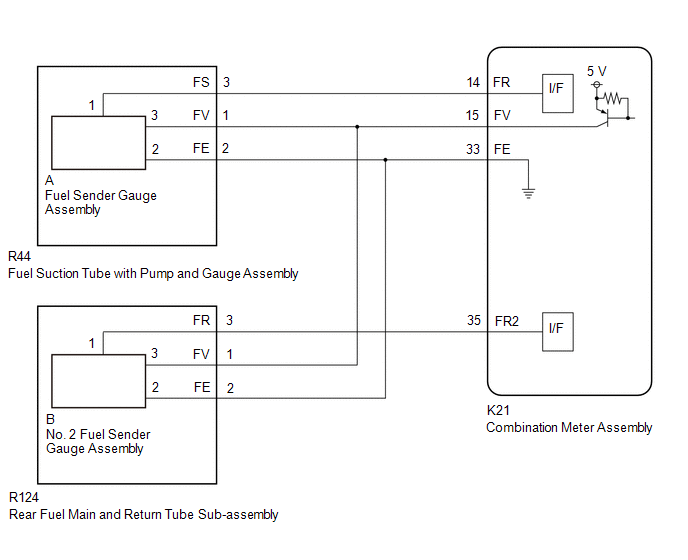
FOR AWD
The fuel sender gauge assembly and No. 2 fuel sender gauge assembly are connected to the combination meter assembly via direct line. If there is an open or short in the direct line, the combination meter assembly stores DTC B150013 or B150113.
|
DTC No. | Detection Item |
DTC Detection Condition | Trouble Area |
Memory | Note |
|---|---|---|---|---|---|
|
B150013 | Fuel Sender Circuit Open |
Diagnosis Condition:
Malfunction Status:
Malfunction Time:
|
| DTC stored |
- |
| B150113 |
Sub Fuel Sender Circuit Open |
Diagnosis Condition:
Malfunction Status:
Malfunction Time:
|
| DTC stored |
for AWD |
WIRING DIAGRAM
FOR 2WD
FOR AWD
CAUTION / NOTICE / HINT
NOTICE:
When replacing the combination meter assembly, always replace it with a new one. If a combination meter assembly which was installed to another vehicle is used, the information stored in it will not match the information from the vehicle and a DTC may be stored.
PROCEDURE
| 1. |
CHECK FOR DTC (METER / GAUGE SYSTEM) |
(a) Check for DTCs.
Body Electrical > Combination Meter > Trouble Codes|
Result | Proceed to |
|---|---|
|
Only DTC B150013 is output | A |
|
Only DTC B150113 is output |
B |
| DTC B150013 and B150113 are output at the same time |
C |
| B |
 | GO TO STEP 11 |
| C |
| GO TO STEP 15 |
|

| 2. |
CONFIRM MODEL |
(a) Choose the model to be inspected.
|
Result | Proceed to |
|---|---|
|
for 2WD | A |
|
for AWD | B |
| B |
| GO TO STEP 7 |
|
| 3. |
READ VALUE USING TECHSTREAM |
(a) Connect the Techstream to the DLC3.
(b) Turn the ignition switch to ON.
(c) Turn the Techstream on.
(d) Enter the following menus: Body Electrical / Combination Meter / Data List.
(e) Read the Data List according to the display on the Techstream.
Body Electrical > Combination Meter > Data List|
Tester Display | Measurement Item |
Range | Normal Condition |
Diagnostic Note |
|---|---|---|---|---|
|
Fuel Input | Fuel level input |
Min.: 0 L, Max.: 655.34 L | for 60 Liters (63.4 US qts, 52.8 Imp. qts) Total Tank Capacity Type:
| The detected value of the fuel sender gauge assembly is displayed. |
|
Tester Display |
|---|
| Fuel Input |
|
Result | Proceed to |
|---|---|
|
Fuel level data can be displayed on the Techstream |
A |
| Fuel level data cannot be displayed on the Techstream |
B |
| A |
| REPLACE COMBINATION METER ASSEMBLY
|
|
| 4. |
CHECK HARNESS AND CONNECTOR (FUEL SUCTION TUBE WITH PUMP AND GAUGE ASSEMBLY - COMBINATION METER ASSEMBLY) |
(a) Disconnect the R44 fuel suction tube with pump and gauge assembly connector.
(b) Disconnect the K21 combination meter assembly connector.
(c) Measure the resistance according to the value(s) in the table below.
Standard Resistance:
|
Tester Connection | Condition |
Specified Condition |
|---|---|---|
|
R44-1 (FV) - K21-15 (FV) |
Always | Below 1 ? |
|
R44-2 (FE) - K21-33 (FE) |
Always | Below 1 ? |
|
R44-3 (FS) - K21-14 (FR) |
Always | Below 1 ? |
|
R44-1 (FV) or K21-15 (FV) - Body ground |
Always | 10 k? or higher |
|
R44-3 (FS) or K21-14 (FR) - Body ground |
Always | 10 k? or higher |
| NG | | REPAIR OR REPLACE HARNESS OR CONNECTOR |
|
| 5. |
INSPECT FUEL SENDER GAUGE ASSEMBLY |
(a) Remove the fuel sender gauge assembly.
for 2GR-FKS: Click here 
for A25A-FKS: Click here
(b) Inspect the fuel sender gauge assembly.
for 2GR-FKS: Click here
for A25A-FKS: Click here
| NG | | REPLACE FUEL SENDER GAUGE ASSEMBLY for 2GR-FKS: Click here for A25A-FKS: Click here
|
|
| 6. |
INSPECT FUEL SUCTION TUBE WITH PUMP AND GAUGE ASSEMBLY |
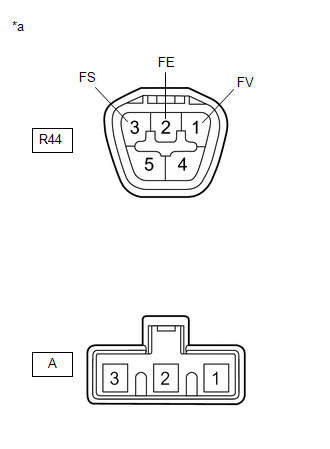
|
*a | Component without harness connected (Fuel Suction Tube with Pump and Gauge Assembly) |
(a) Measure the resistance according to the value(s) in the table below.
Standard Resistance:
|
Tester Connection | Condition |
Specified Condition |
|---|---|---|
|
R44-1 (FV) - A-3 | Always |
Below 1 ? |
|
R44-2 (FE) - A-2 | Always |
Below 1 ? |
|
R44-3 (FS) - A-1 | Always |
Below 1 ? |
|
R44-1 (FV) - R44-3 (FS) or A-3 - A-1 |
Always | 10 k? or higher |
|
R44-1 (FV) - R44-2 (FE) or A-3 - A-2 |
Always | 10 k? or higher |
|
R44-2 (FE) - R44-3 (FS) or A-2 - A-1 |
Always | 10 k? or higher |
| OK | | REPLACE COMBINATION METER ASSEMBLY
|
| NG | | REPLACE FUEL SUCTION TUBE WITH PUMP AND GAUGE ASSEMBLY for 2GR-FKS: Click here for A25A-FKS: Click here
|
| 7. |
READ VALUE USING TECHSTREAM |
(a) Connect the Techstream to the DLC3.
(b) Turn the ignition switch to ON.
(c) Turn the Techstream on.
(d) Enter the following menus: Body Electrical / Combination Meter / Data List.
(e) Read the Data List according to the display on the Techstream.
Body Electrical > Combination Meter > Data List|
Tester Display | Measurement Item |
Range | Normal Condition |
Diagnostic Note |
|---|---|---|---|---|
|
Fuel Input | Fuel level input |
Min.: 0 L, Max.: 655.34 L |
| The detected value of the fuel sender gauge assembly is displayed. |
- *: Combined value of "Fuel Input" and "Sub Fuel Input"
|
Tester Display |
|---|
| Fuel Input |
|
Result | Proceed to |
|---|---|
|
Fuel level data can be displayed on the Techstream |
A |
| Fuel level data cannot be displayed on the Techstream |
B |
| A |
| REPLACE COMBINATION METER ASSEMBLY
|
|
| 8. |
CHECK HARNESS AND CONNECTOR (FUEL SUCTION TUBE WITH PUMP AND GAUGE ASSEMBLY - COMBINATION METER ASSEMBLY) |
(a) Disconnect the R44 fuel suction tube with pump and gauge assembly connector.
(b) Disconnect the K21 combination meter assembly connector.
(c) Measure the resistance according to the value(s) in the table below.
Standard Resistance:
|
Tester Connection | Condition |
Specified Condition |
|---|---|---|
|
R44-1 (FV) - K21-15 (FV) |
Always | Below 1 ? |
|
R44-2 (FE) - K21-33 (FE) |
Always | Below 1 ? |
|
R44-3 (FS) - K21-14 (FR) |
Always | Below 1 ? |
|
R44-3 (FS) or K21-14 (FR) - Body ground |
Always | 10 k? or higher |
| NG | | REPAIR OR REPLACE HARNESS OR CONNECTOR |
|
| 9. |
INSPECT FUEL SENDER GAUGE ASSEMBLY |
(a) Remove the fuel sender gauge assembly.
Click here
(b) Inspect the fuel sender gauge assembly.
Click here
| NG | | REPLACE FUEL SENDER GAUGE ASSEMBLY
|
|
| 10. |
INSPECT FUEL SUCTION TUBE WITH PUMP AND GAUGE ASSEMBLY |
|
*a | Component without harness connected (Fuel Suction Tube with Pump and Gauge Assembly) |
(a) Measure the resistance according to the value(s) in the table below.
Standard Resistance:
|
Tester Connection | Condition |
Specified Condition |
|---|---|---|
|
R44-1 (FV) - A-3 | Always |
Below 1 ? |
|
R44-2 (FE) - A-2 | Always |
Below 1 ? |
|
R44-3 (FS) - A-1 | Always |
Below 1 ? |
|
R44-1 (FV) - R44-3 (FS) or A-3 - A-1 |
Always | 10 k? or higher |
|
R44-1 (FV) - R44-2 (FE) or A-3 - A-2 |
Always | 10 k? or higher |
|
R44-2 (FE) - R44-3 (FS) or A-2 - A-1 |
Always | 10 k? or higher |
| OK | | REPLACE COMBINATION METER ASSEMBLY
|
| NG | | REPLACE FUEL SUCTION TUBE WITH PUMP AND GAUGE ASSEMBLY
|
| 11. |
READ VALUE USING TECHSTREAM |
(a) Connect the Techstream to the DLC3.
(b) Turn the ignition switch to ON.
(c) Turn the Techstream on.
(d) Enter the following menus: Body Electrical / Combination Meter / Data List.
(e) Read the Data List according to the display on the Techstream.
Body Electrical > Combination Meter > Data List|
Tester Display | Measurement Item |
Range | Normal Condition |
Diagnostic Note |
|---|---|---|---|---|
|
Sub Fuel Input | Fuel level input |
Min.: 0 L, Max.: 655.34 L or Unset |
| The detected value of the No. 2 fuel sender gauge assembly is displayed. |
- *: Combined value of "Fuel Input" and "Sub Fuel Input"
|
Tester Display |
|---|
| Sub Fuel Input |
|
Result | Proceed to |
|---|---|
|
Fuel level data can be displayed on the Techstream |
A |
| Fuel level data cannot be displayed on the Techstream |
B |
| A |
| REPLACE COMBINATION METER ASSEMBLY
|
|
| 12. |
CHECK HARNESS AND CONNECTOR (REAR FUEL MAIN AND RETURN TUBE SUB-ASSEMBLY - COMBINATION METER ASSEMBLY) |
(a) Disconnect the R124 rear fuel main and return tube sub-assembly connector.
(b) Disconnect the K21 combination meter assembly connector.
(c) Measure the resistance according to the value(s) in the table below.
Standard Resistance:
|
Tester Connection | Condition |
Specified Condition |
|---|---|---|
|
R124-1 (FV) - K21-15 (FV) |
Always | Below 1 ? |
|
R124-2 (FE) - K21-33 (FE) |
Always | Below 1 ? |
|
R124-3 (FR) - K21-35 (FR2) |
Always | Below 1 ? |
|
R124-3 (FR) or K21-35 (FR2) - Body ground |
Always | 10 k? or higher |
| NG | | REPAIR OR REPLACE HARNESS OR CONNECTOR |
|
| 13. |
INSPECT NO. 2 FUEL SENDER GAUGE ASSEMBLY |
(a) Remove the No. 2 fuel sender gauge assembly.
Click here
(b) Inspect the No. 2 fuel sender gauge assembly.
Click here
| NG | | REPLACE NO. 2 FUEL SENDER GAUGE ASSEMBLY
|
|
| 14. |
INSPECT REAR FUEL MAIN AND RETURN TUBE SUB-ASSEMBLY |
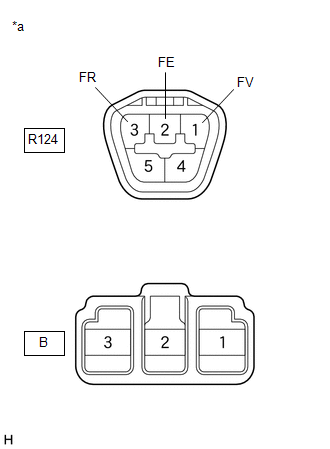
|
*a | Component without harness connected (Rear Fuel Main and Return Tube Sub-assembly) |
(a) Measure the resistance according to the value(s) in the table below.
Standard Resistance:
|
Tester Connection | Condition |
Specified Condition |
|---|---|---|
|
R124-1 (FV) - B-3 | Always |
Below 1 ? |
|
R124-2 (FE) - B-2 | Always |
Below 1 ? |
|
R124-3 (FR) - B-1 | Always |
Below 1 ? |
|
R124-1 (FV) - R124-3 (FR) or B-3 - B-1 |
Always | 10 k? or higher |
|
R124-1(FV) - R124-2(FE) or B-3 - B-2 |
Always | 10 k? or higher |
|
R124-2(FE) - R124-3(FR) or B-2 - B-1 |
Always | 10 k? or higher |
| OK | | REPLACE COMBINATION METER ASSEMBLY
|
| NG | | REPLACE REAR FUEL MAIN AND RETURN TUBE SUB-ASSEMBLY
|
| 15. |
READ VALUE USING TECHSTREAM |
(a) Connect the Techstream to the DLC3.
(b) Turn the ignition switch to ON.
(c) Turn the Techstream on.
(d) Enter the following menus: Body Electrical / Combination Meter / Data List.
(e) Read the Data List according to the display on the Techstream.
Body Electrical > Combination Meter > Data List|
Tester Display | Measurement Item |
Range | Normal Condition |
Diagnostic Note |
|---|---|---|---|---|
|
Fuel Input | Fuel level input |
Min.: 0 L, Max.: 655.34 L or Unset |
| The detected value of the fuel sender gauge assembly is displayed. |
|
Sub Fuel Input | Fuel level input |
Min.: 0 L, Max.: 655.34 L or Unset |
| The detected value of the No. 2 fuel sender gauge assembly is displayed. |
- *: Combined value of "Fuel Input" and "Sub Fuel Input"
|
Tester Display |
|---|
| Fuel Input |
|
Sub Fuel Input |
|
Result | Proceed to |
|---|---|
|
Fuel level data can be displayed on the Techstream |
A |
| Fuel level data cannot be displayed on the Techstream |
B |
| A |
| REPLACE COMBINATION METER ASSEMBLY
|
|
| 16. |
CHECK HARNESS AND CONNECTOR (FUEL SENDER GAUGE SIDE - COMBINATION METER ASSEMBLY) |
(a) Disconnect the R44 fuel suction tube with pump and gauge assembly connector.
(b) Disconnect the R124 rear fuel main and return tube sub-assembly connector.
(c) Disconnect the K21 combination meter assembly connector.
(d) Measure the resistance according to the value(s) in the table below.
Standard Resistance:
|
Tester Connection | Condition |
Specified Condition |
|---|---|---|
|
R44-1 (FV) - K21-15 (FV) |
Always | Below 1 ? |
|
R44-2 (FE) - K21-33 (FE) |
Always | Below 1 ? |
|
R124-1 (FV) - K21-15 (FV) |
Always | Below 1 ? |
|
R124-2 (FE) - K21-33 (FE) |
Always | Below 1 ? |
|
R44-1 (FV), R124-1 (FV) or K21-15 (FV) - Body ground |
Always | 10 k? or higher |
|
R44-3 (FS) or K21-14 (FR) - Body ground |
Always | 10 k? or higher |
|
R124-3 (FR) or K21-35 (FR2) - Body ground |
Always | 10 k? or higher |
| NG | | REPAIR OR REPLACE HARNESS OR CONNECTOR |
|
| 17. |
INSPECT FUEL SENDER GAUGE ASSEMBLY |
(a) Remove the fuel sender gauge assembly.
Click here
(b) Inspect the fuel sender gauge assembly.
Click here
| NG | | REPLACE FUEL SENDER GAUGE ASSEMBLY
|
|
| 18. |
INSPECT FUEL SUCTION TUBE WITH PUMP AND GAUGE ASSEMBLY |
|
*a | Component without harness connected (Fuel Suction Tube with Pump and Gauge Assembly) |
(a) Measure the resistance according to the value(s) in the table below.
Standard Resistance:
|
Tester Connection | Condition |
Specified Condition |
|---|---|---|
|
R44-1 (FV) - R44-3 (FS) or A-3 - A-1 |
Always | 10 k? or higher |
|
R44-1 (FV) - R44-2 (FE) or A-3 - A-2 |
Always | 10 k? or higher |
|
R44-2 (FE) - R44-3 (FS) or A-2 - A-1 |
Always | 10 k? or higher |
| NG | | REPLACE FUEL SUCTION TUBE WITH PUMP AND GAUGE ASSEMBLY
|
|
| 19. |
INSPECT NO. 2 FUEL SENDER GAUGE ASSEMBLY |
(a) Remove the No. 2 fuel sender gauge assembly.
Click here
(b) Inspect the No. 2 fuel sender gauge assembly.
Click here
| NG | | REPLACE NO. 2 FUEL SENDER GAUGE ASSEMBLY
|
|
| 20. |
INSPECT REAR FUEL MAIN AND RETURN TUBE SUB-ASSEMBLY |
|
*a | Component without harness connected (Rear Fuel Main and Return Tube Sub-assembly) |
(a) Measure the resistance according to the value(s) in the table below.
Standard Resistance:
|
Tester Connection | Condition |
Specified Condition |
|---|---|---|
|
R124-1 (FV) - R124-3 (FR) or B-3 - B-1 |
Always | 10 k? or higher |
|
R124-1 (FV) - R124-2 (FE) or B-3 - B-2 |
Always | 10 k? or higher |
|
R124-2 (FE) - R124-3 (FR) or B-2 - B-1 |
Always | 10 k? or higher |
| OK | | REPLACE COMBINATION METER ASSEMBLY
|
| NG | | REPLACE REAR FUEL MAIN AND RETURN TUBE SUB-ASSEMBLY
|
READ NEXT:
SEE MORE:
 Accelerator Pedal
ComponentsCOMPONENTS ILLUSTRATION
*1 ACCELERATOR PEDAL
*2 ACCELERATOR PEDAL PAD
*3 ACCELERATOR PEDAL SENSOR ASSEMBLY
*4 NO. 1 INSTRUMENT PANEL UNDER COVER SUB-ASSEMBLY
Tightening torque for "Major areas involving basic vehicle performance such as
Inspection
INSPECTION PROCEDURE 1. INSPECT VACUUM SWITCHING VALVE (for Active Control Engine Mount System)
(a) Measure the resistance.
(1) Measure the resistance according to the value(s) in the table below.
Standard Resistance:
Tester Connection Condition
Specified Condition
