
Toyota Camry (XV70): Inspection
INSPECTION
PROCEDURE
1. INSPECT STEERING WHEEL SWITCH HOUSING
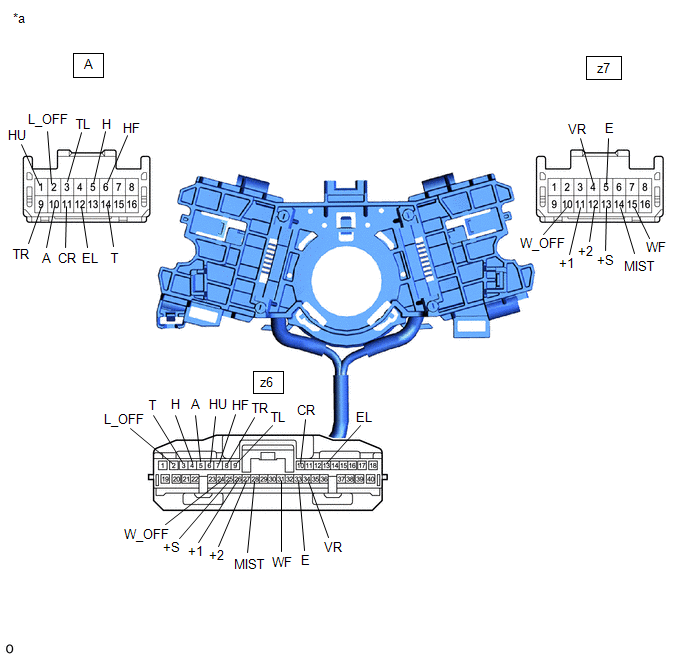
|
*a | Component without harness connected (Steering Wheel Switch Housing) |
- | - |
(a) Measure the resistance according to the value(s) in the table below.
Standard Resistance:
Light Switch Circuit|
Tester Connection | Condition |
Specified Condition |
|---|---|---|
|
A-2 (L_OFF) - z6-2 (L_OFF) |
Always | Below 1 Ω |
|
A-14 (T) - z6-3 (T) |
Always | Below 1 Ω |
|
A-5 (H) - z6-4 (H) |
Always | Below 1 Ω |
|
A-10 (A) - z6-5 (A) |
Always | Below 1 Ω |
|
A-1 (HU) - z6-6 (HU) |
Always | Below 1 Ω |
|
A-6 (HF) - z6-7 (HF) |
Always | Below 1 Ω |
|
A-9 (TR) - z6-8 (TR) |
Always | Below 1 Ω |
|
A-3 (TL) - z6-9 (TL) |
Always | Below 1 Ω |
|
A-11 (CR) - z6-10 (CR) |
Always | Below 1 Ω |
|
A-12 (EL) - z6-13 (EL) |
Always | Below 1 Ω |
|
Tester Connection | Condition |
Specified Condition |
|---|---|---|
|
z7-10 (W_OFF) - z6-24 (W_OFF) |
Always | Below 1 Ω |
|
z7-13 (+S) - z6-25 (+S) |
Always | Below 1 Ω |
|
z7-11 (+1) - z6-26 (+1) |
Always | Below 1 Ω |
|
z7-12 (+2) - z6-27 (+2) |
Always | Below 1 Ω |
|
z7-14 (MIST) - z6-28 (MIST) |
Always | Below 1 Ω |
|
z7-15 (WF) - z6-31 (WF) |
Always | Below 1 Ω |
|
z7-5 (E) - z6-33 (E) |
Always | Below 1 Ω |
|
z7-4 (VR) - z6-34 (VR) |
Always | Below 1 Ω |
If the result is not as specified, replace the steering wheel switch housing.
READ NEXT:
 Installation
INSTALLATION PROCEDURE 1. INSTALL STEERING WHEEL SWITCH HOUSING
(a) When reusing the steering wheel switch housing:
(1) Using pliers, expand the clamp and temporarily install the steering wh
Outer Mirror Switch
ComponentsCOMPONENTS ILLUSTRATION
*1 MULTIPLEX NETWORK MASTER SWITCH ASSEMBLY WITH FRONT DOOR UPPER ARMREST BASE PANEL
*2 OUTER MIRROR SWITCH ASSEMBLY RemovalREMOVAL PROCEDU
SEE MORE:
Components
COMPONENTS ILLUSTRATION
*A for Type A
*B w/o Panoramic View Monitor System
*C w/ Panoramic View Monitor System
- -
*1 OUTER MIRROR
*2 OUTER MIRROR COVER
*3 OUTER MIRROR COVER WITH OUTER MIRROR HOLE COVER
*4 OUTER MIR
Disassembly
DISASSEMBLY PROCEDURE 1. REMOVE COOLER COMPRESSOR BRACKET
(a) Disengage the clamp.
(b) Remove the screw and cooler compressor bracket. 2. REMOVE MAGNET CLUTCH ASSEMBLY
(a) Secure the compressor assembly with magnetic clutch in a vise between aluminum plates.
