
Toyota Camry (XV70): Inspection
INSPECTION
PROCEDURE
1. INSPECT POWER WINDOW REGULATOR MOTOR ASSEMBLY (FOR DRIVER DOOR)
| (a) Connect a positive (+) battery lead to connector terminal 2. NOTICE: Do not connect a positive (+) battery lead to any terminals other than terminal 2 to avoid damaging the pulse sensor inside the motor. |
|
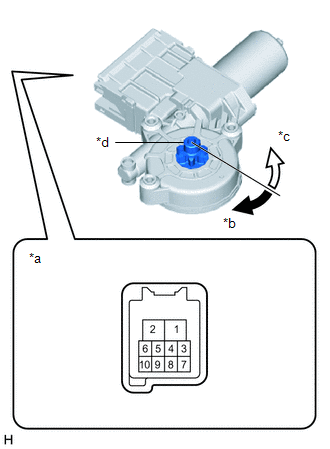
(b) Connect a negative (-) battery lead to connector terminals 1 and 7 or 10.
(c) Check that the motor gear rotates smoothly as follows:
OK:
|
Measurement Condition |
Specified Condition |
|---|---|
| Motor gear rotates clockwise |
| Motor gear rotates counterclockwise |
- If the result is not as specified, replace the power window regulator motor assembly (for driver door).
CAUTION:
Initialize the power window control system after installing the power window regulator motor and regulator assembly.
2. INSPECT POWER WINDOW REGULATOR MOTOR ASSEMBLY (FOR FRONT PASSENGER DOOR)
| (a) Connect a positive (+) battery lead to connector terminal 2. NOTICE: Do not connect a positive (+) battery lead to any terminals other than terminal 2 to avoid damaging the pulse sensor inside the motor. |
|
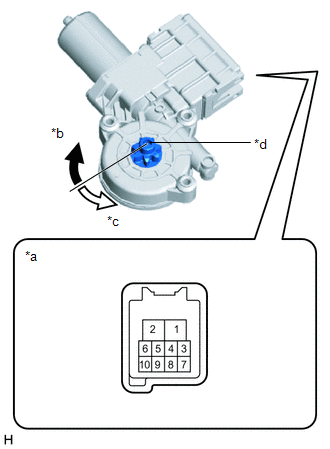
(b) Connect a negative (-) battery lead to connector terminals 1 and 7 or 10.
(c) Check that the motor gear rotates smoothly as follows:
OK:
|
Measurement Condition |
Specified Condition |
|---|---|
| Motor gear rotates counterclockwise |
| Motor gear rotates clockwise |
- If the result is not as specified, replace the power window regulator motor assembly (for front passenger door).
CAUTION:
Initialize the power window control system after installing the power window regulator motor and regulator assembly.
READ NEXT:
 Installation
INSTALLATION CAUTION / NOTICE / HINT
HINT:
Use the same procedure for the RH side and LH side.
The following procedure is for the LH side.
PROCEDURE 1. PRECAUTION NOTICE:
After t
Components
COMPONENTS ILLUSTRATION
*1 REAR ARMREST ASSEMBLY
*2 REAR DOOR ARMREST COVER SUB-ASSEMBLY
*3 REAR DOOR INNER GLASS WEATHERSTRIP
*4 REAR DOOR NO. 2 SERVICE HO
SEE MORE:
On-vehicle Inspection
ON-VEHICLE INSPECTION CAUTION / NOTICE / HINT
HINT:
Use the same procedure for the RH side and LH side.
The following procedure is for the LH side.
PROCEDURE 1. REMOVE REAR WHEEL Click here
2. SEPARATE REAR DISC BRAKE CALIPER ASSEMBLY Click here
3. REMOVE PARKING BRAKE SHOE
Skid Control ECU Communication Stop Mode
DESCRIPTION
Detection Item Symptom
Trouble Area Skid Control ECU Communication Stop Mode
Any of the following conditions are met:
Communication stop for "Skid Control (ABS/VSC/TRAC)" is indicated on the "Communication Bus Check" screen of the Techstream.
Click her
