
Toyota Camry (XV70): Rear Power Window Switch
Components
COMPONENTS
ILLUSTRATION
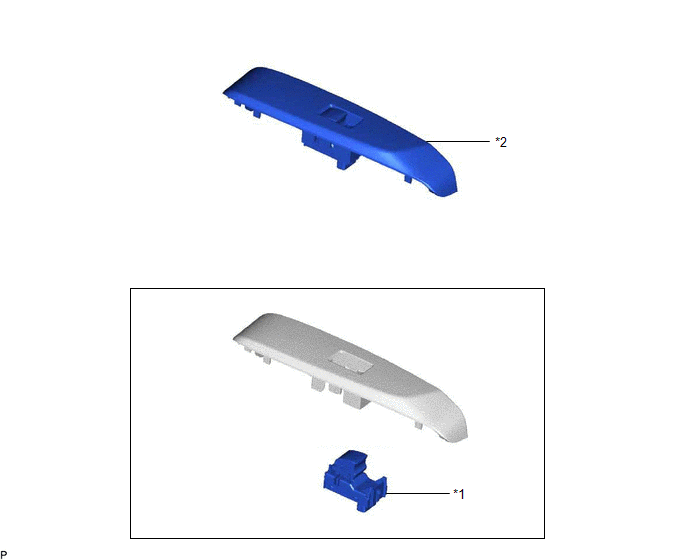
|
*1 | REAR POWER WINDOW REGULATOR SWITCH ASSEMBLY |
*2 | REAR POWER WINDOW REGULATOR SWITCH ASSEMBLY WITH REAR DOOR UPPER ARMREST BASE PANEL |
Removal
REMOVAL
CAUTION / NOTICE / HINT
HINT:
- Use the same procedure for the RH side and LH side.
- The following procedure is for the LH side.
PROCEDURE
1. REMOVE REAR POWER WINDOW REGULATOR SWITCH ASSEMBLY WITH REAR DOOR UPPER ARMREST BASE PANEL
Click here .gif)
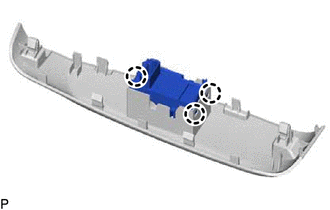
2. REMOVE REAR POWER WINDOW REGULATOR SWITCH ASSEMBLY
| (a) Disengage the 3 claws to remove the rear power window regulator switch assembly. |
|
Inspection
INSPECTION
PROCEDURE
1. INSPECT REAR POWER WINDOW REGULATOR SWITCH ASSEMBLY (for LH/RH DOOR)
| (a) Check the switch function. (1) Measure the resistance according to the value(s) in the table below. Standard Resistance:
If the result is not as specified, replace the rear power window regulator switch assembly (for LH/RH door). |
|
.png)
(b) Check that the LED illuminates.
(1) Apply battery voltage to the power window regulator switch assembly and check that the LED illuminates.
OK:
|
Battery Connection | Specified Condition |
|---|---|
|
Battery positive (+) → 3 Battery negative (-) → 1 |
LED illuminates |
If the result is not as specified, replace the rear power window regulator switch assembly (for LH/RH door).
Installation
INSTALLATION
CAUTION / NOTICE / HINT
HINT:
- Use the same procedure for the RH side and LH side.
- The following procedure is for the LH side.
PROCEDURE
1. INSTALL REAR POWER WINDOW REGULATOR SWITCH ASSEMBLY
(a) Engage the 3 claws to install the rear power window regulator switch assembly.
2. INSTALL REAR POWER WINDOW REGULATOR SWITCH ASSEMBLY WITH REAR DOOR UPPER ARMREST BASE PANEL
Click here .gif)
READ NEXT:
 Relay
Relay
On-vehicle InspectionON-VEHICLE INSPECTION PROCEDURE
1. INSPECT DEF RELAY
(a) Measure the resistance according to the value(s) in the table below.
Standard Resistance:
Tester Co
Precaution
PRECAUTION PRECAUTION FOR DISCONNECTING CABLE FROM NEGATIVE BATTERY TERMINAL
NOTICE: When disconnecting the cable from the negative (-) battery terminal, initialize the following systems after the
SEE MORE:
Summary of functions
The multi-information display presents the driver with a variety of driving-
related data, such as the current outside temperature. The multi-information
display can also be used to change the display settings
and other settings.
Indicators
Driving assist system status display area
Disp
Lost Communication with Instrument Panel Cluster (IPC) Control Module Missing Message (U015587)
DESCRIPTION The ECM and combination meter assembly send and receive signals via CAN communication.
If a communication error occurs between the ECM and combination meter assembly, the ECM illuminates the MIL and stores this DTC.
DTC No. Detection Item
DTC Detection Condition Trouble
