
Toyota Camry (XV70): Reassembly
REASSEMBLY
CAUTION / NOTICE / HINT
CAUTION:
If the rear disc brake cylinder assembly has been disassembled, perform air bleeding for the rear disc brake cylinder assembly.
Click here .gif)
NOTICE:
- Make sure not to scratch, damage or apply excessive force to any of the internal components of the rear disc brake cylinder.
- To prevent rusting on the inside of the rear disc brake cylinder, perform the rear disc brake piston removal and installation quickly.
- Do not clean the interior of the rear disc brake cylinder with brake cleaner.
- Do not remove any parts unless specifically instructed to do so, and only remove the parts indicated.
PROCEDURE
1. TEMPORARILY TIGHTEN REAR DISC BRAKE BLEEDER PLUG
(a) Temporarily install the rear disc brake bleeder plug to the rear disc brake cylinder.
HINT:
Fully tighten the rear disc brake bleeder plug after bleeding the system.
2. INSTALL REAR DISC BRAKE BLEEDER PLUG CAP
(a) Install the rear disc brake bleeder plug cap to the rear disc brake bleeder plug.
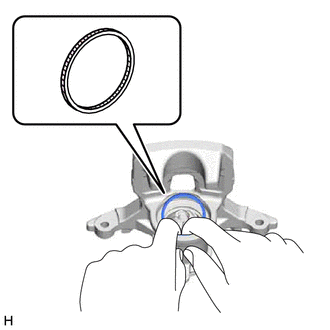
3. INSTALL PISTON SEAL
(a) Apply lithium soap base glycol grease to the entire circumference of a new piston seal.
.png) |
Lithium Soap Base Glycol Grease |
(b) Install the piston seal to the rear disc brake cylinder.
NOTICE:
- Do not damage the inner surface or piston seal groove of the rear disc brake cylinder.
- Do not allow the nut to rotate. If the nut is accidentally allowed to rotate, return it to its original position.
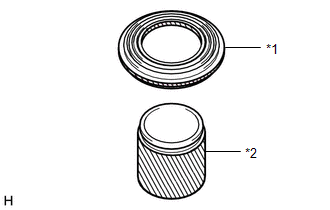
4. INSTALL REAR DISC BRAKE PISTON
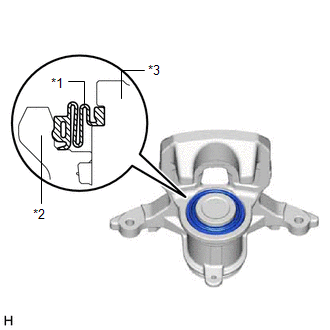
(a) Apply a light layer of lithium soap base glycol grease to the entire circumference of a new cylinder boot.
|
*1 | Cylinder Boot |
|
*2 | Rear Disc Brake Piston |
|
|
Lithium Soap Base Glycol Grease |
(b) Apply a light layer of lithium soap base glycol grease to the contact surfaces of the rear disc brake piston.
| (c) Install the cylinder boot to the rear disc brake piston. NOTICE: The front and back sides of the cylinder boot are different. Make sure not to install the cylinder boot backwards. |
|
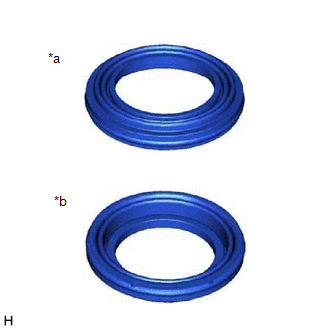
| (d) Install the rear disc brake piston to the rear disc brake cylinder. NOTICE:
|
|
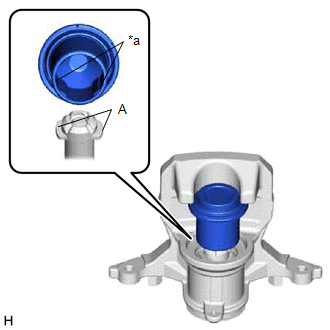
| (e) Install the cylinder boot to the rear disc brake cylinder as shown in the illustration. NOTICE:
|
|
READ NEXT:
 Installation
INSTALLATION CAUTION / NOTICE / HINT
NOTICE:
Immediately after installing the brake pads, the braking performance may be reduced. Always perform a road test in a safe place while paying attentio
Components
COMPONENTS ILLUSTRATION
*1 REAR DISC BRAKE ANTI-SQUEAL SHIM KIT
*2 REAR DISC BRAKE CYLINDER ASSEMBLY
*3 REAR DISC BRAKE PAD
*4 REAR FLEXIBLE HOSE
*5 GAS
SEE MORE:
Removal
REMOVAL CAUTION / NOTICE / HINT
HINT:
Use the same procedure for the RH side and LH side.
The following procedure is for the LH side.
PROCEDURE 1. REMOVE REAR DOOR ARMREST COVER SUB-ASSEMBLY
Click here
2. REMOVE REAR POWER WINDOW REGULATOR SWITCH ASSEMBLY WITH REAR DOOR UPPE
On-vehicle Inspection
ON-VEHICLE INSPECTION PROCEDURE
1. INSPECT BRAKE FLUID LEVEL IN RESERVOIR
(a) Check the fluid level. If the brake fluid level is lower than the MIN line, inspect for brake fluid leaks and brake pad wear. If necessary, refill the reservoir with brake fluid to the MAX line after repair or repl
