
Toyota Camry (XV70): Removal
REMOVAL
CAUTION / NOTICE / HINT
The necessary procedures (adjustment, calibration, initialization or registration) that must be performed after parts are removed and installed, or replaced during power window regulator motor assembly removal/installation are shown below.
Necessary Procedures After Parts Removed/Installed/Replaced|
Replaced Part or Performed Procedure |
Necessary Procedure | Effect/Inoperative Function when Necessary Procedure not Performed |
Link |
|---|---|---|---|
|
Disconnect cable from negative battery terminal |
Perform steering sensor zero point calibration |
Lane Tracing Assist System |
|
|
Pre-collision System | |||
|
Memorize steering angle neutral point |
Parking Assist Monitor System |
| |
|
Panoramic View Monitor System |
| ||
| Initialize power window control system |
|
|
HINT:
- Use the same procedure for the RH side and LH side.
- The following procedure is for the LH side.
PROCEDURE
1. PRECAUTION
NOTICE:
After turning the ignition switch off, waiting time may be required before disconnecting the cable from the negative (-) battery terminal. Therefore, make sure to read the disconnecting the cable from the negative (-) battery terminal notices before proceeding with work.
Click here .gif)
2. DISCONNECT CABLE FROM NEGATIVE BATTERY TERMINAL
for A25A-FKS:
Click here
for 2GR-FKS:
Click here
3. REMOVE REAR DOOR ARMREST COVER SUB-ASSEMBLY
Click here
4. REMOVE REAR POWER WINDOW REGULATOR SWITCH ASSEMBLY WITH REAR DOOR UPPER ARMREST BASE PANEL
Click here
5. REMOVE REAR ARMREST ASSEMBLY
Click here
6. REMOVE REAR DOOR TRIM BOARD SUB-ASSEMBLY
Click here
7. REMOVE REAR DOOR INNER GLASS WEATHERSTRIP
Click here
8. REMOVE REAR DOOR NO. 2 SERVICE HOLE COVER
Click here
9. REMOVE REAR DOOR SERVICE HOLE COVER
Click here
10. REMOVE REAR DOOR NO. 1 VENT SEAL
Click here
11. REMOVE REAR DOOR PANEL PROTECTOR
Click here
12. REMOVE REAR DOOR GLASS RUN
Click here
13. DISCONNECT REAR DOOR WEATHERSTRIP
Click here
14. REMOVE REAR DOOR REAR LOWER WINDOW FRAME SUB-ASSEMBLY
Click here
15. REMOVE REAR DOOR QUARTER WINDOW GLASS
Click here
16. REMOVE REAR DOOR GLASS SUB-ASSEMBLY
Click here
17. REMOVE REAR DOOR WINDOW REGULATOR ASSEMBLY
Click here
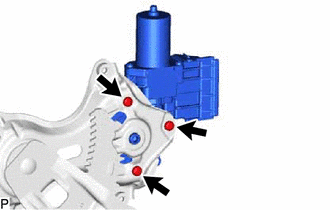
18. REMOVE POWER WINDOW REGULATOR MOTOR ASSEMBLY
| (a) Using a T25 "TORX" socket wrench, remove the 3 screws and power window regulator motor assembly. |
|
READ NEXT:
 Inspection
INSPECTION PROCEDURE 1. INSPECT POWER WINDOW REGULATOR MOTOR ASSEMBLY (FOR REAR LH DOOR)
(a) Connect a positive (+) battery lead to connector terminal 2.
NOTICE: Do not connect a positive (
Installation
INSTALLATION CAUTION / NOTICE / HINT
HINT:
Use the same procedure for the RH side and LH side.
The following procedure is for the LH side.
PROCEDURE 1. PRECAUTION NOTICE:
After t
Rear Power Window Switch
ComponentsCOMPONENTS ILLUSTRATION
*1 REAR POWER WINDOW REGULATOR SWITCH ASSEMBLY
*2 REAR POWER WINDOW REGULATOR SWITCH ASSEMBLY WITH REAR DOOR UPPER ARMREST BASE PANEL Remov
SEE MORE:
Components
COMPONENTS ILLUSTRATION
*1 REAR DISC BRAKE ANTI-SQUEAL SHIM KIT
*2 REAR DISC BRAKE CYLINDER ASSEMBLY
*3 REAR DISC BRAKE PAD
*4 REAR FLEXIBLE HOSE
*5 GASKET
*6 REAR DISC BRAKE PAD WEAR INDICATOR PLATE
*7 REAR NO. 1 DISC BRAKE ANTI-SQUE
Components
COMPONENTS ILLUSTRATION
*1 REAR DOOR FRONT WINDOW FRAME MOULDING
*2 REAR DOOR WEATHERSTRIP
*3 REAR DOOR WINDOW FRAME MOULDING SUB-ASSEMBLY
*4 RIVET
● Non-reusable part
- -
