
Toyota Camry (XV70): Automatic High Beam Switch Indicator does not Come ON
DESCRIPTION
When the automatic high beam system is on, the main body ECU (multiplex network body ECU) illuminates the auto high beam switch indicator.
WIRING DIAGRAM
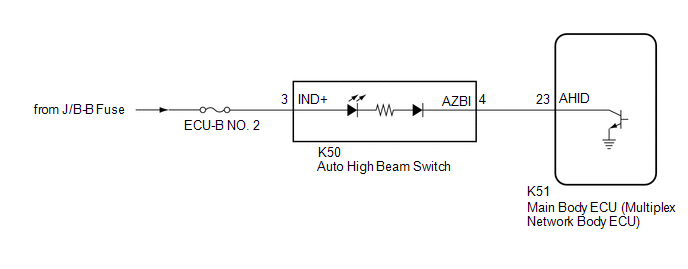
CAUTION / NOTICE / HINT
NOTICE:
- Inspect the fuses for circuits related to this system before performing the following procedure.
- Before replacing the main body ECU (multiplex network body ECU), refer to Registration.*
Click here
.gif)
- *: w/ Smart Key System
PROCEDURE
|
1. | PERFORM ACTIVE TEST USING TECHSTREAM |
(a) Connect the Techstream to the DLC3.
(b) Turn the ignition switch to ON.
(c) Turn the Techstream on.
(d) Enter the following menus: Body Electrical / Main Body / Active Test.
(e) Perform the Active Test according to the display on the Techstream.
Body Electrical > Main Body > Active Test|
Tester Display | Measurement Item |
Control Range | Diagnostic Note |
|---|---|---|---|
|
Automatic High Beam Switch Light |
Auto high beam switch indicator light |
OFF or ON | - |
|
Tester Display |
|---|
|
Automatic High Beam Switch Light |
OK:
Auto high beam switch indicator light illuminates.
| OK | .gif) |
USE SIMULATION METHOD TO CHECK
|
|
.gif)
|
2. | INSPECT AUTO HIGH BEAM SWITCH |
(a) Remove the auto high beam switch.
Click here
(b) Inspect the auto high beam switch.
Click here
| NG | |
REPLACE AUTO HIGH BEAM SWITCH |
|
|
3. | CHECK HARNESS AND CONNECTOR (POWER SOURCE - AUTO HIGH BEAM SWITCH) |
(a) Measure the voltage according to the value(s) in the table below.
Standard Voltage:
|
Tester Connection | Condition |
Specified Condition |
|---|---|---|
|
K50-3 (IND+) - Body ground |
Always | 11 to 14 V |
| NG | |
REPAIR OR REPLACE HARNESS OR CONNECTOR |
|
|
4. | CHECK HARNESS AND CONNECTOR (AUTO HIGH BEAM SWITCH - MAIN BODY ECU (MULTIPLEX NETWORK BODY ECU)) |
(a) Disconnect the K51 main body ECU (multiplex network body ECU) connector.
(b) Measure the resistance according to the value(s) in the table below.
Standard Resistance:
|
Tester Connection | Condition |
Specified Condition |
|---|---|---|
|
K50-4 (AZBI) - K51-23 (AHID) |
Always | Below 1 Ω |
|
K50-4 (AZBI) or K51-23 (AHID) - Body ground |
Always | 10 kΩ or higher |
| OK | |
REPLACE MAIN BODY ECU (MULTIPLEX NETWORK BODY ECU)
|
| NG | |
REPAIR OR REPLACE HARNESS OR CONNECTOR |
READ NEXT:
 Automatic High Beam System does not Operate or Operation Indicator does not Illuminate
DESCRIPTION The main body ECU (multiplex network body ECU) controls the automatic high beam system based on signals received from the forward recognition camera. WIRING DIAGRAM
CAUTION / NOTICE /
Headlight Dimmer Switch Circuit
DESCRIPTION The steering sensor receives the following switch information:
Light control switch in DRL OFF*, tail, head or AUTO position
Dimmer switch in high, low or high flash (pass) pos
Daytime Running Light Circuit
DESCRIPTION The main body ECU (multiplex network body ECU) controls the daytime running lights. WIRING DIAGRAM
for Bulb Type Turn Signal Light
for LED Type Turn Signal Light
CAUTION / NOTIC
SEE MORE:
Crankshaft Position - Camshaft Position Correlation Bank 1 Sensor A (P001600,P001800)
DESCRIPTION In the VVT (Variable Valve Timing) system, the appropriate intake valve open and close timing is controlled by the ECM. The ECM performs intake valve control by performing the following: 1) controlling the intake camshaft, cam timing oil control solenoid assembly, camshaft timing gear bo
No Warm Air Comes Out
DESCRIPTION If cool air blows from the registers regardless of the temperature setting of the air conditioning system, the following suspected areas may be the cause.
Symptom Factor
No warm air comes out
(Blower control is normal)
Outlet air temperature does not increase (Blo
