Toyota Camry (XV70): Components
COMPONENTS
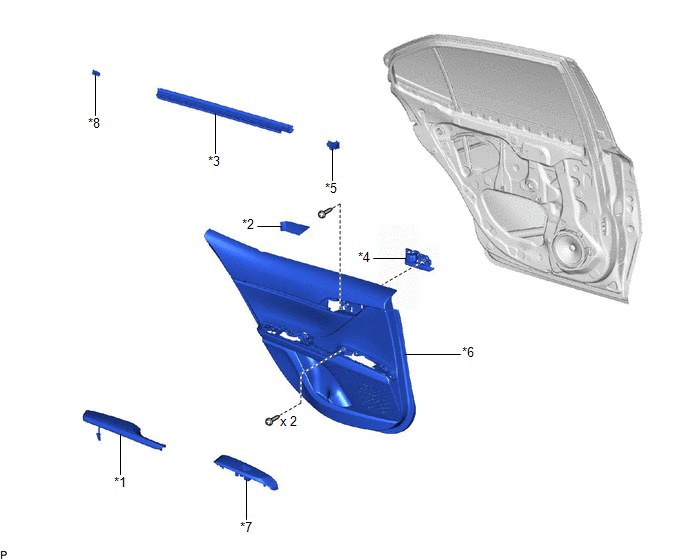
ILLUSTRATION
|
*1 | REAR ARMREST ASSEMBLY |
*2 | REAR DOOR ARMREST COVER SUB-ASSEMBLY |
|
*3 | REAR DOOR INNER GLASS WEATHERSTRIP |
*4 | REAR DOOR INSIDE HANDLE SUB-ASSEMBLY |
|
*5 | REAR DOOR NO. 2 SERVICE HOLE COVER |
*6 | REAR DOOR TRIM BOARD SUB-ASSEMBLY |
|
*7 | REAR POWER WINDOW REGULATOR SWITCH ASSEMBLY WITH REAR DOOR UPPER ARMREST BASE PANEL |
*8 | NO. 1 DOOR SCUFF PLATE CLAMP |
ILLUSTRATION
|
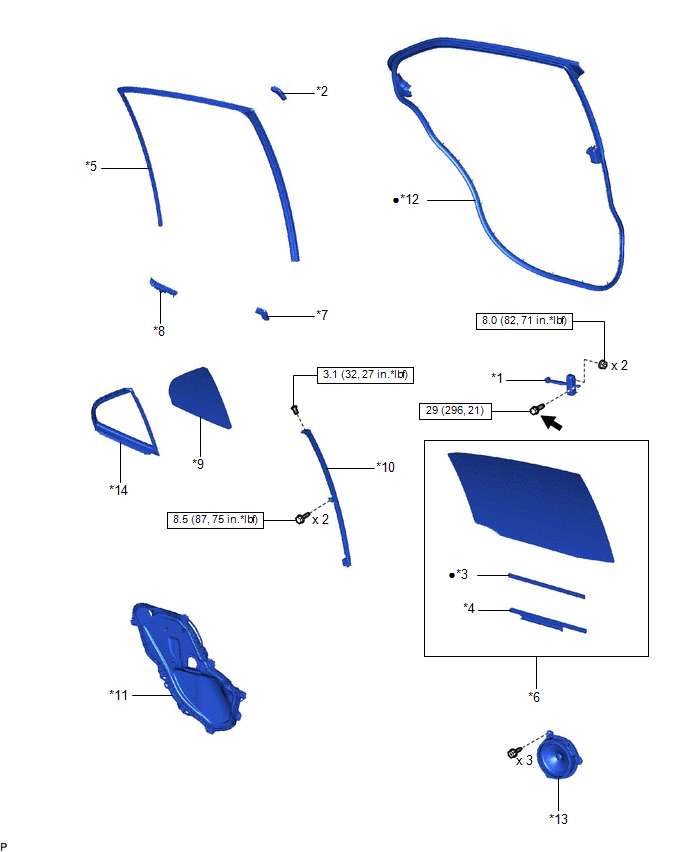
*1 | REAR DOOR CHECK ASSEMBLY |
*2 | REAR DOOR FRAME GARNISH |
|
*3 | REAR DOOR GLASS CHANNEL FILLER |
*4 | REAR DOOR GLASS CHANNEL SUB-ASSEMBLY |
|
*5 | REAR DOOR GLASS RUN |
*6 | REAR DOOR GLASS SUB-ASSEMBLY |
|
*7 | REAR DOOR NO. 1 VENT SEAL |
*8 | REAR DOOR PANEL PROTECTOR |
|
*9 | REAR DOOR QUARTER WINDOW GLASS |
*10 | REAR DOOR REAR LOWER WINDOW FRAME SUB-ASSEMBLY |
|
*11 | REAR DOOR SERVICE HOLE COVER |
*12 | REAR DOOR WEATHERSTRIP |
|
*13 | REAR SPEAKER ASSEMBLY |
*14 | REAR DOOR QUARTER WINDOW GLASS WEATHERSTRIP |
.png) |
N*m (kgf*cm, ft.*lbf): Specified torque |
● | Non-reusable part |
.png) |
Toyota Genuine Adhesive 1324, Three Bond 1324 or equivalent |
★ | Precoated part |
ILLUSTRATION
|
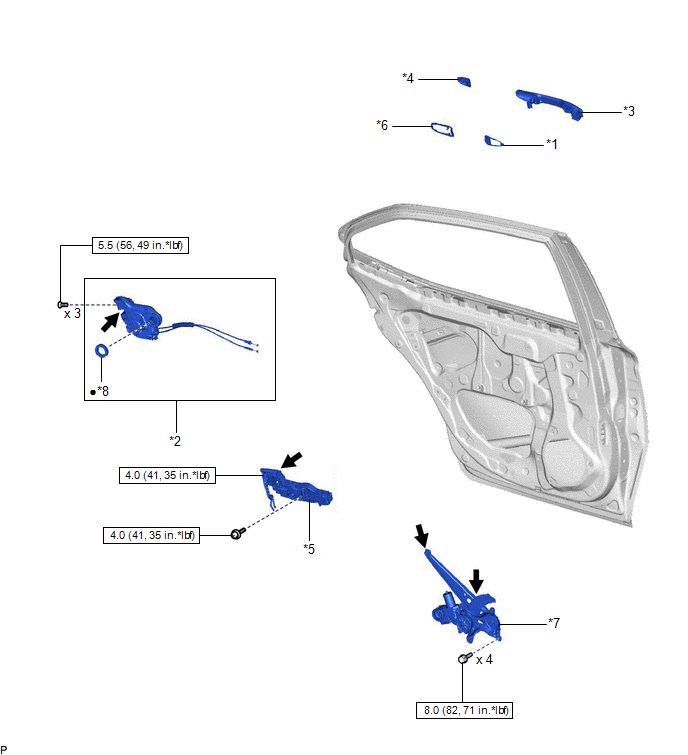
*1 | REAR DOOR FRONT OUTSIDE HANDLE PAD |
*2 | REAR DOOR LOCK WITH MOTOR ASSEMBLY |
|
*3 | REAR DOOR OUTSIDE HANDLE ASSEMBLY |
*4 | REAR DOOR OUTSIDE HANDLE COVER |
|
*5 | REAR DOOR OUTSIDE HANDLE FRAME SUB-ASSEMBLY |
*6 | REAR DOOR REAR OUTSIDE HANDLE PAD |
|
*7 | REAR DOOR WINDOW REGULATOR ASSEMBLY |
*8 | DOOR LOCK WIRING HARNESS SEAL |
|
|
N*m (kgf*cm, ft.*lbf): Specified torque |
● | Non-reusable part |
|
|
MP grease | - |
- |
ILLUSTRATION
|
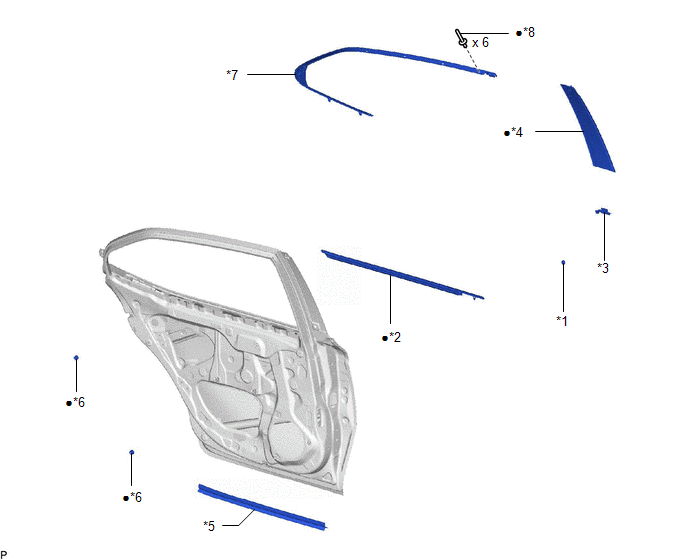
*1 | DOOR WINDOW FRAME MOULING CLIP |
*2 | REAR DOOR BELT MOULDING ASSEMBLY |
|
*3 | REAR DOOR FRONT OUTSIDE SEAL |
*4 | REAR DOOR FRONT WINDOW FRAME MOULDING |
|
*5 | REAR DOOR NO. 2 WEATHERSTRIP |
*6 | REAR DOOR PANEL CUSHION |
|
*7 | REAR DOOR WINDOW FRAME MOULDING SUB-ASSEMBLY |
*8 | RIVET |
|
● | Non-reusable part |
- | - |
READ NEXT:
 Disassembly
DISASSEMBLY CAUTION / NOTICE / HINT
The necessary procedures (adjustment, calibration, initialization, or registration) that must be performed after parts are removed and installed, or replaced dur
Adjustment
ADJUSTMENT CAUTION / NOTICE / HINT
*a Centering Bolt
*b Standard Bolt
HINT:
Use the same procedure for the RH side and LH side.
The following procedure is f
Reassembly
REASSEMBLY CAUTION / NOTICE / HINT
HINT:
Use the same procedure for the RH side and LH side.
The following procedure is for the LH side.
PROCEDURE 1. INSTALL REAR DOOR WINDOW FRAME
SEE MORE:
Installation
INSTALLATION PROCEDURE 1. INSTALL CAMSHAFT TIMING GEAR BOLT
(a) Make sure that the No. 1 cylinder is at TDC/compression. HINT:
Check that the cutout of the camshaft timing gear assembly is at the top and align the timing mark (cutout) of the crankshaft pulley with the timing mark on the timing c
Reassembly
REASSEMBLY CAUTION / NOTICE / HINT
HINT:
Use the same procedure for the RH side and LH side.
The following procedure is for the LH side.
PROCEDURE 1. INSTALL FRONT AXLE OUTBOARD JOINT BOOT
(a) Secure the drive shaft in a vise between aluminum plates. NOTICE:
Do not overtighten the
