Toyota Camry (XV70): Inspection
INSPECTION
PROCEDURE
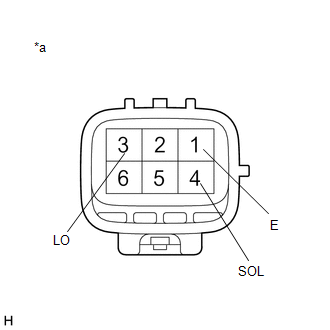
1. INSPECT HEADLIGHT ASSEMBLY LH (for Bulb Type Turn Signal Light)
|
*a | Component without harness connected (Headlight Assembly LH) |
(a) Apply battery voltage to the headlight assembly LH and check that the Lo/Hi beam shade operates.
OK:
|
Condition | Specified Condition |
|---|---|
|
Battery positive (+) → Terminal 4 (SOL) Battery negative (-) → Terminal 1 (E) |
Operates normally |
If the result is not as specified, replace the headlight assembly LH.
(b) Apply battery voltage to the headlight assembly LH and check that the light illuminates.
OK:
|
Condition | Specified Condition |
|---|---|
|
Battery positive (+) → Terminal 3 (LO) Battery negative (-) → Terminal 1 (E) |
Lo/Hi beam headlight illuminates |
If the result is not as specified, replace the headlight assembly LH.
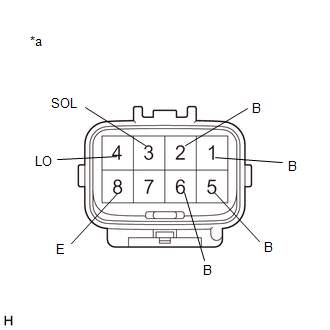
2. INSPECT HEADLIGHT ASSEMBLY LH (for LED Type Turn Signal Light)
|
*a | Component without harness connected (Headlight Assembly LH) |
(a) Apply battery voltage to the headlight assembly LH and check that the Lo/Hi beam shade operates.
OK:
|
Condition | Specified Condition |
|---|---|
|
Battery positive (+) → Terminal 3 (SOL) Battery negative (-) → Terminal 8 (E) |
Operates normally |
If the result is not as specified, replace the headlight assembly LH.
(b) Apply battery voltage to the headlight assembly LH and check that the light illuminates.
OK:
|
Condition | Specified Condition |
|---|---|
|
Battery positive (+) → Terminal 4 (LO) Battery negative (-) → Terminal 8 (E) |
Lo/Hi beam headlight illuminates |
|
Battery positive (+) → Terminal 1 (B) Battery positive (+) → Terminal 5 (B) Battery negative (-) → Terminal 8 (E) |
Parking light/daytime running light illuminates |
|
Battery positive (+) → Terminal 2 (B) Battery negative (-) → Terminal 8 (E) |
Turn signal light illuminates |
|
Battery positive (+) → Terminal 6 (B) Battery negative (-) → Terminal 8 (E) |
Side marker light illuminates |
If the result is not as specified, replace the headlight assembly LH.
3. INSPECT HEADLIGHT ASSEMBLY RH (for Bulb Type Turn Signal Light)
|
*a | Component without harness connected (Headlight Assembly RH) |
(a) Apply battery voltage to the headlight assembly RH and check that the Lo/Hi beam shade operates.
OK:
|
Condition | Specified Condition |
|---|---|
|
Battery positive (+) → Terminal 4 (SOL) Battery negative (-) → Terminal 1 (E) |
Operates normally |
If the result is not as specified, replace the headlight assembly RH.
(b) Apply battery voltage to the headlight assembly RH and check that the light illuminates.
OK:
|
Condition | Specified Condition |
|---|---|
|
Battery positive (+) → Terminal 3 (LO) Battery negative (-) → Terminal 1 (E) |
Lo/Hi beam headlight illuminates |
If the result is not as specified, replace the headlight assembly RH.
4. INSPECT HEADLIGHT ASSEMBLY RH (for LED Type Turn Signal Light)
|
*a | Component without harness connected (Headlight Assembly RH) |
(a) Apply battery voltage to the headlight assembly RH and check that the Lo/Hi beam shade operates.
OK:
|
Condition | Specified Condition |
|---|---|
|
Battery positive (+) → Terminal 3 (SOL) Battery negative (-) → Terminal 8 (E) |
Operates normally |
If the result is not as specified, replace the headlight assembly RH.
(b) Apply battery voltage to the headlight assembly RH and check that the light illuminates.
OK:
|
Condition | Specified Condition |
|---|---|
|
Battery positive (+) → Terminal 4 (LO) Battery negative (-) → Terminal 8 (E) |
Lo/Hi beam headlight illuminates |
|
Battery positive (+) → Terminal 1 (B) Battery positive (+) → Terminal 5 (B) Battery negative (-) → Terminal 8 (E) |
Parking light/daytime running light illuminates |
|
Battery positive (+) → Terminal 2 (B) Battery negative (-) → Terminal 8 (E) |
Turn signal light illuminates |
|
Battery positive (+) → Terminal 6 (B) Battery negative (-) → Terminal 8 (E) |
Side marker light illuminates |
If the result is not as specified, replace the headlight assembly RH.
READ NEXT:
 Adjustment
ADJUSTMENT CAUTION / NOTICE / HINT
HINT:
Use the same procedure for the RH side and LH side.
The following procedure is for the LH side.
PROCEDURE 1. PREPARE VEHICLE FOR HEADLIGHT A
Reassembly
REASSEMBLY CAUTION / NOTICE / HINT
HINT:
Use the same procedure for the RH side and LH side.
The following procedure is for the LH side.
PROCEDURE 1. INSTALL HEADLIGHT COVER (for LE
Installation
INSTALLATION CAUTION / NOTICE / HINT
HINT:
Use the same procedure for the RH side and LH side.
The following procedure is for the LH side.
PROCEDURE 1. INSTALL HEADLIGHT ASSEMBLY
SEE MORE:
AWD Warning does not Come ON
DESCRIPTION Refer to "4WD Warning Remains ON".
Click here WIRING DIAGRAM
Refer to "4WD Warning Remains ON". Click here
CAUTION / NOTICE / HINT
Refer to "4WD Warning Remains ON". Click here
PROCEDURE
1.
CHECK HARNESS AND CONNECTOR (a) Check that there is no looseness at
Parts Location
PARTS LOCATION ILLUSTRATION
*1 FAN WITH MOTOR ASSEMBLY - COOLING FAN MOTOR
- COOLING FAN ECU *2
ECM *3
ENGINE ROOM RELAY BLOCK AND JUNCTION BLOCK ASSEMBLY - EFI-MAIN NO. 1 RELAY
- -
