Toyota Camry (XV70): Installation
INSTALLATION
PROCEDURE
1. INSTALL REAR STABILIZER BUSHING
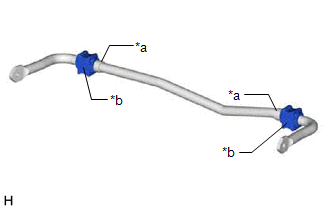
| (a) Install the 2 rear stabilizer bushings to the outside of the stoppers on the rear stabilizer bar. NOTICE: Be sure to install the rear stabilizer bushings so that each cutout faces the front of the vehicle. HINT: The cutout of the rear stabilizer bushing can be positioned either up or down. |
|
2. INSTALL REAR NO. 1 STABILIZER BAR BRACKET
(a) Install the 2 rear No. 1 stabilizer bar brackets to the 2 rear stabilizer bushings.
NOTICE:
- Ensure that the identification mark faces the right side of the vehicle.
- Be sure to install the rear No. 1 stabilizer bar brackets so that each arrow mark faces the upper side of the vehicle.

|
*a | Arrow Mark |
|
*b | Identification Mark |
.png) |
Upper Side of the Vehicle |
3. INSTALL REAR LOWER STABILIZER BRACKET
| (a) Install the 2 rear lower stabilizer brackets to the rear stabilizer bushing. |
|
.png)
4. INSTALL REAR STABILIZER BAR
| (a) Install the rear stabilizer bar, 2 rear No. 1 stabilizer bar brackets, 2 rear stabilizer bushings and 2 rear lower stabilizer brackets to the rear suspension member sub-assembly with the 4 bolts. Torque: 78 N |
READ NEXT:
 Components
COMPONENTS ILLUSTRATION
*1 NO. 1 FLOOR UNDER COVER
*2 NO. 2 FLOOR UNDER COVER
N*m (kgf*cm, ft.*lbf): Specified torque
- - ILLUSTRATION
*A w/o
Removal
REMOVAL CAUTION / NOTICE / HINT
The necessary procedures (adjustment, calibration, initialization, or registration) that must be performed after parts are removed and installed, or replaced during r
SEE MORE:
Left Electric Parking Brake Actuator Control Circuit Short to Battery (C060B12)
DESCRIPTION
DTC No. Detection Item
DTC Detection Condition Trouble Area
Memory Note
C060B12 Left Electric Parking Brake Actuator Control Circuit Short to Battery
Diagnosis Condition:
Electric parking brake not operating
Malfunction Status:
The E
Precaution
PRECAUTION HANDLING PRECAUTIONS FOR STEERING SYSTEM
(a) Care must be taken when replacing parts. Incorrect replacement may affect the performance of the steering system and result in a driving hazard.
HANDLING PRECAUTIONS FOR SRS AIRBAG SYSTEM (a) This vehicle is equipped with a Supplemental R
