
Toyota Camry (XV70): Installation
INSTALLATION
CAUTION / NOTICE / HINT
CAUTION:
After installing the luggage compartment door support assembly, use your hand to open and close the luggage door. Make sure the luggage door can open and close smoothly.
PROCEDURE
1. INSTALL LUGGAGE COMPARTMENT DOOR SUPPORT ASSEMBLY
NOTICE:
- Avoid touching the piston rod as much as possible to prevent foreign matter from attaching to it. Be sure to hold the cylinder while servicing.
- Do not wear cotton gloves or other similar materials when handling the piston rod. Fibers may attach to the rod and result in gas leaks.
- Do not apply any horizontal load to the luggage compartment door support assembly in order to prevent the piston rod from deforming.
(a) Engage the guide as indicated by the arrows, in the order shown in the illustration.
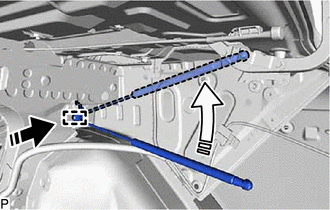
 |
Install in this Direction (1) |
 |
Install in this Direction (2) |
| (b) Engage the ball joint to install the luggage compartment door support assembly. NOTICE: Install the luggage compartment door support assembly while supporting the luggage door by hand. |
|
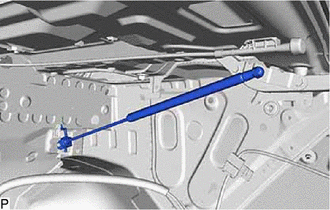
(c) Check that the ball joint is engaged securely and the luggage compartment door support assembly cannot be pulled off.
2. INSTALL BACK DOOR LOCK UPPER BUSH
(a) Engage the 2 claws to install the back door lock upper bush.
HINT:
Use the same procedure for the RH side and LH side.
3. INSTALL BACK DOOR STAY SPRING
| (a) Engage the 2 guides to install the back door stay spring. NOTICE: Make sure that the alignment mark is on the rear inner side. HINT: Use the same procedure for the RH side and LH side. |
|
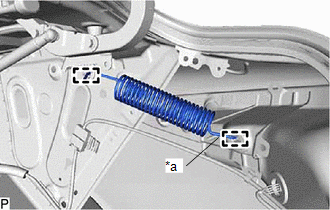
4. INSTALL LUGGAGE COMPARTMENT TRIM INNER COVER LH
(a) Engage each fastener to install the luggage compartment trim inner cover LH.
(b) Install the 2 clips.
5. INSTALL LUGGAGE COMPARTMENT TRIM INNER COVER RH
(a) Engage each fastener to install the luggage compartment trim inner cover RH.
(b) Install the 2 clips.
6. INSTALL REAR FLOOR FINISH PLATE
(a) Engage the 4 claws and 8 guides to install the rear floor finish plate as shown in the illustration.
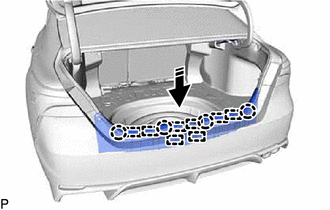
|
|
Install in this Direction |
(b) Install the 4 clips.
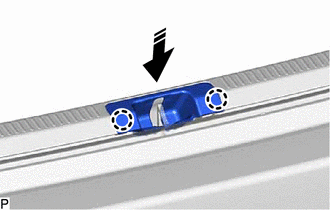
7. INSTALL LUGGAGE COMPARTMENT DOOR STRIKER COVER
(a) Engage the 2 claws to install the luggage compartment door striker cover as shown in the illustration.
|
|
Install in this Direction |
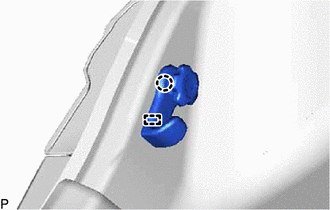
8. INSTALL NO. 1 LUGGAGE COMPARTMENT TRIM HOOK
| (a) Engage the guide and claw to install the No. 1 luggage compartment trim hook. HINT: Use the same procedure for the RH side and LH side. |
|
9. INSTALL SPARE WHEEL COVER TRAY
(a) Install the spare wheel cover tray.
10. INSTALL SPARE WHEEL COVER ASSEMBLY
(a) Install the spare wheel cover assembly.
READ NEXT:
 Disposal
DISPOSAL PROCEDURE 1. DISPOSE OF LUGGAGE COMPARTMENT DOOR SUPPORT ASSEMBLY
(a) Secure the luggage compartment door support assembly horizontally in a vise with the piston rod pulled out.
Luggage Compartment Door Weatherstrip
ComponentsCOMPONENTS ILLUSTRATION
*1 LUGGAGE COMPARTMENT DOOR WEATHERSTRIP
*2 REAR FLOOR FINISH PLATE
*3 SPARE WHEEL COVER ASSEMBLY
*4 SPARE WHEEL COVER TRA
SEE MORE:
Left Front Wheel Speed Sensor Circuit Short to Ground or Open (C050014)
DESCRIPTION Refer to DTC C050012 Click here
DTC No. Detection Item
DTC Detection Condition Trouble Area
C050014 Left Front Wheel Speed Sensor Circuit Short to Ground or Open
A short or open circuit is detected in the speed sensor signal circuit for 0.12 seconds or
Dtc Check / Clear
DTC CHECK / CLEAR CHECK FOR DTC (a) Connect the Techstream to the DLC3.
(b) Turn the ignition switch to ON. (c) Turn the Techstream on.
(d) Enter the following menus: Body Electrical / (desired system) / Trouble Codes. Body Electrical > Main Body > Trouble Codes Body Electrical > Fron
