
Toyota Camry (XV70): On-vehicle Inspection
ON-VEHICLE INSPECTION
CAUTION / NOTICE / HINT
HINT:
- Use the same procedure for the RH side and LH side.
- The following procedure is for the LH side.
PROCEDURE
1. REMOVE FRONT WHEEL
Click here
.gif)
2. SEPARATE FRONT FLEXIBLE HOSE
Click here
3. SEPARATE FRONT DISC BRAKE CALIPER ASSEMBLY
Click here
4. REMOVE FRONT DISC
except 2-Pot Caliper: Click here
for 2-Pot Caliper: Click here
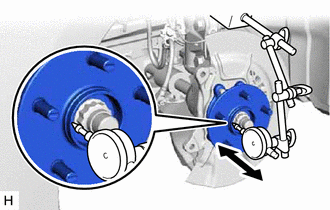
5. INSPECT FRONT AXLE HUB BEARING LOOSENESS
| (a) Using a dial indicator with magnetic base, check for looseness near the center of the front axle hub sub-assembly. Maximum Looseness: 0.05 mm (0.00196 in.) NOTICE:
HINT: If the looseness exceeds the maximum, replace the front axle hub sub-assembly. |
|
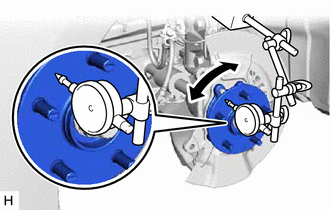
6. INSPECT FRONT AXLE HUB RUNOUT
| (a) Using a dial indicator with magnetic base, check for runout on the surface of the front axle hub sub-assembly outside the front axle hub bolts. Maximum Runout: 0.05 mm (0.00196 in.) NOTICE:
HINT: If the runout exceeds the maximum, replace the front axle hub sub-assembly. |
|
7. INSTALL FRONT DISC
except 2-Pot Caliper: Click here
for 2-Pot Caliper: Click here
8. INSTALL FRONT DISC BRAKE CALIPER ASSEMBLY
Click here
9. INSTALL FRONT FLEXIBLE HOSE
Click here
10. INSTALL FRONT WHEEL
Click here
READ NEXT:
 Removal
REMOVAL CAUTION / NOTICE / HINT
The necessary procedures (adjustment, calibration, initialization, or registration) that must be performed after parts are removed and installed, or replaced during f
Installation
INSTALLATION CAUTION / NOTICE / HINT
HINT:
Use the same procedure for the RH side and LH side.
The following procedure is for the LH side.
PROCEDURE 1. INSTALL FRONT AXLE HUB SUB-ASSEMBL
Front Axle Hub Bolt
ComponentsCOMPONENTS ILLUSTRATION
*A except 2-Pod Caliper
*B for 2-Pod Caliper
*1 FRONT AXLE HUB BOLT
*2 FRONT DISC
*3 FRONT DISC BRAKE CALIPER ASSEMBLY
SEE MORE:
Blower Motor does not Operate
DESCRIPTION If air does not flow from the front registers after the blower switch on the air conditioning control assembly is operated, the following suspected areas may be the cause.
Symptom Factor
No air flows from the registers
Air conditioning amplifier assembly malfunctio
Removal
REMOVAL CAUTION / NOTICE / HINT
The necessary procedures (adjustment, calibration, initialization or registration) that must be performed after parts are removed and installed, or replaced during park/neutral position switch assembly removal/installation are shown below. Necessary Procedures After
