Toyota Camry (XV70): On-vehicle Inspection
ON-VEHICLE INSPECTION
PROCEDURE
1. REMOVE FRONT WHEEL OPENING EXTENSION PAD RH
Click here
.gif)
2. REMOVE FRONT WHEEL OPENING EXTENSION PAD LH
Click here
3. REMOVE NO. 1 ENGINE UNDER COVER
Click here
4. REMOVE NO. 2 ENGINE UNDER COVER ASSEMBLY
Click here
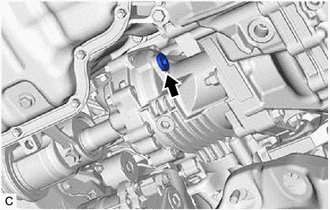
5. CHECK TRANSFER OIL
(a) Stop the vehicle on a level surface.
| (b) Using a 10 mm straight hexagon wrench and 10 x 12 mm long offset wrench, remove the transfer filler plug and gasket from the transfer assembly. |
|
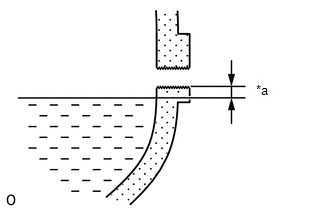
| (c) Check that the oil level is between 0 to 5 mm (0 to 0.197 in.) from the bottom lip of the transfer filler plug hole. If the result is not as specified, add transfer oil. Oil Type and Viscosity: Toyota genuine differential gear oil LT SAE 75W-85 API GL-5 or equivalent NOTICE:
|
|
(d) If the oil level is low, refill transfer oil after checking for oil leaks.
| (e) Using SST, a 10 mm straight hexagon wrench and 10 mm union nut wrench, install the transfer filler plug and a new gasket to the transfer assembly. SST: 09961-00950 Torque: Specified tightening torque : 39 N |
READ NEXT:
 Replacement
REPLACEMENT PROCEDURE 1. REMOVE FRONT WHEEL OPENING EXTENSION PAD RH
Click here
2. REMOVE FRONT WHEEL OPENING EXTENSION PAD LH Click here
3. REMOVE NO. 1 ENGINE UNDER COVER
Click h
Transfer System
PrecautionPRECAUTION
PRECAUTION (a) Before disassembling the transfer assembly, thoroughly clean it to remove any foreign matter. This will help prevent contamination inside the transfer during disa
SEE MORE:
Customize Parameters
CUSTOMIZE PARAMETERS CUSTOMIZE BLIND SPOT MONITOR SYSTEM
(a) Customizing with the Techstream
NOTICE:
When the customer requests a change in a function, first make sure that the function can be customized.
Be sure to make a note of the current settings before customizing.
When troubl
Parts Location
PARTS LOCATION ILLUSTRATION
*1 ROOF CONSOLE BOX SUB-ASSEMBLY
*2 TELEPHONE MICROPHONE ASSEMBLY
*3 ENGINE ROOM RELAY BLOCK AND JUNCTION BLOCK ASSEMBLY
- TV FUSE (for 9 Inch Display Type)
*4 INSTRUMENT PANEL JUNCTION BLOCK ASSEMBLY
- ECU-ACC FUSE - ECU-DCC
