
Toyota Camry (XV70): On-vehicle Inspection
ON-VEHICLE INSPECTION
CAUTION / NOTICE / HINT
HINT:
Refer to Problem Symptoms Table.
Click here
.gif)
PROCEDURE
1. REMOVE FRONT WHEEL OPENING EXTENSION PAD LH
Click here
2. REMOVE FRONT WHEEL OPENING EXTENSION PAD RH
Click here
3. REMOVE NO. 1 ENGINE UNDER COVER
Click here
4. REMOVE REAR ENGINE UNDER COVER LH
Click here
5. INSPECT REAR ENGINE MOUNTING INSULATOR
| (a) Disengage the clamp to separate the vacuum hose. |
|
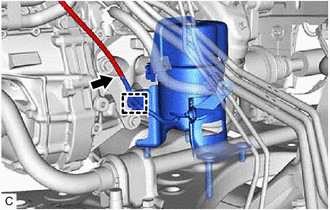
(b) Disconnect the vacuum hose.
| (c) Using a vacuum pump, apply vacuum of 80 kPa (600 mmHg, 23.6 in.Hg) and wait for 1 minute. |
|
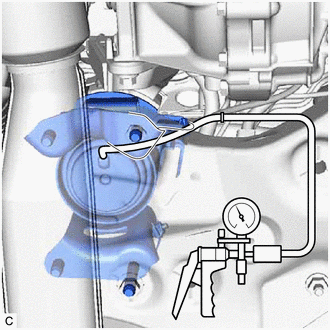
(d) Check that there is no change in the needle movement of the vacuum pump gauge.
OK:
Vacuum pressure holds.
(e) Check that there is no fluid leakage caused by a break in the diaphragm.
(f) Connect the vacuum hose.
(g) Engage the clamp to install the vacuum hose.
6. INSTALL REAR ENGINE UNDER COVER LH
Click here
7. INSTALL NO. 1 ENGINE UNDER COVER
Click here
8. INSTALL FRONT WHEEL OPENING EXTENSION PAD LH
Click here
9. INSTALL FRONT WHEEL OPENING EXTENSION PAD RH
Click here
READ NEXT:
 Removal
REMOVAL CAUTION / NOTICE / HINT
The necessary procedures (adjustment, calibration, initialization, or registration) that must be performed after parts are removed and installed, or replaced during r
Installation
INSTALLATION PROCEDURE 1. INSTALL REAR ENGINE MOUNTING INSULATOR
(a) Engage the clamp and install the vacuum hose to the rear engine mounting insulator.
(b) Install the wire harness clamp bracket
SEE MORE:
Washer Level Warning Switch
ComponentsCOMPONENTS ILLUSTRATION
*1 LEVEL WARNING SWITCH ASSEMBLY
- - RemovalREMOVAL CAUTION / NOTICE / HINT
The necessary procedures (adjustment, calibration, initialization or registration) that must be performed after parts are removed and installed, or replaced dur
Door Control Switch
ComponentsCOMPONENTS ILLUSTRATION
*1 DOOR CONTROL SWITCH ASSEMBLY
*2 POWER WINDOW REGULATOR SWITCH ASSEMBLY WITH FRONT DOOR UPPER ARMREST BASE PANEL RemovalREMOVAL PROCEDURE
1. REMOVE POWER WINDOW REGULATOR SWITCH ASSEMBLY WITH FRONT DOOR UPPER ARMREST BASE PANEL
Click here 2.
