Toyota Camry (XV70): Rear Brake Flexible Hose (w/o Electric Parking Brake System)
Components
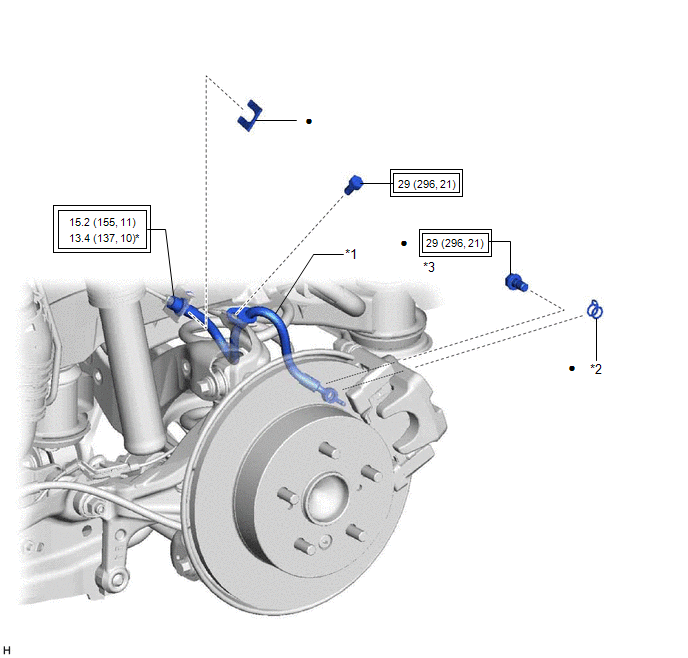
COMPONENTS
ILLUSTRATION
|
*1 | REAR FLEXIBLE HOSE |
*2 | GASKET |
|
*3 | UNION BOLT |
- | - |
.png) |
Tightening torque for "Major areas involving basic vehicle performance such as moving/turning/stopping" : N*m (kgf*cm, ft.*lbf) |
* | For use with a union nut wrench |
|
● | Non-reusable part |
- | - |
Removal
REMOVAL
CAUTION / NOTICE / HINT
NOTICE:
If both left and right rear flexible hoses are disconnected at the same time, be sure to place an identification mark on each hose to indicate its installation position.
HINT:
- Use the same procedure for the RH side and LH side.
- The following procedure is for the LH side.
PROCEDURE
1. REMOVE REAR WHEEL
Click here .gif)
2. DRAIN BRAKE FLUID
NOTICE:
If brake fluid leaks onto any painted surface, immediately wash it off.
3. REMOVE REAR FLEXIBLE HOSE
| (a) Remove the union bolt and gasket, and disconnect the rear flexible hose from the rear disc brake cylinder assembly. |
|

| (b) Remove the bolt and separate the rear flexible hose from the rear flexible hose bracket. |
|
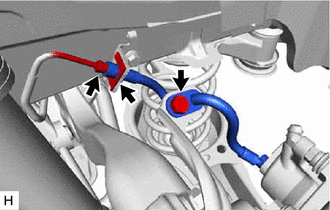
(c) Using a union nut wrench, disconnect the brake line while holding the rear flexible hose with a wrench.
NOTICE:
- Do not kink or damage the brake line.
- Do not allow any foreign matter such as dirt or dust to enter the brake line from the connecting parts.
(d) Remove the clip and rear flexible hose from the vehicle body.
Installation
INSTALLATION
CAUTION / NOTICE / HINT
NOTICE:
When reusing the rear flexible hoses, use the identification marks created during removal to install each rear flexible hose to its original position.
HINT:
- Use the same procedure for the RH side and LH side.
- The following procedure is for the LH side.
PROCEDURE
1. INSTALL REAR FLEXIBLE HOSE
NOTICE:
When installing the rear flexible hose, minimize twisting of the hose.
| (a) Install the rear flexible hose with a new clip. NOTICE:
|
|
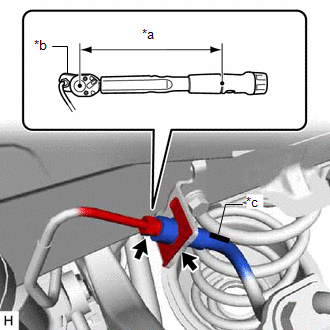
(b) Using a union nut wrench, connect the brake line to the rear flexible hose while holding the rear flexible hose with a wrench.
Torque:
Specified tightening torque :
15.2 N
READ NEXT:
 Components
COMPONENTS ILLUSTRATION
*1 NO. 2 PARKING BRAKE WIRE ASSEMBLY
*2 REAR DISC BRAKE ANTI-SQUEAL SHIM KIT
*3 REAR DISC BRAKE PAD
*4 REAR DISC BRAKE CYLINDER ASSEMBLY
Removal
REMOVAL CAUTION / NOTICE / HINT
NOTICE:
Immediately after installing the brake pads, the braking performance may be reduced. Always perform a road test in a safe place while paying attention to
SEE MORE:
Removal
REMOVAL CAUTION / NOTICE / HINT
HINT:
Use the same procedure for the RH side and LH side.
The following procedure is for the LH side.
The front speed sensor rotor is a component of the front axle hub sub-assembly. If the front speed sensor rotor is malfunctioning, replace the front axl
If the engine will not
start
If the engine will not start even though correct starting procedures
are being followed consider each of the following
points:
The engine will not start even though the starter motor operates
normally.
One of the following may be the cause of the problem:
There may not be sufficient fuel in
