Toyota Camry (XV70): Removal
REMOVAL
CAUTION / NOTICE / HINT
HINT:
- Use the same procedure for the RH side and LH side.
- The following procedure is for the LH side.
PROCEDURE
1. DISCONNECT FRONT DOOR OPENING TRIM WEATHERSTRIP
Click here .gif)
2. REMOVE FRONT PILLAR GARNISH
Click here
3. REMOVE NO. 1 INSTRUMENT PANEL SPEAKER PANEL
Click here
4. REMOVE FRONT NO. 2 SPEAKER ASSEMBLY
NOTICE:
Do not touch the speaker cone.
| (a) Remove the 2 screws. |
|
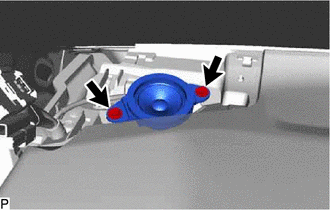
(b) Lift the front No. 2 speaker assembly and disconnect the connector to remove it.
READ NEXT:
 Inspection
INSPECTION PROCEDURE 1. INSPECT FRONT NO. 2 SPEAKER ASSEMBLY (for 6 Speakers)
(a) With the speaker installed, check that there is no looseness or other abnormalities.
(b) Check that there is no fo
Installation
INSTALLATION CAUTION / NOTICE / HINT
HINT:
Use the same procedure for the RH side and LH side.
The following procedure is for the LH side.
PROCEDURE 1. INSTALL FRONT NO. 2 SPEAKER ASSEMB
Microphone
ComponentsCOMPONENTS ILLUSTRATION
*A for Normal Roof
*B except Normal Roof
*1 ROOF CONSOLE BOX ASSEMBLY
*2 TELEPHONE MICROPHONE ASSEMBLY
*3 ROOF CONSOLE
SEE MORE:
Front Brake Flexible Hose
ComponentsCOMPONENTS ILLUSTRATION
*1 FRONT FLEXIBLE HOSE
*2 GASKET
*3 BRAKE LINE
*4 FRONT SPEED SENSOR
*5 UNION BOLT
- -
Tightening torque for "Major areas involving basic vehicle performance such as moving/turning/stopping" : N*
Components
COMPONENTS ILLUSTRATION
*1 NO. 1 VACUUM SWITCHING VALVE ASSEMBLY (for ACIS)
*2 VACUUM HOSE SUB-ASSEMBLY
*3 V-BANK COVER SUB-ASSEMBLY
- -
N*m (kgf*cm, ft.*lbf): Specified torque
- -
© 2023-2026 Copyright www.tocamry.com
