
Toyota Camry (XV70): Removal
REMOVAL
PROCEDURE
1. RECOVER REFRIGERANT FROM REFRIGERATION SYSTEM
Click here .gif)
2. REMOVE PIPING CLAMP (for Suction Hose Sub-assembly Side)
(a) for A25A-FKS:
(1) While pressing the end of the suction hose sub-assembly into the end of the suction pipe sub-assembly, use pliers to squeeze together both sides of the piping clamp until it breaks apart.
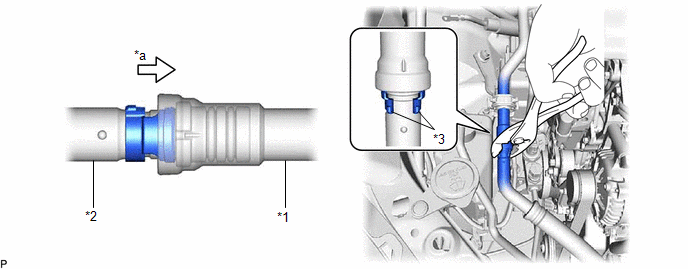
|
*1 | Suction Pipe Sub-assembly |
*2 | Suction Hose Sub-assembly |
|
*3 | Piping Clamp |
- | - |
|
*a | Press In |
- | - |
NOTICE:
- If any foreign matter is adhered to the connected parts, brush it off or use compressed air to remove it.
- Make sure that fragments of the piping clamp do not enter the piping.
(2) Separate the suction hose sub-assembly.
NOTICE:
Remove any foreign matter from the connecting parts of the suction hose sub-assembly and suction pipe sub-assembly.
(3) Remove the 2 O-rings from the suction hose sub-assembly.
NOTICE:
Seal the openings of the disconnected parts with vinyl tape to prevent entry of moisture and foreign matter.
(4) Remove the piping clamp.
(b) for 2GR-FKS:
(1) While pressing the end of the suction hose sub-assembly into the end of the No. 2 air conditioner tube and accessory assembly, use pliers to squeeze together both sides of the piping clamp until it breaks apart.
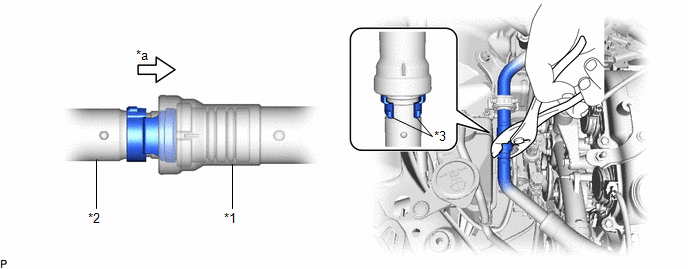
|
*1 | No. 2 Air Conditioner Tube and Accessory Assembly |
*2 | Suction Hose Sub-assembly |
|
*3 | Piping Clamp |
- | - |
|
*a | Press In |
- | - |
NOTICE:
- If any foreign matter is adhered to the connected parts, brush it off or use compressed air to remove it.
- Make sure that fragments of the piping clamp do not enter the piping.
(2) Separate the suction hose sub-assembly.
NOTICE:
Remove any foreign matter from the connecting parts of the suction hose sub-assembly and No. 2 air conditioner tube and accessory assembly.
(3) Remove the 2 O-rings from the suction hose sub-assembly.
NOTICE:
Seal the openings of the disconnected parts with vinyl tape to prevent entry of moisture and foreign matter.
(4) Remove the piping clamp.
3. REMOVE PIPING CLAMP (for 2GR-FKS)
| (a) Install SST to the piping clamp as shown in the illustration. SST: 09870-00025 |
|
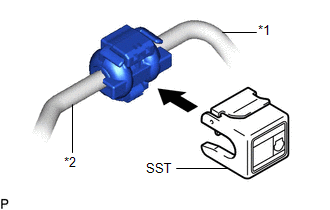
| (b) Hold the No. 2 air conditioner tube and accessory assembly and air conditioner tube and accessory assembly with each hand and push in SST with both thumbs. NOTICE: Do not apply excessive force to the No. 2 air conditioner tube and accessory assembly or air conditioner tube and accessory assembly as they may bend. |
|
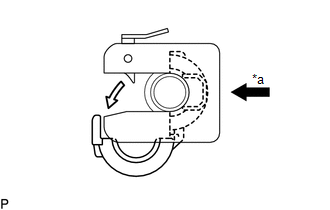
| (c) Raise the stopper of SST and remove SST and the piping clamp together from the No. 2 air conditioner tube and accessory assembly. |
|
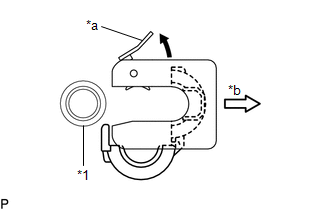
(d) Remove the piping clamp from SST.
(e) Disconnect the air conditioner tube and accessory assembly from the No. 2 air conditioner tube and accessory assembly.
(f) Remove the 2 O-rings from the air conditioner tube and accessory assembly.
NOTICE:
Seal the openings of the disconnected parts using vinyl tape to prevent entry of moisture and foreign matter.
4. REMOVE PIPING CLAMP (for Air Conditioning Tube and Accessory Assembly Side)
Click here
READ NEXT:
SEE MORE:
 Fail-safe Chart
FAIL-SAFE CHART FAIL-SAFE FUNCTION (a) When a malfunction occurs in the road sign assist system, a message will be displayed on the multi-information display and the road sign assist system will be disabled, depending on the malfunction.
Warning Message Malfunction Status
Fail-safe Oper
Emission inspection and
maintenance (I/M)
programs
Some states have vehicle emission inspection programs which
include OBD (On Board Diagnostics) checks. The OBD system
monitors the operation of the emission control system.
If the malfunction indicator lamp comes on
The OBD system determines that a problem exists somewhere in the
emission contr
