
Toyota Camry (XV70): Components
COMPONENTS
ILLUSTRATION
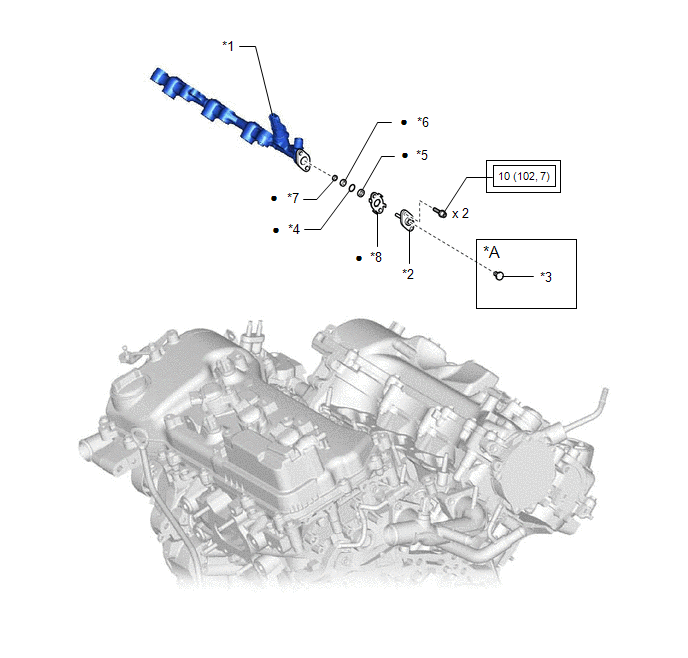
|
*A | w/ Dust Cap |
- | - |
|
*1 | FUEL PRESSURE SENSOR (FUEL DELIVERY PIPE WITH SENSOR ASSEMBLY LH) |
*2 | FUEL PIPE PLUG SUB-ASSEMBLY |
|
*3 | DUST CAP SUB-ASSEMBLY |
*4 | O-RING |
|
*5 | NO. 1 FUEL INJECTOR BACK-UP RING |
*6 | NO. 2 FUEL INJECTOR BACK-UP RING |
|
*7 | NO. 3 FUEL INJECTOR BACK-UP RING |
*8 | GASKET |
.png) |
Tightening torque for "Major areas involving basic vehicle performance such as moving/turning/stopping": N*m (kgf*cm, ft.*lbf) |
● | Non-reusable part |
READ NEXT:
 Removal
REMOVAL CAUTION / NOTICE / HINT
The necessary procedures (adjustment, calibration, initialization or registration) that must be performed after parts are removed and installed, or replaced during fu
Inspection
INSPECTION PROCEDURE 1. INSPECT FUEL PRESSURE SENSOR (FUEL DELIVERY PIPE WITH SENSOR ASSEMBLY LH)
NOTICE:
Do not remove the fuel pressure sensor from the fuel delivery pipe with sensor assembly
Installation
INSTALLATION PROCEDURE 1. INSTALL FUEL PIPE PLUG SUB-ASSEMBLY
(a) Install a new O-ring, No. 1 fuel injector back-up ring, No. 2 fuel injector back-up ring and No. 3 fuel injector back-up ring to the
SEE MORE:
Master Module Horizontal Axis Misalignment (C1AC1)
DESCRIPTION This DTC is stored when the angle of the blind spot monitor sensor RH deviates more than the allowable range from the horizontal axis.
HINT:
If a drum tester such as a speedometer tester, brake/speedometer combination tester or chassis dynamometer is used with the blind spot monito
Diagnosis System
DIAGNOSIS SYSTEM DESCRIPTION (a) Blind spot monitor data and Diagnostic Trouble Codes (DTCs) can be read from the Data Link Connector 3 (DLC3) of the vehicle. When the system seems to be malfunctioning, use the Techstream to check for malfunctions and perform repairs.
CHECK DLC3 (a) Check the DLC3
© 2023-2026 Copyright www.tocamry.com
