
Toyota Camry (XV70): Components
COMPONENTS
ILLUSTRATION
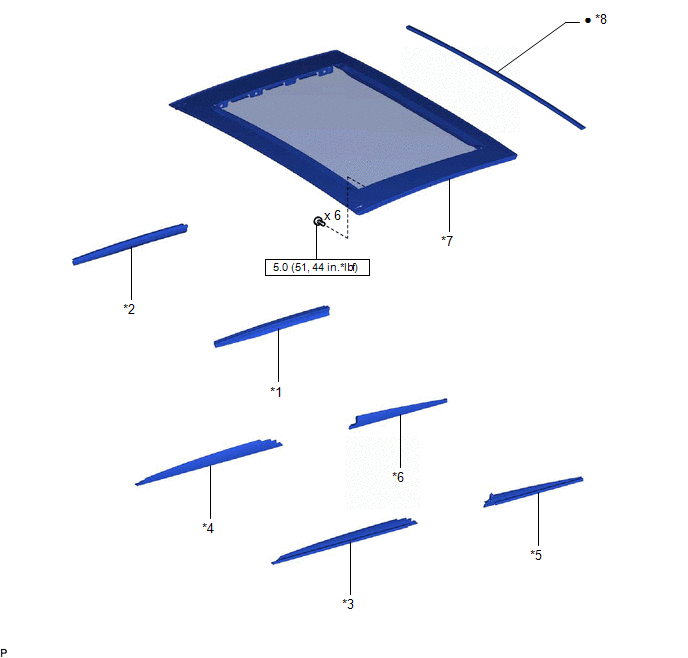
|
*1 | NO. 2 SLIDING ROOF SIDE GARNISH LH |
*2 | NO. 2 SLIDING ROOF SIDE GARNISH RH |
|
*3 | NO. 3 SLIDING ROOF SIDE GARNISH LH |
*4 | NO. 3 SLIDING ROOF SIDE GARNISH RH |
|
*5 | NO. 4 SLIDING ROOF SIDE GARNISH LH |
*6 | NO. 4 SLIDING ROOF SIDE GARNISH RH |
|
*7 | SLIDING ROOF GLASS SUB-ASSEMBLY |
*8 | SLIDING ROOF WEATHERSTRIP |
.png) |
N*m (kgf*cm, ft.*lbf): Specified torque |
● | Non-reusable part |
ILLUSTRATION
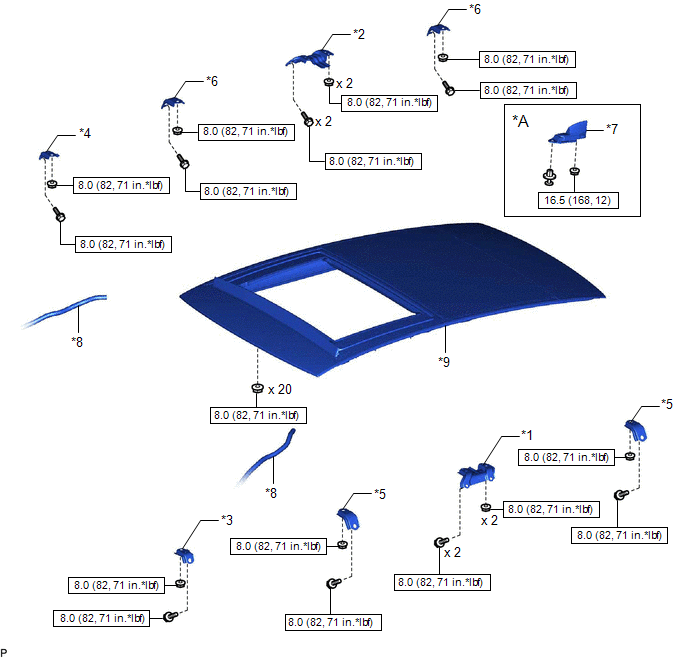
|
*A | w/ Manual (SOS) Switch |
- | - |
|
*1 | CENTER SLIDING ROOF HOUSING MOUNTING BRACKET LH |
*2 | CENTER SLIDING ROOF HOUSING MOUNTING BRACKET RH |
|
*3 | FRONT SLIDING ROOF HOUSING MOUNTING BRACKET LH |
*4 | FRONT SLIDING ROOF HOUSING MOUNTING BRACKET RH |
|
*5 | REAR SLIDING ROOF HOUSING MOUNTING BRACKET LH |
*6 | REAR SLIDING ROOF HOUSING MOUNTING BRACKET RH |
|
*7 | ROOF ANTENNA ASSEMBLY |
*8 | SLIDING ROOF DRAIN HOSE |
|
*9 | SLIDING ROOF HOUSING ASSEMBLY |
- | - |
|
|
N*m (kgf*cm, ft.*lbf): Specified torque |
- | - |
ILLUSTRATION
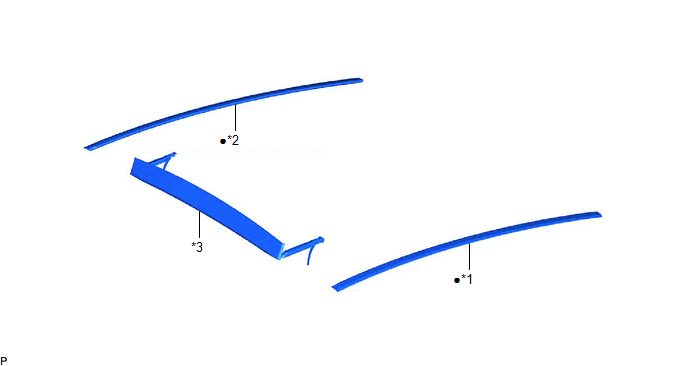
|
*1 | NO. 1 SLIDING ROOF SIDE GARNISH LH |
*2 | NO. 1 SLIDING ROOF SIDE GARNISH RH |
|
*3 | ROOF WIND DEFLECTOR PANEL SUB-ASSEMBLY |
- | - |
|
● | Non-reusable part |
- | - |
ILLUSTRATION
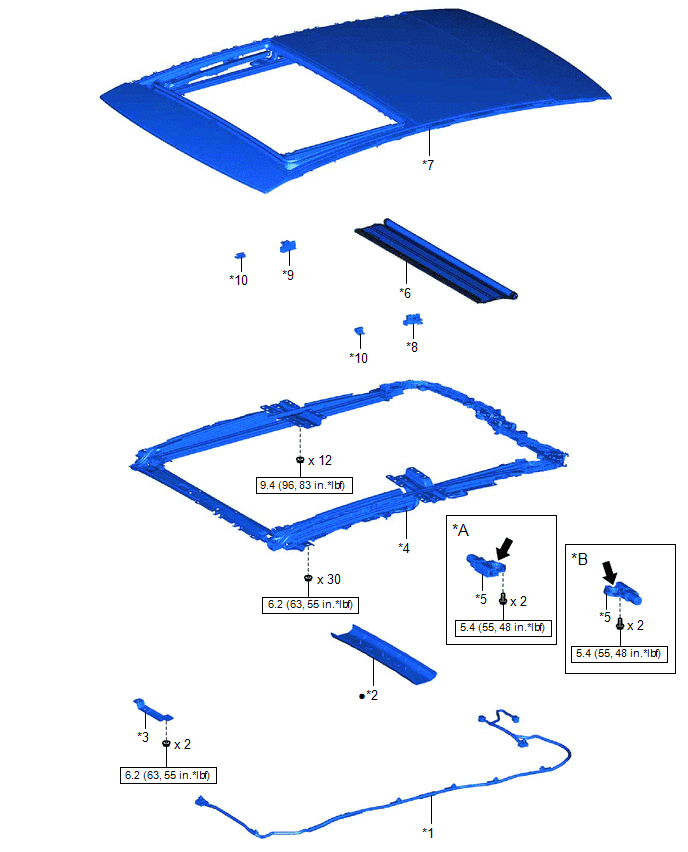
|
*A | for Roof Sunshade |
*B | for Sliding Roof Glass |
|
*1 | NO. 2 ROOF WIRE |
*2 | REAR SLIDING ROOF GARNISH |
|
*3 | ROOM LIGHT BRACKET |
*4 | SLIDE ROOF RAIL SUB-ASSEMBLY |
|
*5 | SLIDING ROOF DRIVE GEAR ASSEMBLY |
*6 | SUNSHADE TRIM SUB-ASSEMBLY |
|
*7 | SLIDING ROOF HOUSING PANEL |
*8 | SLIDING ROOF SUNSHADE GUIDE LH |
|
*9 | SLIDING ROOF SUNSHADE GUIDE RH |
*10 | SLIDING ROOF SUNSHADE RUNNER |
|
|
N*m (kgf*cm, ft.*lbf): Specified torque |
● | Non-reusable part |
.png) |
MP grease | - |
- |
READ NEXT:
 Removal
REMOVAL CAUTION / NOTICE / HINT
The necessary procedures (adjustment, calibration, initialization or registration) that must be performed after parts are removed and installed, or replaced during s
Disassembly
DISASSEMBLY PROCEDURE 1. REMOVE NO. 1 SLIDING ROOF SIDE GARNISH LH
(a) Using a heat light, heat the No. 1 sliding roof side garnish LH. Heating Temperature
Item Temperature
No. 1
Reassembly
REASSEMBLY PROCEDURE 1. INSTALL SUNSHADE TRIM SUB-ASSEMBLY
(a) Install the sunshade trim sub-assembly as shown in the illustration.
*A RH Side
*B LH Side
*a Re
SEE MORE:
Installation
INSTALLATION CAUTION / NOTICE / HINT
HINT:
Use the same procedure for the RH side and LH side.
The following procedure is for the LH side.
PROCEDURE 1. INSTALL SIDE TURN SIGNAL LIGHT ASSEMBLY
(a) for Type A: (1) Connect the connector. (2) Engage the 2 guides.
(3) Engage the
Pressure Control Solenoid "H" Circuit Short to Battery (P281612)
DESCRIPTION Changing gears is performed by the ECM turning the solenoid (SL1, SL2, SL3, SL4, SL5 and SL6) valves on and off.
If an open or short occurs in any of the solenoid valve circuits, the ECM controls the remaining normal solenoid valves to allow the vehicle to be driven. If all of the sole
