Toyota Camry (XV70): Disassembly
DISASSEMBLY
CAUTION / NOTICE / HINT
NOTICE:
Before installation of each part, thoroughly clean and dry it. Then apply grease or oil as necessary. Do not use alkaline chemicals to clean aluminum parts, rubber parts or precoated bolts. Also, do not use non-residue solvent or other cleaning oils to clean O-rings, oil seals or rubber parts.
PROCEDURE
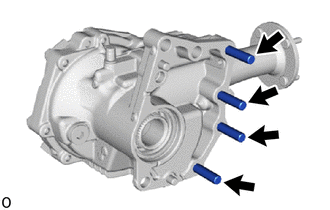
1. REMOVE TRANSFER AND TRANSAXLE SETTING STUD BOLT
| (a) Using 2 nuts, remove the 4 transfer and transaxle setting stud bolts. |
|
2. SECURE TRANSFER ASSEMBLY
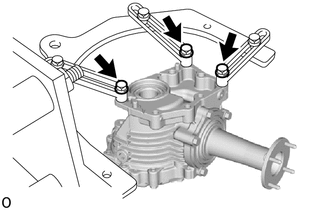
(a) Secure the transfer assembly to the overhaul attachment.
3. REMOVE TRANSFER CASE STRAIGHT PIN
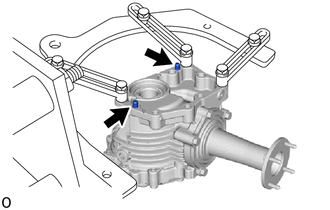
(a) Remove the 2 transfer case straight pins.
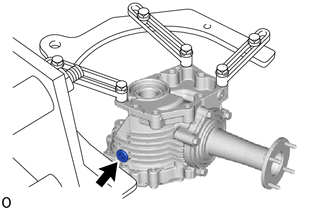
4. REMOVE NO. 1 TRANSFER CASE PLUG
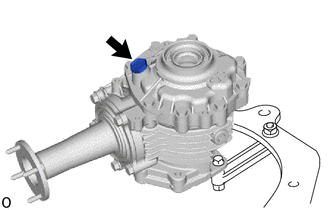
(a) Remove the No. 1 transfer case plug and gasket.
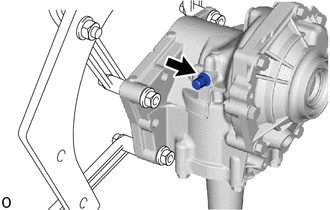
5. REMOVE TRANSFER DRAIN PLUG
(a) Using a 10 mm socket hexagon wrench, remove the transfer drain plug and gasket.
6. REMOVE TRANSFER FILLER PLUG
(a) Using a 10 mm socket hexagon wrench, remove the transfer filler plug and gasket.
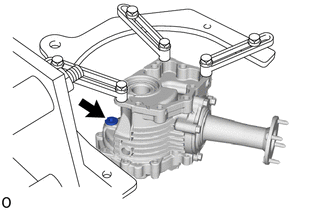
7. REMOVE TRANSFER CASE BREATHER PLUG
(a) Using a chisel and hammer, slightly pry out the transfer case breather plug.
(b) Using a screwdriver, lightly pry up and remove the transfer case breather plug.
8. REMOVE TRANSFER CASE OIL SEAL
Click here
.gif)
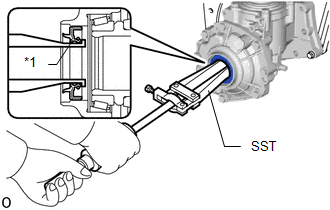
9. REMOVE TRANSFER CASE OIL SEAL RH
|
*1 | Transfer Case Oil Seal RH |
(a) Using SST, remove the transfer case oil seal RH from the No. 1 transfer case cover.
SST: 09308-00010
NOTICE:
Do not scratch the press-fitting surface of the transfer case oil seal RH.
10. INSPECT TOTAL PRELOAD
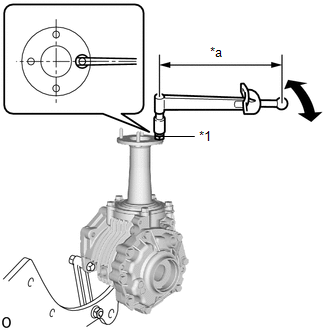
|
*1 | Double Nut |
|
*a | Torque Wrench Fulcrum Length |
(a) Install the double nut to the transfer output shaft stud bolt and set the torque wrench into place.
HINT:
Adjust the double nut until the torque wrench is straight.
(b) Using a torque wrench, check the total preload (starting torque) with the teeth of the drive pinion and ring gear in contact.
Torque:
Total preload (starting torque) :
0.87-2.85 N
READ NEXT:
 Reassembly
REASSEMBLY CAUTION / NOTICE / HINT
NOTICE: Steps 9 to 16 are temporary reassembly procedures for adjustment purposes. PROCEDURE
1. INSTALL BREATHER OIL DEFLECTOR
(a) Install a new breather oil
Installation
INSTALLATION PROCEDURE 1. INSTALL TRANSFER ASSEMBLY
(a) Using SST and a 17 mm union nut wrench, install the transfer assembly to the automatic transaxle assembly with the 8 nuts.
SST: 09961-0
SEE MORE:
On-vehicle Inspection
ON-VEHICLE INSPECTION CAUTION / NOTICE / HINT
NOTICE: If the battery is weak or if the engine is difficult to start, recharge the battery and perform inspections again before returning the vehicle to the customer. PROCEDURE
1. CHECK BATTERY CONDITION (a) Check the battery for damage or deformati
Panoramic Moon Roof System does not Operate
DESCRIPTION The sliding roof ECU (sliding roof drive gear assembly) and roof sunshade ECU (sliding roof drive gear assembly) receive each other's position information from the main body ECU (multiplex network body ECU) via LIN communication.
The sliding roof ECU (sliding roof drive gear assembly)
