Toyota Camry (XV70): Hood
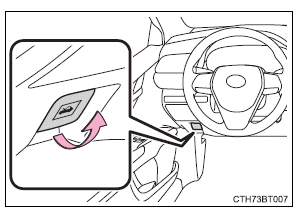
Release the lock from the inside of the vehicle to open the hood.
1. Pull the hood lock release lever.
The hood will pop up slightly.
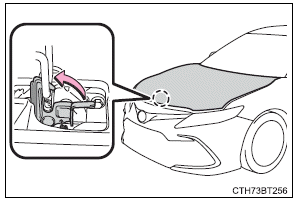
2. Pull up the auxiliary catch lever and lift the hood.
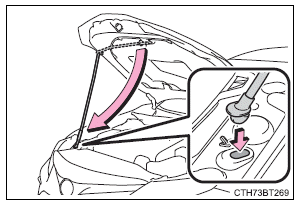
3. Hold the hood open by inserting the support rod into the slot.
■Open hood warning buzzer
If the vehicle reaches a speed of 3 mph (5 km/h), the master warning light flashes and a buzzer sounds to indicate that the hood is not fully closed.
WARNING
■Pre-driving check
Check that the hood is fully closed and locked.
If the hood is not locked properly, it may open while the vehicle is in motion and cause an accident, which may result in death or serious injury.
■After installing the support rod into the slot
Make sure the rod supports the hood securely preventing it from falling down onto your head or body.
NOTICE
■When closing the hood
Be sure to return the support rod to its clip before closing the hood. Closing the hood with the support rod not clipped could cause the hood to bend.
READ NEXT:
 Positioning a floor jack
When using a floor jack, follow the instructions in the manual
provided with the jack and perform the operation safely.
When raising your vehicle with a floor jack, position the jack correctly.
Engine compartment
2.5 L 4-cylinder (A25A-FKS) engine
Fuse boxes (if equipped)
Engine oil filler cap
Engine oil level dipstick
Brake fluid reservoir
Battery
Radiator
Electric cooling fan
Condenser
Engine oil
With the engine at operating temperature and turned off, check the oil
level on the dipstick.
■ Checking the engine oil
1. Park the vehicle on level ground. After warming up the engine
and turni
SEE MORE:
Speaker Output Short (B15C3)
DESCRIPTION This DTC is stored when a malfunction occurs in the speakers.
DTC No. Detection Item
DTC Detection Condition Trouble Area
B15C3 Speaker Output Short
A short is detected in the speaker output circuit
Harness or connector
Speaker
Radio
Components
COMPONENTS ILLUSTRATION
*1 NO. 1 FLOOR UNDER COVER
*2 NO. 2 FLOOR UNDER COVER
N*m (kgf*cm, ft.*lbf): Specified torque
- - ILLUSTRATION
*A w/ Fuel Outlet Valve Assembly
*B w/o Fuel Outlet Valve Assembly
*1 FUEL TANK ASSEMBLY
