
Toyota Camry (XV70): Installation
INSTALLATION
PROCEDURE
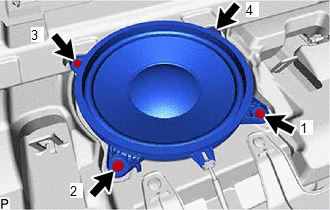
1. INSTALL REAR STEREO COMPONENT SPEAKER ASSEMBLY
NOTICE:
Do not touch the speaker cone.
(a) Connect the connector.
(b) Engage the guide to temporarily install the rear stereo component speaker assembly.
| (c) Install the rear stereo component speaker assembly with the 4 bolts. HINT: Install the bolts in the order shown in the illustration. |
|
2. INSTALL PACKAGE TRAY TRIM PANEL ASSEMBLY
Click here
.gif)
3. INSTALL REAR SEAT SHOULDER BELT HOLE COVER
Click here
4. INSTALL CENTER STOP LIGHT SET
Click here
5. CONNECT REAR SEAT OUTER BELT ASSEMBLY LH
Click here
6. CONNECT REAR SEAT OUTER BELT ASSEMBLY RH
HINT:
Use the same procedure as for the LH side.
7. INSTALL INNER ROOF SIDE GARNISH LH
Click here
8. INSTALL INNER ROOF SIDE GARNISH RH
HINT:
Use the same procedure as for the LH side.
9. INSTALL REAR SIDE SEATBACK ASSEMBLY LH
Click here
10. INSTALL REAR DOOR OPENING TRIM WEATHERSTRIP LH
Click here
11. INSTALL REAR SIDE SEATBACK ASSEMBLY RH
HINT:
Use the same procedure as for the LH side.
12. INSTALL REAR DOOR OPENING TRIM WEATHERSTRIP RH
HINT:
Use the same procedure as for the LH side.
13. INSTALL REAR SEAT CUSHION LOCK HOOK
Click here
14. INSTALL REAR SEAT CUSHION ASSEMBLY
Click here
15. CONNECT CABLE TO NEGATIVE BATTERY TERMINAL
for A25A-FKS:
Click here
for 2GR-FKS:
Click here
16. PERFORM DIAGNOSTIC SYSTEM CHECK
Click here
17. INSPECT SRS WARNING LIGHT
Click here
READ NEXT:
 Components
COMPONENTS ILLUSTRATION
*A except Panoramic Moon Roof
- -
*1 ROOF ANTENNA ASSEMBLY
*2 ROOF ANTENNA ASSEMBLY WITH COVER
*3 COVER
*4 WASHER AND HO
Removal
REMOVAL CAUTION / NOTICE / HINT
The necessary procedures (adjustment, calibration, initialization, or registration) that must be performed after parts are removed and installed, or replaced during r
SEE MORE:
Installation
INSTALLATION PROCEDURE 1. INSTALL HOOD LOCK CONTROL CABLE ASSEMBLY
(a) Pass the hood lock control cable assembly into the engine compartment.
(b) Engage the grommet. (c) Engage the 4 clamps to install the hood lock control cable assembly.
(d) Engage the clamp. 2. INSTALL HOOD LOCK CONTROL L
Installation
INSTALLATION PROCEDURE 1. INSTALL CAMSHAFT TIMING GEAR BOLT
(a) Make sure that the No. 1 cylinder is at TDC/compression. HINT:
Check that the cutout of the camshaft timing gear assembly is at the top and align the timing mark (cutout) of the crankshaft pulley with the timing mark on the timing c
