
Toyota Camry (XV70): Replacement
REPLACEMENT
CAUTION / NOTICE / HINT
The necessary procedures (adjustment, calibration, initialization or registration) that must be performed after parts are removed and installed, or replaced during transfer case oil seal RH removal/installation are shown below.
Necessary Procedures After Parts Removed/Installed/Replaced|
Replaced Part or Performed Procedure |
Necessary Procedure | Effect/Inoperative Function when Necessary Procedure not Performed |
Link |
|---|---|---|---|
|
*1: w/ Electric Parking Brake System
*2: w/o Electric Parking Brake System | |||
|
Replacement of automatic transaxle fluid |
ATF thermal degradation estimate reset |
The value of the Data List item "ATF Thermal Degradation Estimate" is not estimated correctly. |
|
|
Front wheel alignment adjustment |
|
|
|
PROCEDURE
1. REMOVE FRONT WHEEL OPENING EXTENSION PAD RH
Click here
.gif)
2. REMOVE FRONT WHEEL OPENING EXTENSION PAD LH
Click here
3. REMOVE NO. 1 ENGINE UNDER COVER
Click here
4. REMOVE NO. 2 ENGINE UNDER COVER ASSEMBLY
Click here
5. REMOVE FRONT DRIVE SHAFT ASSEMBLY RH
Click here
6. REMOVE DRIVE SHAFT BEARING BRACKET
Click here
7. REMOVE TRANSFER CASE OIL SEAL RH
| (a) Using SST, remove the transfer case oil seal RH from the transfer assembly. SST: 09308-00010 NOTICE: Do not scratch the press-fitting surface of the transfer case oil seal RH. |
|
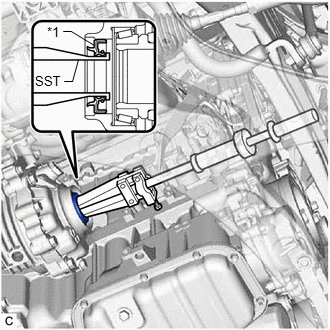
8. INSTALL TRANSFER CASE OIL SEAL RH
(a) Coat the lip of a new transfer case oil seal RH with MP grease.
| (b) Using SST and a hammer, tap in the transfer case oil seal RH to the transfer assembly as shown in the illustration. SST: 09631-32020 SST: 09950-60021 09951-00680 SST: 09950-70010 09951-07360 Drive in depth (A): 7.5 to 8.5 mm (0.296 to 0.334 in.) NOTICE:
|
|
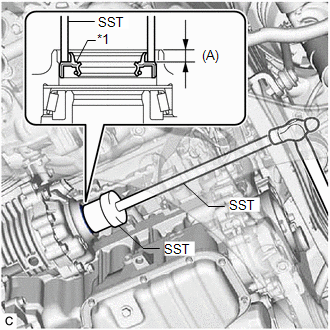
9. INSTALL DRIVE SHAFT BEARING BRACKET
Click here
10. INSTALL FRONT DRIVE SHAFT ASSEMBLY RH
Click here
11. INSTALL NO. 2 ENGINE UNDER COVER ASSEMBLY
Click here
12. INSTALL NO. 1 ENGINE UNDER COVER
Click here
13. INSTALL FRONT WHEEL OPENING EXTENSION PAD LH
Click here
14. INSTALL FRONT WHEEL OPENING EXTENSION PAD RH
Click here
READ NEXT:
 Components
COMPONENTS ILLUSTRATION
*1 FRONT WHEEL OPENING EXTENSION PAD RH
*2 FRONT WHEEL OPENING EXTENSION PAD LH
*3 NO. 1 ENGINE UNDER COVER
*4 NO. 2 ENGINE UNDER COVER AS
On-vehicle Inspection
ON-VEHICLE INSPECTION PROCEDURE
1. REMOVE FRONT WHEEL OPENING EXTENSION PAD RH Click here
2. REMOVE FRONT WHEEL OPENING EXTENSION PAD LH
Click here
3. REMOVE NO. 1 ENGINE UNDER COV
SEE MORE:
Display does not Dim when Light Control Switch is Turned ON
CAUTION / NOTICE / HINT
NOTICE:
Depending on the parts that are replaced during vehicle inspection or maintenance, performing initialization, registration or calibration may be needed. Refer to Precaution for Audio and Visual System.
Click here
When replacing the radio and display
Readiness Monitor Drive Pattern
READINESS MONITOR DRIVE PATTERN PURPOSE OF READINESS TESTS
The On-Board Diagnostic (OBD II) system is designed to monitor the performance of emission related components, and indicate any detected abnormalities using DTCs (Diagnostic Trouble Codes). Since various components need to be monitored
