
Toyota Camry (XV70): Washer Motor
Components
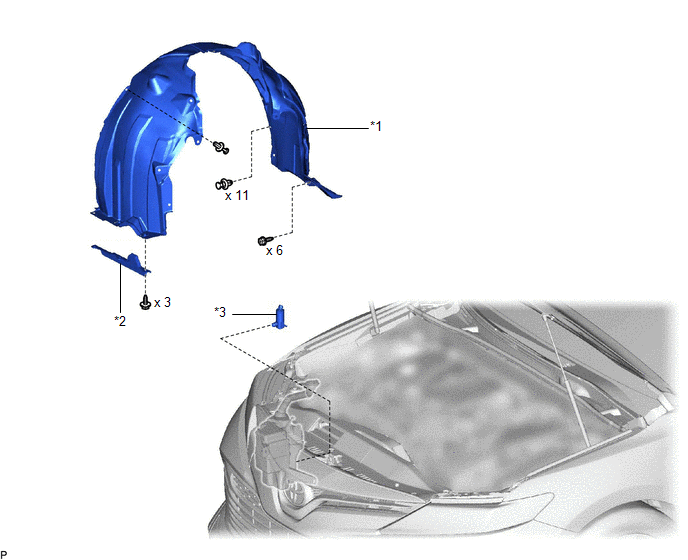
COMPONENTS
ILLUSTRATION
|
*1 | FRONT FENDER LINER RH |
*2 | FRONT WHEEL OPENING EXTENSION PAD RH |
|
*3 | WINDSHIELD WASHER MOTOR AND PUMP ASSEMBLY |
- | - |
Removal
REMOVAL
PROCEDURE
1. REMOVE FRONT WHEEL RH
Click here
.gif)
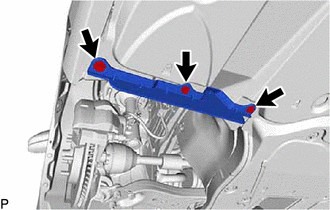
2. REMOVE FRONT WHEEL OPENING EXTENSION PAD RH
| (a) Remove the 3 screws and front wheel opening extension pad RH. |
|
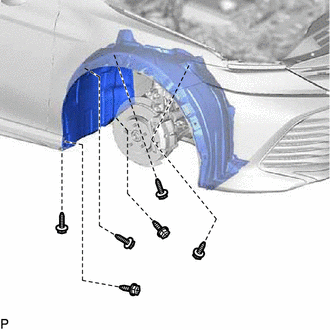
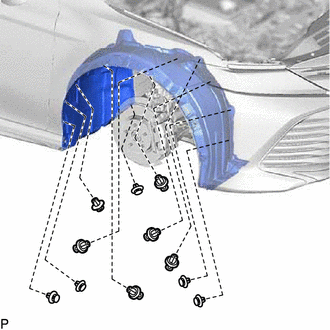
3. REMOVE FRONT FENDER LINER RH
| (a) Remove the 6 screws. |
|
| (b) Remove the clip. |
|
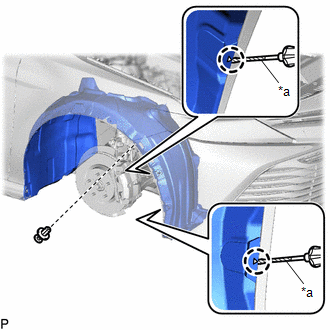
(c) Using a screwdriver, disengage the 2 claws.
HINT:
Tape the screwdriver tip before use.
| (d) Remove the 11 clips and front fender liner RH. |
|
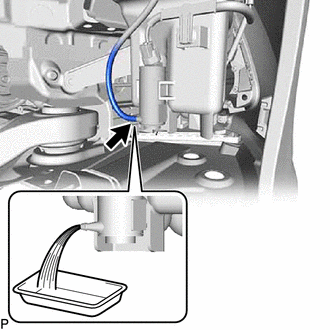
4. DRAIN WASHER FLUID
| (a) Disconnect the washer hose from the windshield washer motor and pump assembly, and drain the washer fluid. HINT: Use a container to collect the washer fluid. |
|
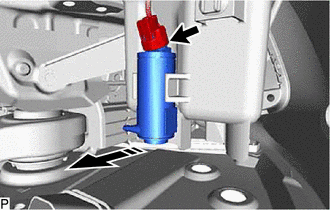
5. REMOVE WINDSHIELD WASHER MOTOR AND PUMP ASSEMBLY
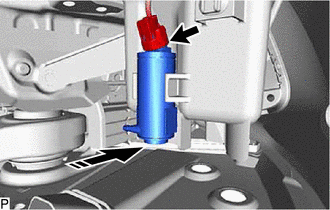
(a) Disconnect the connector.
.png) |
Remove in this Direction |
(b) Remove the windshield washer motor and pump assembly as shown in the illustration.
Inspection
INSPECTION
PROCEDURE
1. INSPECT WINDSHIELD WASHER MOTOR AND PUMP ASSEMBLY
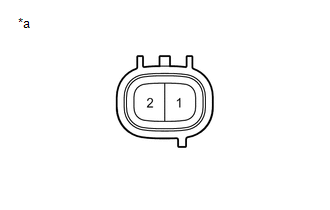
|
*a | Component without harness connected (Windshield Washer Motor and Pump Assembly) |
(a) Remove the washer jar.
(b) Disconnect the windshield washer motor and pump assembly connector.
HINT:
This check should be performed with the windshield washer motor and pump assembly installed on the washer jar.
(c) Fill the washer jar with washer fluid.
(d) Connect a battery positive (+) lead to terminal 1 of the windshield washer motor and pump assembly, and a negative (-) lead to terminal 2.
(e) Check that washer fluid flows from the washer jar.
OK:
Washer fluid flows from the washer jar.
If the result is not as specified, replace the windshield washer motor and pump assembly.
Installation
INSTALLATION
PROCEDURE
1. INSTALL WINDSHIELD WASHER MOTOR AND PUMP ASSEMBLY
(a) Install the windshield washer motor and pump assembly as shown in the illustration.
.png) |
Install in this Direction |
(b) Connect the connector.
2. ADD WASHER FLUID
(a) Connect the washer hose.
(b) Add washer fluid to the washer jar.
3. INSTALL FRONT FENDER LINER RH
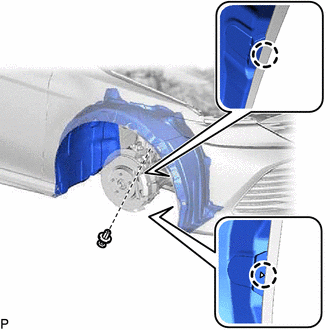
(a) Install the front fender liner RH with the 11 clips and 6 screws.
| (b) Install the clip and engage the 2 claws. |
|
4. INSTALL FRONT WHEEL OPENING EXTENSION PAD RH
(a) Install the front wheel opening extension pad RH with the 3 screws.
5. INSTALL FRONT WHEEL RH
Click here
.gif)
READ NEXT:
 Washer Nozzle
ComponentsCOMPONENTS ILLUSTRATION
*1 WASHER NOZZLE SUB-ASSEMBLY
- -
● Non-reusable part
- - On-vehicle InspectionON-VEHICLE INSPECTION PROCEDURE
Precaution
PRECAUTION PRECAUTION FOR DISCONNECTING CABLE FROM NEGATIVE BATTERY TERMINAL
NOTICE: When disconnecting the cable from the negative (-) battery terminal, initialize the following systems after the
SEE MORE:
Components
COMPONENTS ILLUSTRATION
*1 INSTRUMENT PANEL JUNCTION BLOCK ASSEMBLY WITH MAIN BODY ECU
*2 NO. 3 INSTRUMENT PANEL TO COWL BRACE SUB-ASSEMBLY
N*m (kgf*cm, ft.*lbf): Specified torque
- - ILLUSTRATION
*1 MAIN BODY ECU (MULTIPLEX NETWORK BODY ECU
Actuator Supply Voltage "A" Stuck On (P06579E)
MONITOR DESCRIPTION The ECM monitors the output voltage to the throttle actuator. This self-check ensures that the ECM is functioning properly. The output voltage is usually 0 V when the engine switch is turned off. If the output voltage is 7 V or higher when the engine switch is turned off, the ECM
