
Toyota Camry (XV70): Disassembly
DISASSEMBLY
CAUTION / NOTICE / HINT
HINT:
- Use the same procedure for the RH side and LH side.
- The following procedure is for the LH side.
PROCEDURE
1. REMOVE REAR SIDE MARKER LIGHT BULB (for Bulb Type Back-up Light)
(a) Turn the rear combination light socket and wire with the rear side marker light bulb as shown in the illustration to disconnect them as a unit.
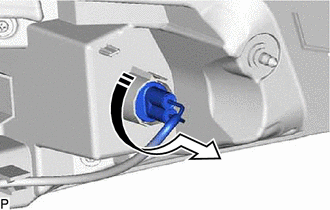
 |
Remove in this Direction |
(b) Remove the rear side marker light bulb from the rear combination light socket and wire.
2. REMOVE REAR TURN SIGNAL LIGHT BULB (for Bulb Type Back-up Light)
(a) Turn the rear combination light socket and wire with the rear turn signal light bulb as shown in the illustration to disconnect them as a unit.
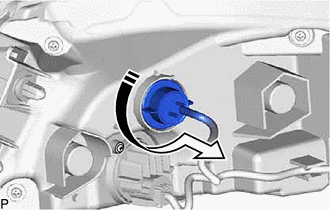
|
|
Remove in this Direction |
(b) Remove the rear turn signal light bulb from the rear combination light socket and wire.
3. REMOVE REAR COMBINATION LIGHT LED (for Bulb Type Back-up Light)
| (a) Disconnect the connector. |
|
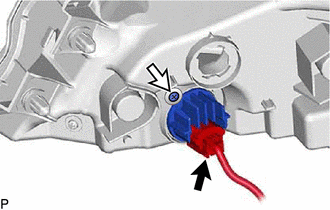
(b) Remove the screw.
(c) Turn the rear combination light LED as shown in the illustration to remove it.
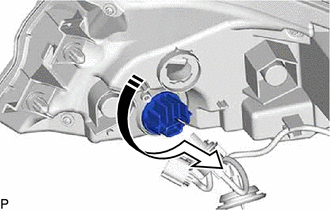
|
|
Remove in this Direction |
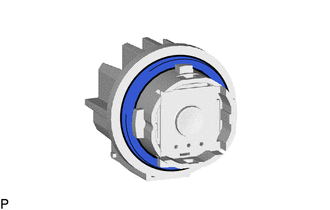
4. REMOVE REAR COMBINATION LIGHT GASKET (for Bulb Type Back-up Light)
| (a) Remove the rear combination light gasket. NOTICE: After the rear combination light gasket is removed, be sure to replace it with a new one. Failure to do so may cause water ingress. |
|
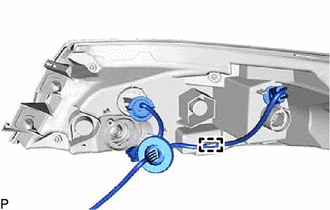
5. REMOVE REAR COMBINATION LIGHT SOCKET AND WIRE (for Bulb Type Back-up Light)
| (a) Disengage the clamp to remove the rear combination light socket and wire. |
|
6. REMOVE REAR COMBINATION LIGHT CORD (for LED Type Back-up Light)
| (a) Disengage the 2 clamps. |
|
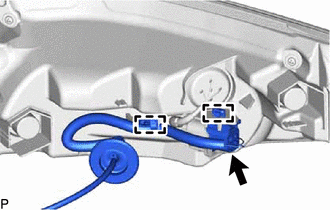
(b) Disconnect the connector to remove the rear combination light cord.
7. REMOVE REAR COMBINATION LIGHT LENS AND BODY (for Bulb Type Back-up Light)
READ NEXT:
 Inspection
INSPECTION PROCEDURE 1. INSPECT REAR COMBINATION LIGHT LED (for Bulb Type Back-up Light)
*a Component without harness connected
(Rear Combination Light LED) (a) Apply battery vo
Reassembly
REASSEMBLY CAUTION / NOTICE / HINT
HINT:
Use the same procedure for the RH side and LH side.
The following procedure is for the LH side.
PROCEDURE 1. INSTALL REAR COMBINATION LIGHT
Installation
INSTALLATION CAUTION / NOTICE / HINT
HINT:
Use the same procedure for the RH side and LH side.
The following procedure is for the LH side.
PROCEDURE 1. INSTALL REAR COMBINATION LIGH
SEE MORE:
Installation
INSTALLATION PROCEDURE 1. INSTALL TIMING CHAIN CASE OIL SEAL
(a) Apply MP grease to the lip of a new timing chain case oil seal.
*a Oil Seal Protrusion Height
(b) Using SST and a hammer, tap in the timing chain case oil seal until its surface is flus
Components
COMPONENTS ILLUSTRATION
*A except Panoramic Moon Roof
- -
*1 ROOF ANTENNA ASSEMBLY
*2 ROOF ANTENNA ASSEMBLY WITH COVER
*3 COVER
*4 WASHER AND HOLDER
*5 SEAL
*6 ROOF ANTENNA HOUSING
N*m (kgf*cm, ft.*lbf): Specifi
