Toyota Camry (XV70): Inspection
INSPECTION
PROCEDURE
1. INSPECT FRONT STABILIZER LINK ASSEMBLY
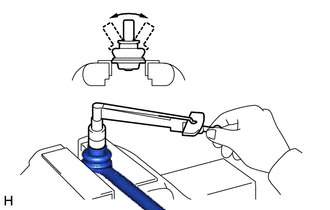
| (a) Inspect the turning torque of the ball joint. (1) Secure the front stabilizer link assembly in a vise using aluminum plates. NOTICE: Do not overtighten the vise. (2) Install the nut to the front stabilizer link assembly stud. (3) Using a torque wrench, turn the stud continuously at a rate of 3 to 5 seconds per turn and take the torque reading on the 5th turn. Turning Torque: 0.05 to 1.96 N*m (0.6 to 19 kgf*cm, 0.5 to 17 in.*lbf) HINT: If the turning torque is not within the specified range, replace the front stabilizer link assembly with a new one. (4) Turn the stud to check that the stud does not catch and there is no play. HINT: If the stud catches or there is play while turning, replace the front stabilizer link assembly with a new one. |
|
(b) Inspect the dust cover.
(1) Check that the dust cover is not cracked and that there is no grease on it.
HINT:
If the dust cover is cracked or there is grease on it, replace the front stabilizer link assembly with a new one.
READ NEXT:
 Installation
INSTALLATION PROCEDURE 1. INSTALL FRONT NO. 1 STABILIZER BAR BUSHING (for LH Side)
(a) Install the front No. 1 stabilizer bar bushing to the front stabilizer bar as shown in the illustration.
Components
COMPONENTS ILLUSTRATION
*A for A25A-FKS
*B for AWD
*1 FRONT FRAME ASSEMBLY
*2 FUEL DELIVERY GUARD
*3 STEERING GEAR HEAT INSULATOR
*4 WIRE HARNES
SEE MORE:
Removal
REMOVAL PROCEDURE 1. PRECAUTION (w/o Navigation System)
NOTICE:
When replacing the radio and display receiver assembly, always replace it with a new one. If a radio and display receiver assembly which was installed to another vehicle is used, the following may occurs:
A communication mal
Removal
REMOVAL CAUTION / NOTICE / HINT
The necessary procedures (adjustment, calibration, initialization, or registration) that must be performed after parts are removed and installed, or replaced during navigation antenna assembly removal/installation are shown below. Necessary Procedure After Parts Rem
