
Toyota Camry (XV70): Installation
INSTALLATION
CAUTION / NOTICE / HINT
HINT:
- Use the same procedure for the RH and LH sides.
- The procedure listed below is for the LH side.
PROCEDURE
1. INSTALL REAR DRIVE SHAFT INBOARD JOINT SHAFT SNAP RING LH
(a) Install a new rear drive shaft inboard joint shaft snap ring LH.
2. INSTALL REAR DRIVE SHAFT ASSEMBLY LH
(a) Coat the splines of the rear drive shaft inboard joint assembly LH with Toyota genuine differential gear oil LT 75W-85 API GL-5.
(b) Coat the rear drive shaft inboard joint shaft snap ring LH of the rear drive shaft inboard joint assembly LH with MP grease.
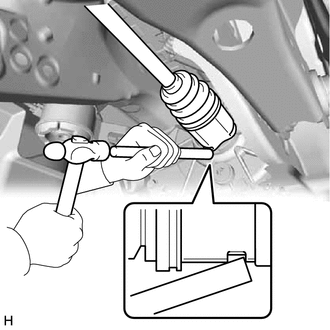
| (c) Align the inboard joint splines, and using a brass bar and a hammer, install the rear drive shaft assembly LH. NOTICE:
HINT: Confirm whether the drive shaft is securely driven in by checking the reaction force and sound. |
|
3. INSTALL REAR AXLE CARRIER
Click here
.gif)
4. INSTALL REAR WHEEL
Click here
5. INSPECT FOR DIFFERENTIAL OIL LEAK
READ NEXT:
 4wd Control Ecu
ComponentsCOMPONENTS ILLUSTRATION
*1 NO. 3 INSTRUMENT PANEL TO COWL BRACE SUB-ASSEMBLY
*2 4WD ECU ASSEMBLY
N*m (kgf*cm, ft.*lbf): Specified torque
- - Rem
SEE MORE:
Motor Control Relay Stuck ON (B2345)
DESCRIPTION This DTC will be stored if the operation of the sliding roof or roof sunshade is suspended and a pulse input of 10 Hz or more is detected when the motor relay is off. Sliding Roof
DTC No. Detection Item
DTC Detection Condition
Trouble Area
B2345 Motor Cont
System Too Lean Bank 1 (P017100,P017200,P017400,P017500,P117000,P117B00)
DESCRIPTION The fuel trim is related to the feedback compensation value, not to the basic injection duration. The fuel trim consists of both the short-term and long-term fuel trims.
The short-term fuel trim is fuel compensation that is used to constantly maintain the air fuel ratio at stoichiometr
