Toyota Camry (XV70): Removal
REMOVAL
PROCEDURE
1. REMOVE FRONT DOOR SCUFF PLATE LH
Click here .gif)
2. REMOVE COWL SIDE TRIM SUB-ASSEMBLY LH
Click here
3. REMOVE NO. 1 INSTRUMENT PANEL UNDER COVER SUB-ASSEMBLY
Click here
4. DISCONNECT FRONT DOOR OPENING TRIM WEATHERSTRIP LH
Click here
5. REMOVE INSTRUMENT SIDE PANEL LH
Click here
6. REMOVE NO. 2 METER HOOD CLUSTER
Click here
7. DISCONNECT HOOD LOCK CONTROL LEVER SUB-ASSEMBLY
Click here
8. REMOVE NO. 1 INSTRUMENT PANEL SUB-ASSEMBLY
Click here
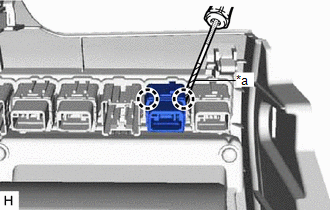
9. REMOVE VSC OFF SWITCH
| (a) Using a screwdriver with its tip wrapped with protective tape, disengage the 2 claws to remove the VSC OFF switch from the No. 1 instrument panel sub-assembly. |
|
READ NEXT:
 Inspection
INSPECTION PROCEDURE 1. INSPECT VSC OFF SWITCH
(a) Make sure that there is no looseness at the locking part and the connecting part of the connector.
OK: The connector is securely connected.
Installation
INSTALLATION PROCEDURE 1. INSTALL VSC OFF SWITCH
(a) Engage the 2 claws to install the VSC OFF switch to the No. 1 instrument panel sub-assembly.
2. INSTALL NO. 1 INSTRUMENT PANEL SUB-ASSEMBLY Cli
SEE MORE:
Inspection
INSPECTION PROCEDURE 1. INSPECT FRONT DOOR LOCK WITH MOTOR ASSEMBLY LH
(a) Check the operation of the door lock motor. (1) Apply battery voltage and check the operation of the door lock motor.
OK:
Battery Connection Result
Battery positive (+) > Terminal 4 Battery negative (-
Wireless Door Lock Buzzer
ComponentsCOMPONENTS ILLUSTRATION
*1 FRONT FENDER LINER LH
*2 FRONT WHEEL OPENING EXTENSION PAD LH
*3 WIRELESS DOOR LOCK BUZZER
- - RemovalREMOVAL PROCEDURE
1. REMOVE FRONT WHEEL LH Click here
2. REMOVE FRONT WHEEL OPENING EXTENSION PAD LH HINT: Use the same
© 2023-2026 Copyright www.tocamry.com
