
Toyota Camry (XV70): Removal
REMOVAL
CAUTION / NOTICE / HINT
The necessary procedures (adjustment, calibration, initialization or registration) that must be performed after parts are removed and installed, or replaced during air fuel ratio sensor removal/installation are shown below.
Necessary Procedures After Parts Removed/Installed/Replaced|
Replaced Part or Performed Procedure |
Necessary Procedure | Effect/Inoperative Function when Necessary Procedure not Performed |
Link |
|---|---|---|---|
| Inspection after repair |
|
|
PROCEDURE
1. REMOVE V-BANK COVER SUB-ASSEMBLY
Click here
.gif)
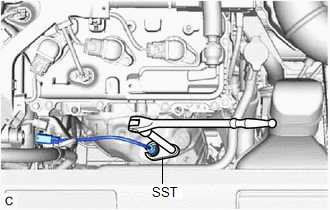
2. REMOVE AIR FUEL RATIO SENSOR (for Bank 2)
| (a) Disengage the wire harness clamp. |
|
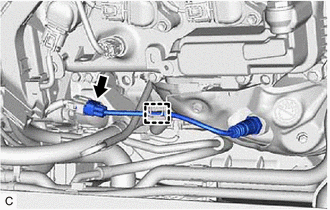
(b) Disconnect the air fuel ratio sensor connector.
| (c) Using SST, remove the air fuel ratio sensor from the exhaust manifold assembly LH (TWC: Front Catalyst). SST: 09224-00012 NOTICE: If the air fuel ratio sensor has been struck or dropped, replace it. |
|
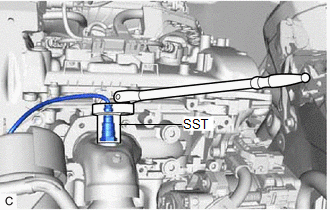
3. REMOVE AIR FUEL RATIO SENSOR (for Bank 1)
| (a) Disconnect the air fuel ratio sensor connector. |
|
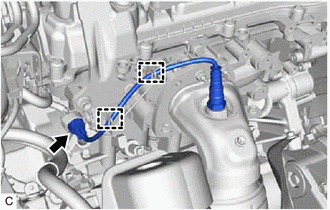
(b) Disengage the 2 wire harness clamps.
| (c) Using SST, remove the air fuel ratio sensor from the exhaust manifold assembly RH (TWC: Front Catalyst). SST: 09224-00012 NOTICE: If the air fuel ratio sensor has been struck or dropped, replace it. |
|
READ NEXT:
 Inspection
INSPECTION PROCEDURE 1. INSPECT AIR FUEL RATIO SENSOR (for Bank 1)
(a) Measure the resistance according to the value(s) in the table below.
Standard Resistance:
Tester Connection Co
Installation
INSTALLATION PROCEDURE 1. INSTALL AIR FUEL RATIO SENSOR (for Bank 1)
HINT: Perform "Inspection After Repair" after replacing the air fuel ratio sensor.
Click here
(a) Using SST, instal
SEE MORE:
Parts Location
PARTS LOCATION ILLUSTRATION
*1 FORWARD RECOGNITION CAMERA
*2 MILLIMETER WAVE RADAR SENSOR ASSEMBLY ILLUSTRATION
*1 INSTRUMENT PANEL JUNCTION BLOCK ASSEMBLY
- ECU-IG1 NO. 3 FUSE *2
DLC3
On-vehicle Inspection
ON-VEHICLE INSPECTION PROCEDURE
1. INSPECT COOLING FAN SYSTEM CAUTION: To prevent injury due to contact with an operating cooling fan, keep your hands and clothing away from the cooling fan when inspecting the cooling fan system.
(a) Connect the Techstream to the DLC3.
(b) Turn the ignition s
