Toyota Camry (XV70): Disassembly
DISASSEMBLY
PROCEDURE
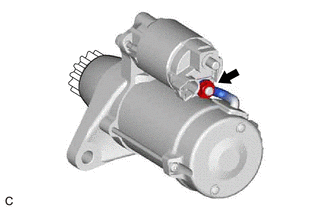
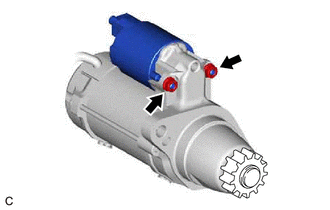
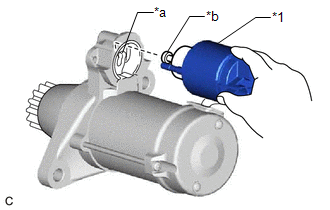
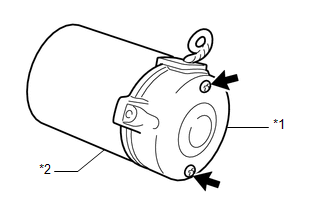
1. REMOVE MAGNET STARTER SWITCH ASSEMBLY
| (a) Remove the nut and disconnect the field coil lead wire from the magnet starter switch assembly. |
|
| (b) While holding the magnet starter switch assembly to the repair service starter kit, remove the 2 nuts. |
|
| (c) While lifting the rear of the magnet starter switch assembly, remove the hook from the pinion drive lever, then remove the magnet starter switch assembly. |
|
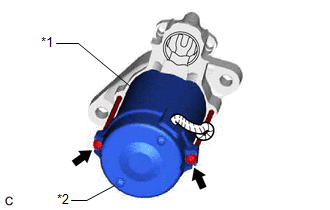
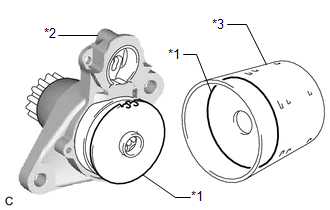
2. REMOVE STARTER YOKE ASSEMBLY
| (a) Using a T25 "TORX" socket wrench, remove the 2 through bolts and pull out the starter yoke assembly together with the starter commutator end frame assembly. |
|
3. REMOVE STARTER COMMUTATOR END FRAME ASSEMBLY
| (a) Remove the 2 screws and while holding down the field coil lead wire, remove the starter commutator end frame assembly from the starter yoke assembly. |
|
4. REMOVE STARTER BRUSH HOLDER ASSEMBLY
| (a) Using a screwdriver, hold the brush spring back and disconnect the starter brush holder assembly. |
|
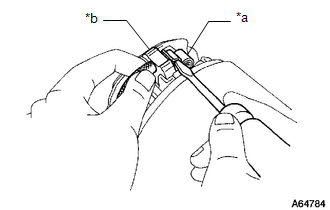
(b) Disconnect the 4 brushes, and remove the starter brush holder assembly.
5. REMOVE STARTER ARMATURE ASSEMBLY
| (a) Remove the starter armature assembly from the starter yoke assembly. |
|
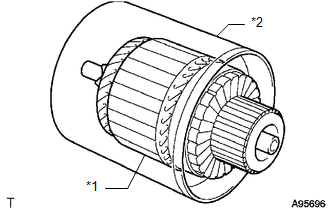
6. REMOVE STARTER ARMATURE PLATE
| (a) Remove the starter armature plate from the repair service starter kit or starter yoke assembly. |
|
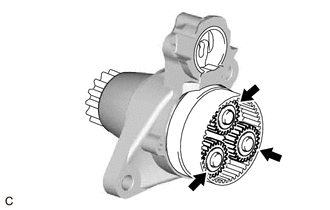
7. REMOVE PLANETARY GEAR
|
(a) Remove the 3 planetary gears from the repair service starter kit. |
|
READ NEXT:
 Inspection
INSPECTION PROCEDURE 1. INSPECT STARTER ASSEMBLY
CAUTION: As a large electric current passes through the cable during this inspection, a thick cable must be used. If not, the cable may become hot an
Reassembly
REASSEMBLY PROCEDURE 1. INSTALL PLANETARY GEAR
(a) Apply high-temperature grease to the 3 planetary gears, 3 planetary gear shafts and repair service starter kit.
High-temperature G
Installation
INSTALLATION PROCEDURE 1. INSTALL STARTER ASSEMBLY
(a) Install the starter assembly with the 2 bolts. Torque: 46 N·m {469 kgf·cm, 34 ft·lbf}
(b) Connect the engine wire to the terminal 30 with
SEE MORE:
Starting System
Parts LocationPARTS LOCATION ILLUSTRATION
*1 STARTER ASSEMBLY
*2 ECM
*3 ENGINE ROOM RELAY BLOCK AND JUNCTION BLOCK ASSEMBLY
- ST RELAY - FL MAIN FUSE - ST FUSE
*4 PARK/NEUTRAL POSITION SWITCH ASSEMBLY ILLUSTRATION
*1 ENGINE SWITCH
*2 C
Cooling System
On-vehicle InspectionON-VEHICLE INSPECTION CAUTION / NOTICE / HINT
CAUTION: Do not remove the radiator cap sub-assembly while the engine and radiator assembly are still hot. Pressurized, hot engine coolant and steam may be released and cause serious burns.
PROCEDURE
1. INSPECT FOR COOLANT LEA
