
Toyota Camry (XV70): Disassembly
Toyota Camry Repair Manual XV70 (2018-2024) / Vehicle Exterior / Lighting (ext) / Rear Light Assembly / Disassembly
DISASSEMBLY
CAUTION / NOTICE / HINT
HINT:
- Use the same procedure for the RH side and LH side.
- The following procedure is for the LH side.
PROCEDURE
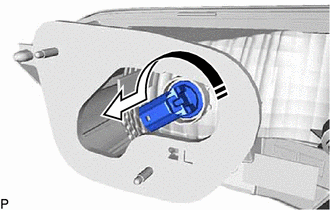
1. REMOVE BACK-UP LIGHT BULB (for Bulb Type Back-up Light)
(a) Turn the rear light socket plug with the back-up light bulb as shown in the illustration to remove them as a unit.
.png) |
Remove in this Direction |
(b) Remove the back-up light bulb from the rear light socket plug.
2. REMOVE REAR LIGHT SOCKET PLUG (for Bulb Type Back-up Light)
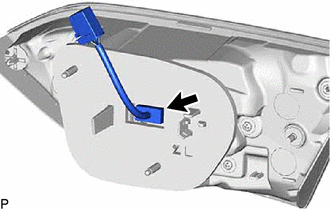
3. REMOVE REAR LIGHT CORD (for LED Type Back-up Light)
| (a) Disconnect the connector to remove the rear light cord. |
|
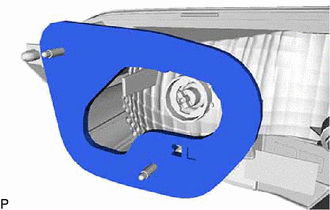
4. REMOVE REAR LIGHT PACKING
| (a) Remove the rear light packing. NOTICE:
|
|
5. REMOVE REAR LIGHT LENS AND BODY
READ NEXT:
 Inspection
INSPECTION PROCEDURE 1. INSPECT REAR LIGHT ASSEMBLY LH (for TMMK Made LED Type Back-up Light)
*a Component without harness connected
(Rear Light Assembly LH) (a) Apply battery v
Reassembly
REASSEMBLY CAUTION / NOTICE / HINT
HINT:
Use the same procedure for the RH side and LH side.
The following procedure is for the LH side.
PROCEDURE 1. INSTALL REAR LIGHT LENS AND BOD
Installation
INSTALLATION CAUTION / NOTICE / HINT
HINT:
Use the same procedure for the RH side and LH side.
The following procedure is for the LH side.
PROCEDURE 1. INSTALL REAR LIGHT ASSEMBLY
SEE MORE:
Components
COMPONENTS ILLUSTRATION
*A for A25A-FKS
*B for 2GR-FKS
*1 FRONT FENDER APRON SEAL LH
*2 FRONT FLOOR COVER LH
*3 FRONT WHEEL OPENING EXTENSION PAD LH
*4 FRONT WHEEL OPENING EXTENSION PAD RH
*5 NO. 1 ENGINE UNDER COVER
*6 NO. 2
Operation Check
OPERATION CHECK CHECK WINDOW DEFOGGER SYSTEM (a) Turn the ignition switch to ON.
(b) Check that the rear window defogger wire becomes warm by operating the rear window defogger switch of the air conditioning control assembly.
(c) When the vehicle is stopped, confirm that the window defogger sy
© 2023-2026 Copyright www.tocamry.com
