Toyota Camry (XV70): Inspection
INSPECTION
PROCEDURE
1. INSPECT BRAKE CYLINDER AND PISTON
(a) Check the front disc brake cylinder bore and front disc brake piston for rust and scoring. If necessary, replace the front disc brake cylinder assembly and front disc brake piston.
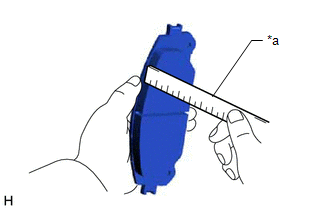
2. INSPECT PAD LINING THICKNESS
| (a) Using a ruler, measure the front disc brake pad lining thickness. Standard Thickness: 12.0 mm (0.472 in.) Minimum Thickness: 1.0 mm (0.0394 in.) HINT:
|
|
3. INSPECT FRONT DISC BRAKE PAD SUPPORT PLATE
(a) Make sure that the front disc brake pad support plates have sufficient rebound, no deformation, cracks or wear, and that all rust and dirt is cleaned off. If necessary, replace the front disc brake pad support plates.
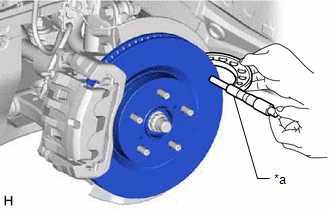
4. INSPECT DISC THICKNESS
| (a) Using a micrometer, measure the front disc thickness. Standard Thickness: 28.0 mm (1.10 in.) Minimum Thickness: 25.0 mm (0.984 in.) HINT: If the front disc thickness is less than the minimum thickness, replace the front disc. |
|
5. INSPECT DISC RUNOUT
(a) Inspect the front axle hub bearing looseness and front axle hub runout.
Click here .gif)
(b) Temporarily install the front disc with the 5 hub nuts.
Torque:
103 N
READ NEXT:
 Reassembly
REASSEMBLY CAUTION / NOTICE / HINT
HINT: Perform the removal and installation of the front disc brake piston, cylinder boot and piston seal one side at a time. PROCEDURE
1. TEMPORARILY TIGHTEN FRO
Installation
INSTALLATION CAUTION / NOTICE / HINT
NOTICE:
Immediately after installing the front disc brake pads, the braking performance may be reduced. Always perform a road test in a safe place while payi
Front Brake Flexible Hose
ComponentsCOMPONENTS ILLUSTRATION
*1 FRONT FLEXIBLE HOSE
*2 GASKET
*3 BRAKE LINE
*4 FRONT SPEED SENSOR
*5 UNION BOLT
- -
Tighteni
SEE MORE:
Components
COMPONENTS ILLUSTRATION
*A for A25A-FKS
*B for AWD
*1 FRONT FRAME ASSEMBLY
*2 FUEL DELIVERY GUARD
*3 STEERING GEAR HEAT INSULATOR
*4 WIRE HARNESS
*5 FRONT ENGINE MOUNTING INSULATOR
*6 REAR ENGINE MOUNTING INSULATOR
*7
Precaution
PRECAUTION PRECAUTION FOR DISCONNECTING CABLE FROM NEGATIVE BATTERY TERMINAL
NOTICE: When disconnecting the cable from the negative (-) battery terminal, initialize the following system(s) after the cable is reconnected.
System See Procedure
Lane Tracing Assist System
