
Toyota Camry (XV70): Removal
REMOVAL
CAUTION / NOTICE / HINT
The necessary procedures (adjustment, calibration, initialization, or registration) that must be performed after parts are removed and installed, or replaced during ignition coil assembly or spark plug removal/installation are shown below.
Necessary Procedures After Parts Removed/Installed/Replaced|
Replaced Part or Performed Procedure |
Necessary Procedure | Effect/Inoperative Function when Necessary Procedure not Performed |
Link |
|---|---|---|---|
| Inspection after repair |
|
|
PROCEDURE
1. REMOVE V-BANK COVER SUB-ASSEMBLY
Click here
.gif)
2. REMOVE IGNITION COIL ASSEMBLY
| (a) Disconnect the 3 ignition coil assembly connectors. |
|
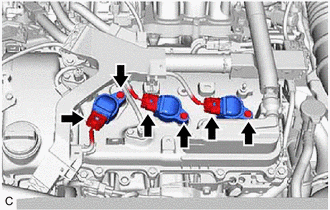
(b) Remove the 3 bolts and 3 ignition coil assemblies from the cylinder head cover sub-assembly LH.
NOTICE:
If an ignition coil assembly has been struck or dropped, replace it.
HINT:
Arrange the removed parts in the correct order.
| (c) Disengage the 4 clamps to separate the vacuum hose from the intake air surge tank assembly. |
|
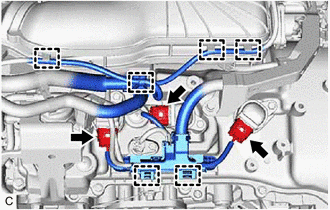
(d) Disengage the 2 wire harness clamps.
(e) Disconnect the 3 ignition coil assembly connectors.
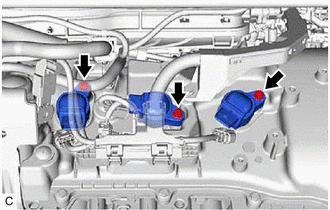
| (f) Remove the 3 bolts and 3 ignition coil assemblies from the cylinder head cover sub-assembly. NOTICE: If an ignition coil assembly has been struck or dropped, replace it. HINT: Arrange the removed parts in the correct order. |
|
3. REMOVE SPARK PLUG
Click here
READ NEXT:
 Installation
INSTALLATION PROCEDURE 1. INSTALL SPARK PLUG
Click here 2. INSTALL IGNITION COIL ASSEMBLY
HINT: Perform "Inspection After Repair" after replacing an ignition coil assembly.
Click here
Parts Location
PARTS LOCATION ILLUSTRATION
*1 ECM
*2 ENGINE ROOM RELAY BLOCK AND JUNCTION BLOCK ASSEMBLY
- INJ FUSE *3
IGNITION COIL ASSEMBLY
*4 SPARK PLUG
SEE MORE:
Installation
INSTALLATION CAUTION / NOTICE / HINT
HINT: When installing the name plates or luggage compartment door emblem, heat the luggage compartment door panel and name plates using a heat light. Heating Temperature
Item Temperature
Luggage Compartment Door Panel
40 to 60
Removal
REMOVAL PROCEDURE 1. REMOVE REAR LIGHT ASSEMBLY LH
Click here
2. REMOVE REAR LIGHT ASSEMBLY RH
HINT: Use the same procedure as for the LH side. 3. REMOVE NO. 3 LUGGAGE COMPARTMENT DOOR OUTSIDE GARNISH
(a) Using a screwdriver with its tip wrapped with protective tape, disengage the 12
