
Toyota Camry (XV70): Removal
REMOVAL
CAUTION / NOTICE / HINT
The necessary procedures (adjustment, calibration, initialization or registration) that must be performed after parts are removed and installed, or replaced during mass air flow meter sub-assembly removal/installation are shown below.
Necessary Procedures After Parts Removed/Installed/Replaced|
Replaced Part or Performed Procedure |
Necessary Procedure | Effect/Inoperative Function when Necessary Procedure not Performed |
Link |
|---|---|---|---|
| Replacement of mass air flow meter sub-assembly |
Inspection after repair |
|
|
.gif)
PROCEDURE
1. REMOVE MASS AIR FLOW METER SUB-ASSEMBLY
| (a) Disconnect the mass air flow meter sub-assembly connector. |
|
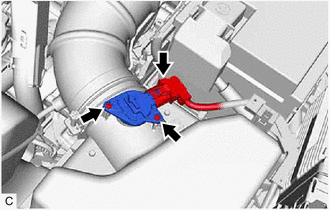
(b) Remove the 2 screws and mass air flow meter sub-assembly from the air cleaner cap sub-assembly.
NOTICE:
If the mass air flow meter sub-assembly has been struck or dropped, replace it.
READ NEXT:
 Inspection
INSPECTION PROCEDURE 1. INSPECT MASS AIR FLOW METER SUB-ASSEMBLY
(a) Perform a visual check for any foreign matter on the intake air temperature sensor (thermistor) of the mass air flow meter su
Installation
INSTALLATION PROCEDURE 1. INSTALL MASS AIR FLOW METER SUB-ASSEMBLY
HINT: Perform "Inspection After Repair" after replacing the mass air flow meter sub-assembly.
Click here
(a) Install the
Relay
On-vehicle InspectionON-VEHICLE INSPECTION PROCEDURE
1. INSPECT NO. 1 ELECTRONIC FUEL INJECTION MAIN RELAY (EFI-MAIN NO. 1)
(a) Measure the resistance according to the value(s) in the table be
SEE MORE:
On-vehicle Inspection
ON-VEHICLE INSPECTION PROCEDURE
1. CONNECT TECHSTREAM (a) Connect the Techstream to the DLC3 with the ignition switch off.
(b) Start the engine and run it at idle. (c) Turn the Techstream on.
(d) Enter the following menus: Chassis / Brake / Active Test. HINT:
Refer to the Techstream operator
Installation
INSTALLATION PROCEDURE 1. INSTALL AUTOMATIC LIGHT CONTROL SENSOR
(a) Engage the 2 claws to install the automatic light control sensor. (b) Connect the connector.
2. INSTALL DEFROSTER NOZZLE ASSEMBLY Click here
3. INSTALL NO. 2 SIDE DEFROSTER NOZZLE DUCT Click here
4. INSTALL NO. 1
