Toyota Camry (XV70): Removal
REMOVAL
PROCEDURE
1. REMOVE COOL AIR INTAKE DUCT SEAL
Click here .gif)
2. REMOVE INLET AIR CLEANER ASSEMBLY
Click here
3. REMOVE AIR CLEANER ASSEMBLY WITH AIR CLEANER HOSE
Click here
4. REMOVE VACUUM SWITCHING VALVE (for Active Control Engine Mount System)
| (a) Remove the bolt and disengage the wire harness clamp to separate the engine wire. |
|
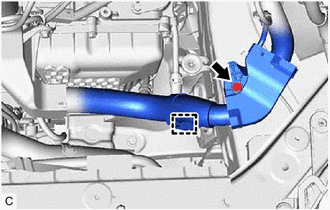
| (b) Remove the 2 bolts. |
|
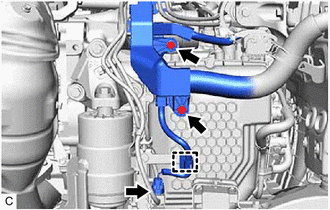
(c) Disengage the wire harness clamp and disconnect the vacuum switching valve (for active control engine mount system) connector.
| (d) Disconnect the 3 vacuum hoses from the vacuum switching valve (for active control engine mount system). |
|
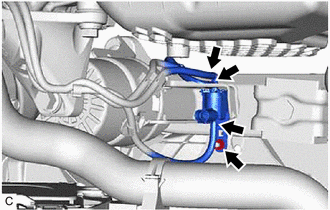
(e) Remove the nut and vacuum switching valve (for active control engine mount system) from the front engine mounting insulator.
READ NEXT:
 Inspection
INSPECTION PROCEDURE 1. INSPECT VACUUM SWITCHING VALVE (for Active Control Engine Mount System)
(a) Measure the resistance.
(1) Measure the resistance according to the value(s) in the table be
Installation
INSTALLATION PROCEDURE 1. INSTALL VACUUM SWITCHING VALVE (for Active Control Engine Mount System)
(a) Install the vacuum switching valve (for active control engine mount system) to the front engine
SEE MORE:
Outside Vehicle
OUTSIDE VEHICLE
These are maintenance and inspection items that are considered to be the owner's responsibility.
The owner can do them or they can have them done at a service center.
These items include those that should be checked on a daily basis, those that in most cases do not require s
Diagnostic Trouble Code Chart
DIAGNOSTIC TROUBLE CODE CHART LIN Communication System
DTC No. Detection Item
Link B1206
P/W Master Switch Communication Stop
B1273 Sliding Roof ECU Communication Stop
B2321 Driver Side Door ECU Communication Stop
B2322
© 2023-2026 Copyright www.tocamry.com
